

Documentation and User Guides
Tet Cloud
First log on to the portal
Users White IP list
Due to security reasons, after every login to the portal users IP is checked with the White IP list. If the list is empty, user is prompted every time to add current session IP to white list or wait for 20 seconds and continue without adding IP to the whitelist.
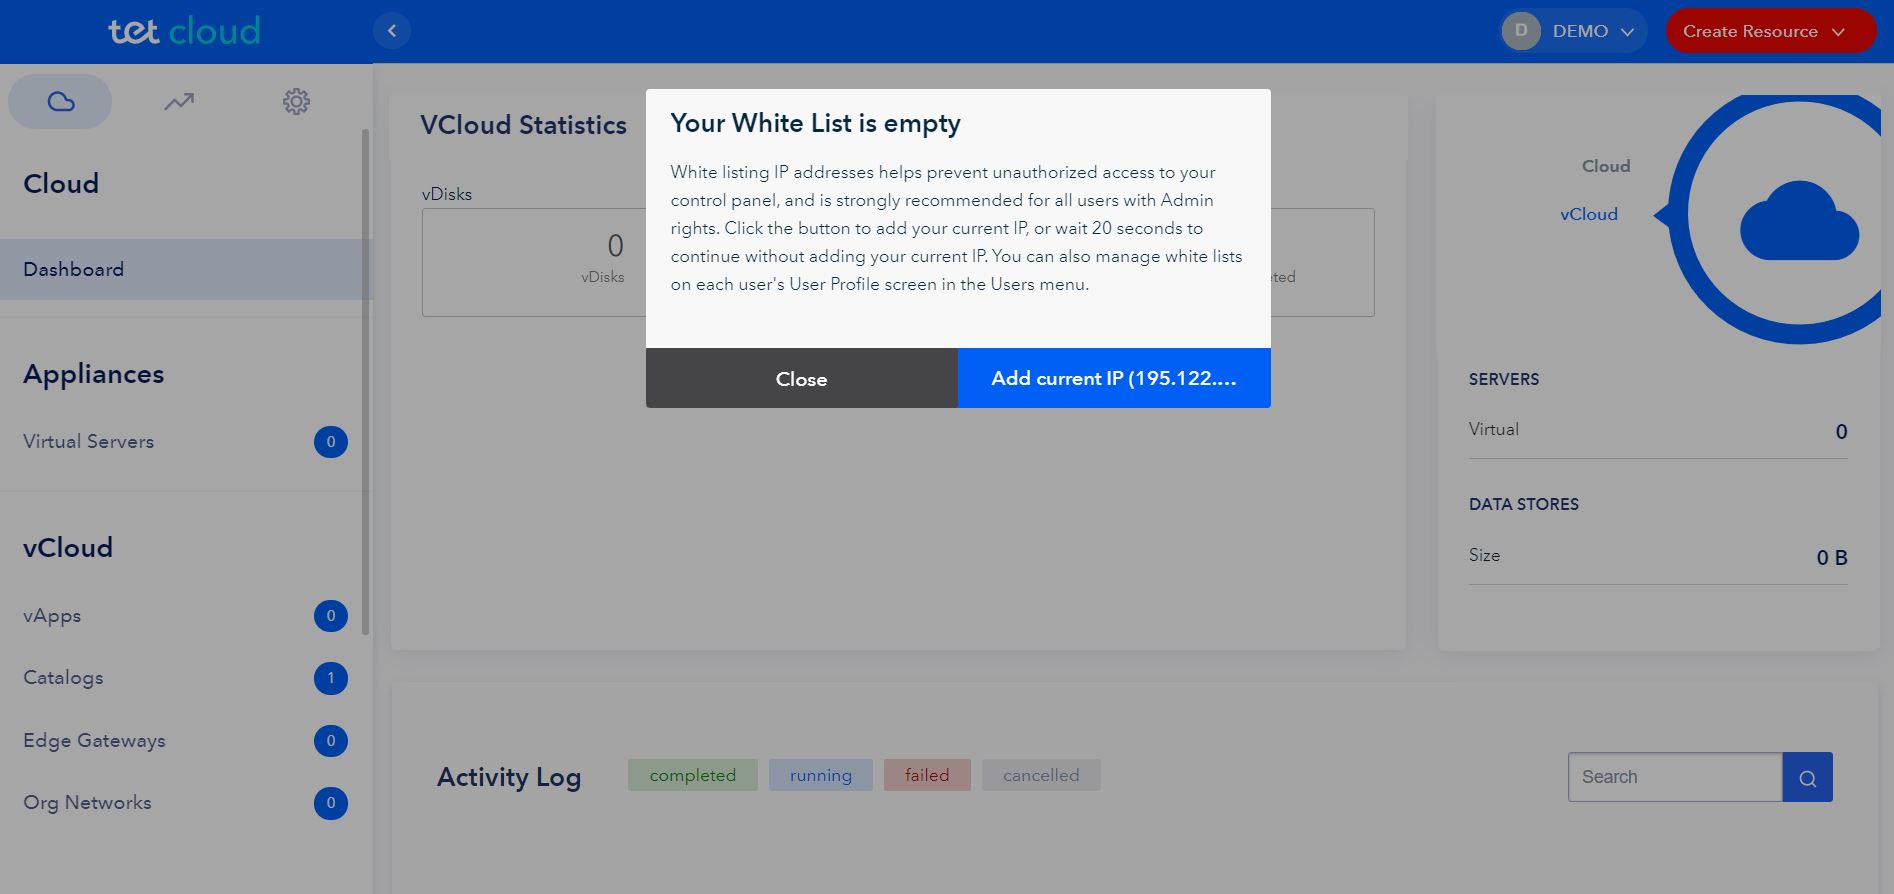
IMPORTANT
Once the current IP address is added to the IP White list, user will not be able to log in to portal from different IP addresses.
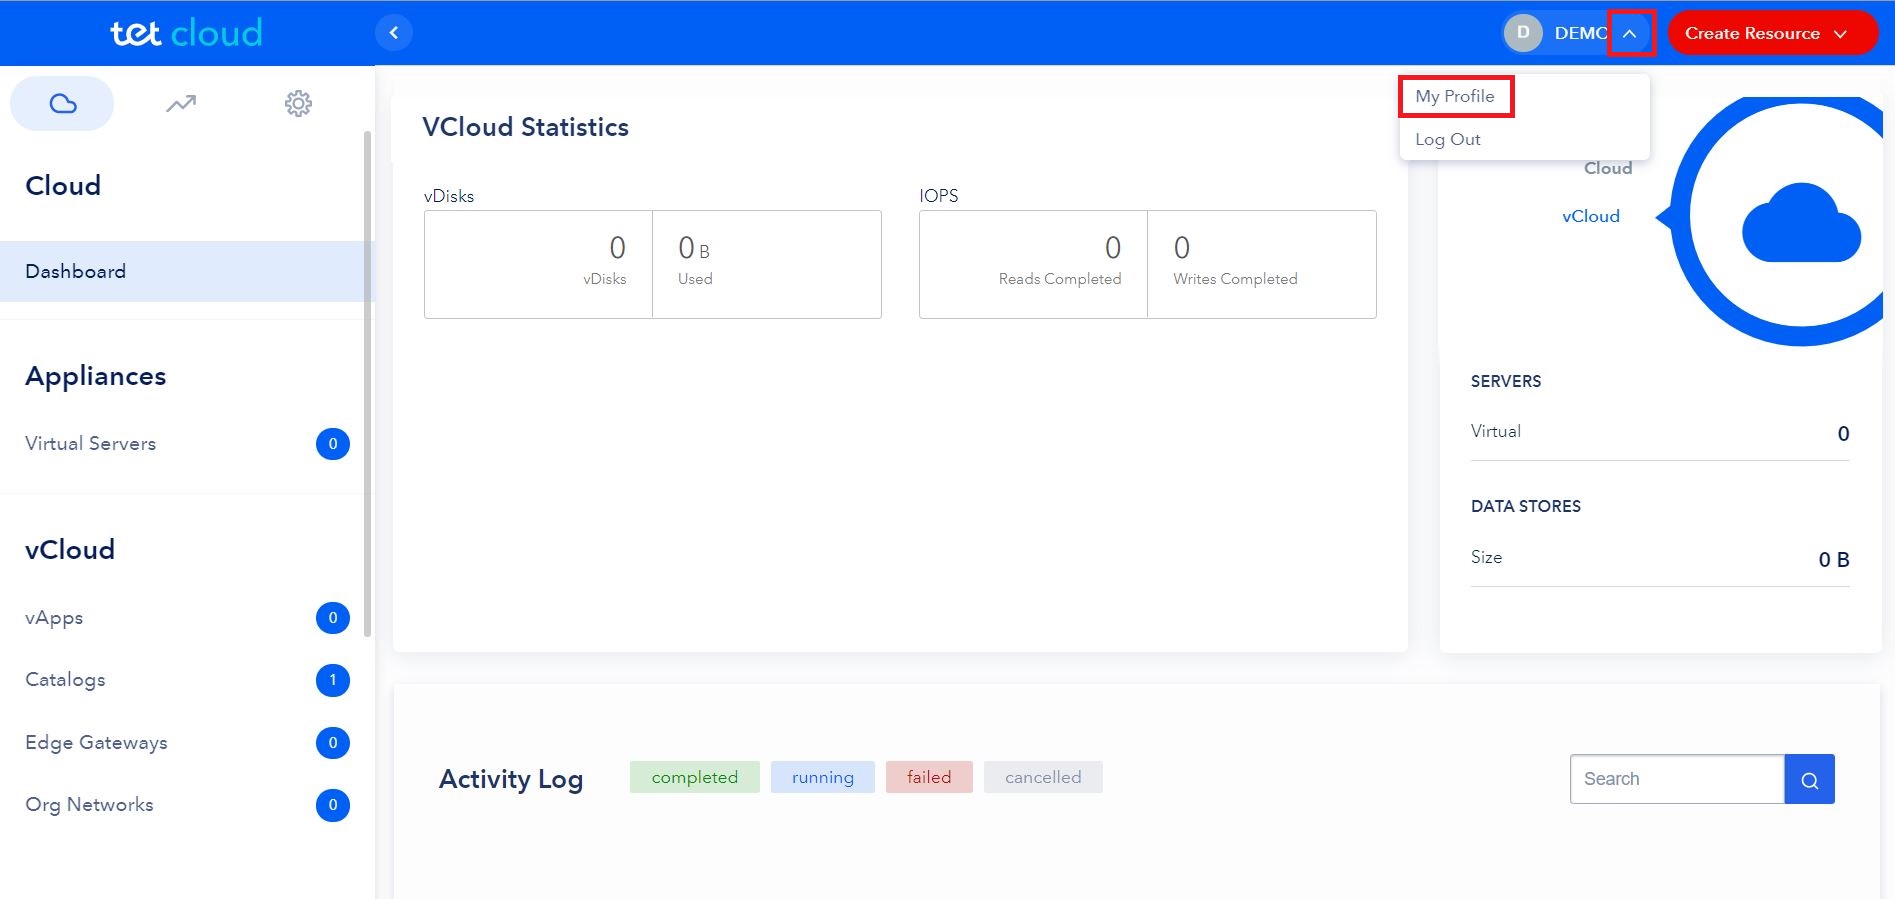
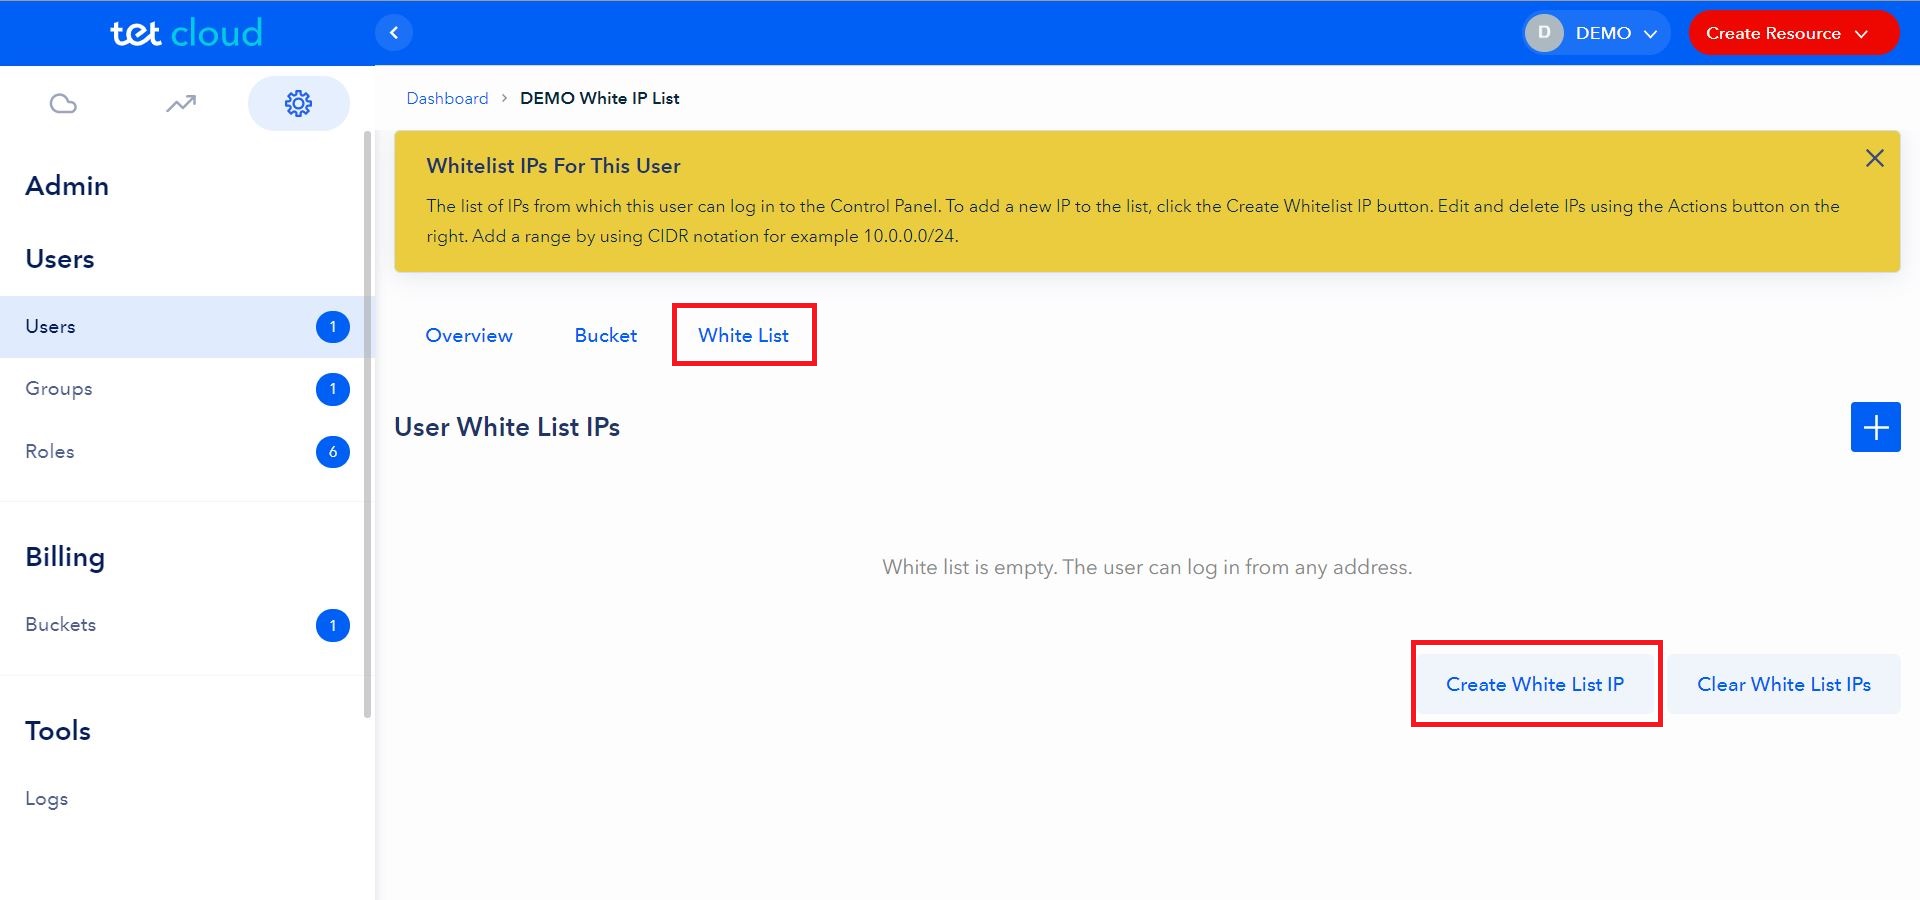
To turn IP whitelist validation off, user must add to the while list the following IP – 0.0.0.0/0, to do this, go to My Profile -> White List -> Create White List IP, after performing this action, connection from any IP address will be allowed, but please note that this action poses a significant security risk.

2 EASY STEPS to get your first virtual server up and running
STEP 1. Use Orchestration Model to create Resource Pool and network components
In order to start creating your virtual infrastructure (servers) you will need to create Resource Pool, EDGE gateway (virtual router) and Organization Network (internal vLAN).
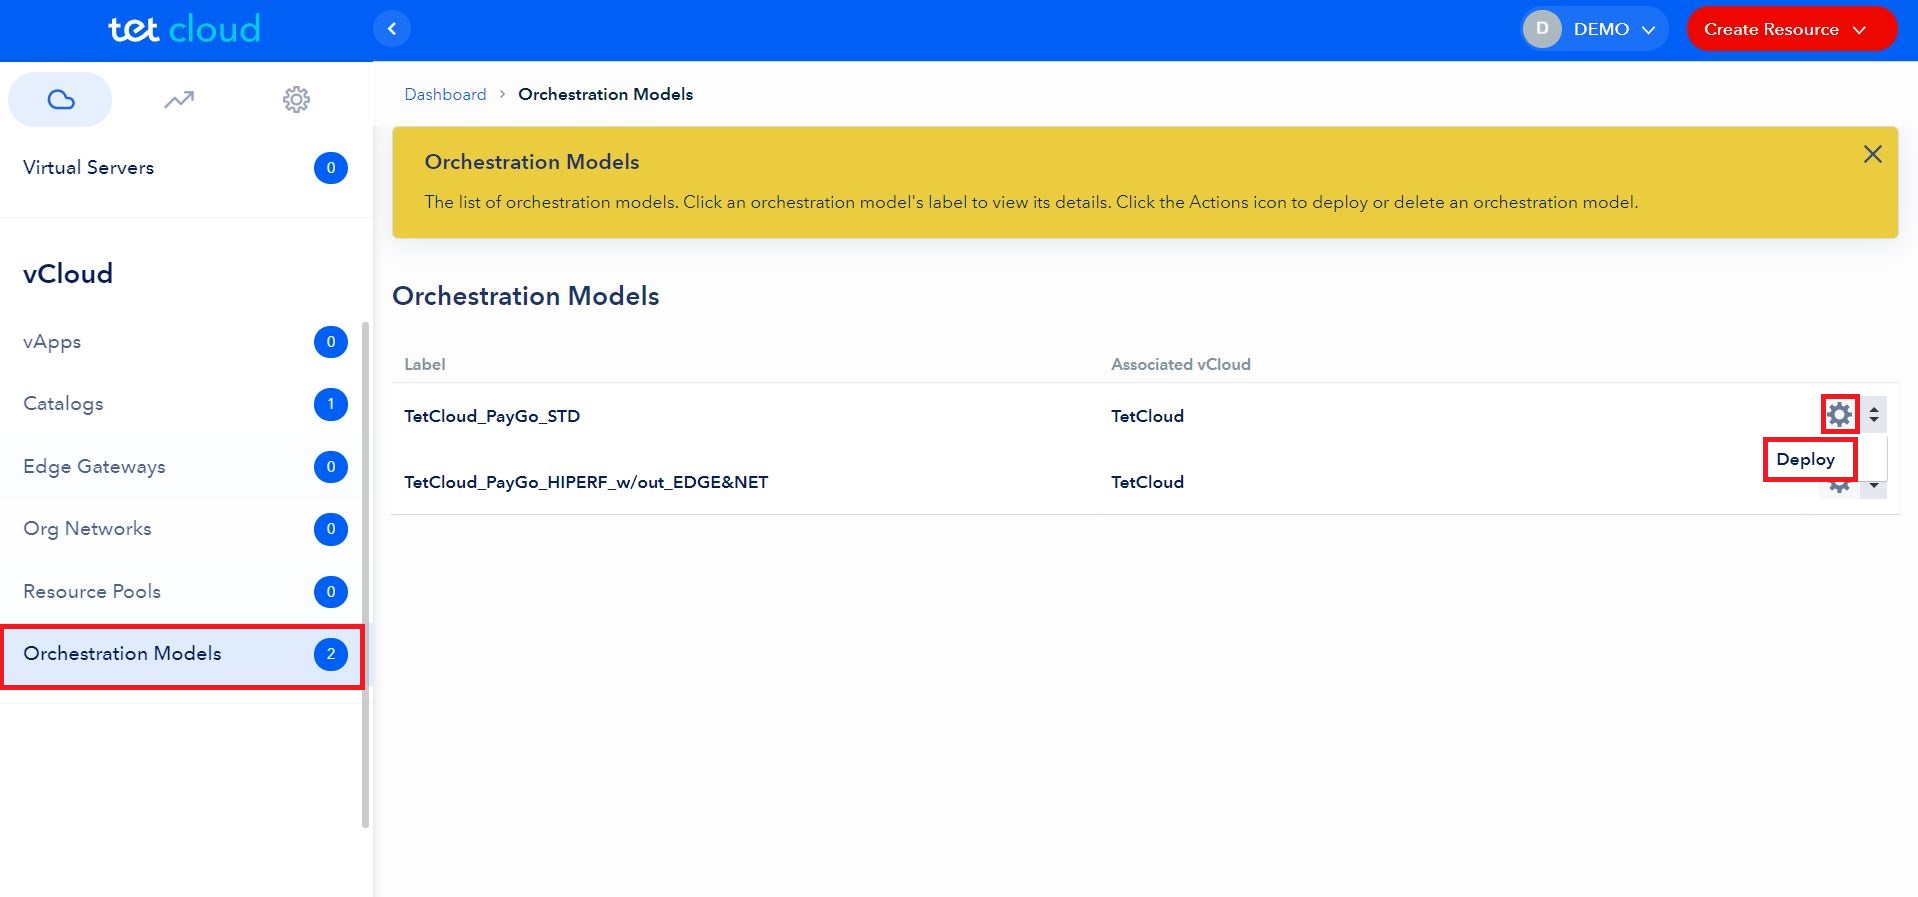
For easy infrastructure deployment you should use already preconfigured Orchestration Model, you will get your resources set up in a few clicks by deploying this model.
Go to Orchestration Models and click Deploy
NOTE
There are different Orchestration Models available, depending on users billing plan and vCPU needs, for more detailed information please refer to the "Navigation in the portal MAIN page (Cloud, Appliances, vCloud) -> Orchestration Models" section of this manual.
STEP 2. Start creating your virtual servers
After the deployment of the Orchestration Model is done and Resource Pool, EDGE gateway and Org Network are created you can move on and start creating Virtual Servers.
Virtual Servers are created through vApps. On more detailed instruction for how to create virtual servers please refer to the "vApps -> create vApp" section of this manual.
Tet Cloud TRIAL, how to start
Read First
In order to start creating your virtual infrastructure (servers) you will need to create Resource Pool, EDGE gateway and Org Network (internal vLAN)
For easy infrastructure deployment you should use already preconfigured Orchestration Model, you will get your resources (Res.Pool, EDGE Gateway and Org.Net.) set up in a few clicks by deploying this model.
NOTE
In the TRIAL billing plan there are only 2 Orchestration Models available for deployment.
IMPORTANT
There are limited resources amount for standard TRIAL subscription (unless there is an agreement with the Customer Manager for different resources amount). Please refer to the "Default Resource Pool amount for TRIAL" section of this manual.
Default Resource Pool amount for TRIAL
- 25GHz vCPU (10pcs Standard (2.3Ghz) vCPU cores or 8pcs High-Performance (3.1Ghz) vCPU cores)
- 20Gb vRAM
- HDDs: 200Gb 7.2k HDD, 100Gb 10k HDD, 100Gb SSD, 100GB SSD NVMe
- 50Mbps Shared Internet connection without Shared DDoS protection
- OS: Linux of Windows Server
NOTE
Depending on your needs for vCPU (Standard 2.3GHz or High Performance 3.1GHz) Deploy the corresponding orchestration model.
Creating a TRIAL Resource Pool
Go to Orchestration Models and click Deploy. Please choose the corresponding model depending on your vCPU needs.
Specify the following parameters during deployment process:
- Verify there is a proper Organization Selected
- Resource Pool Label (will be used further as the name or your Resource Pool)
- Specify disk type for “Default Storage Policy” (will be used further as a default HDD Tier for all the resources you create)
- Edge Gateway Name (name of your vRouter)
- Edge Gateway default Uplink Networks (in TRIAL available only Public)
- Default Gateway (you need to choose one from a drop-down menu)
- Use Default Gateway for DNS relay (upon user decision)
- Network Name (name of your default vLAN)
Navigation in the portal MAIN page (Cloud, Appliances, vCloud)
Top menu
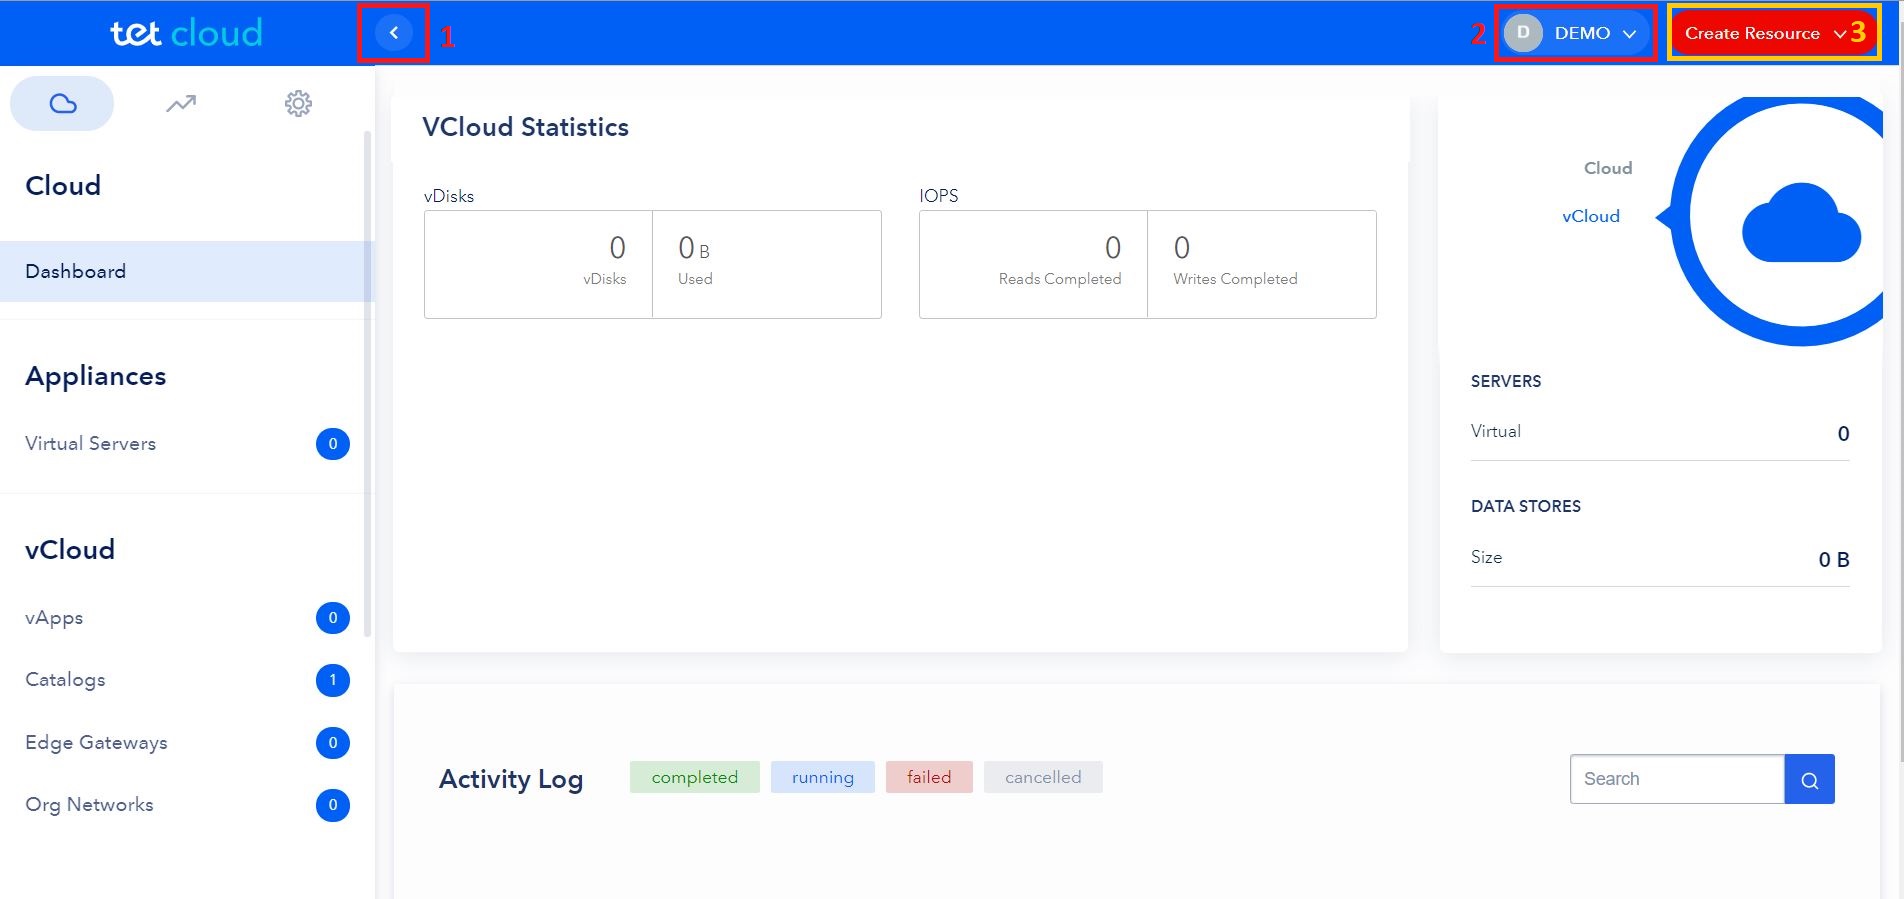
In the top navigation menu the following options are available for user:
1. Show/hide left side panel
2. Actions with user account:
- My Profile – edit user profile and settings
- Log Out – log out user from the portal
3. Create Resource -> Deploy New vApp, this option allows user to deploy new vApp, for more detailed information on how to create new vApps please refer to the "vAPPs" section of this manual.
Dashboard
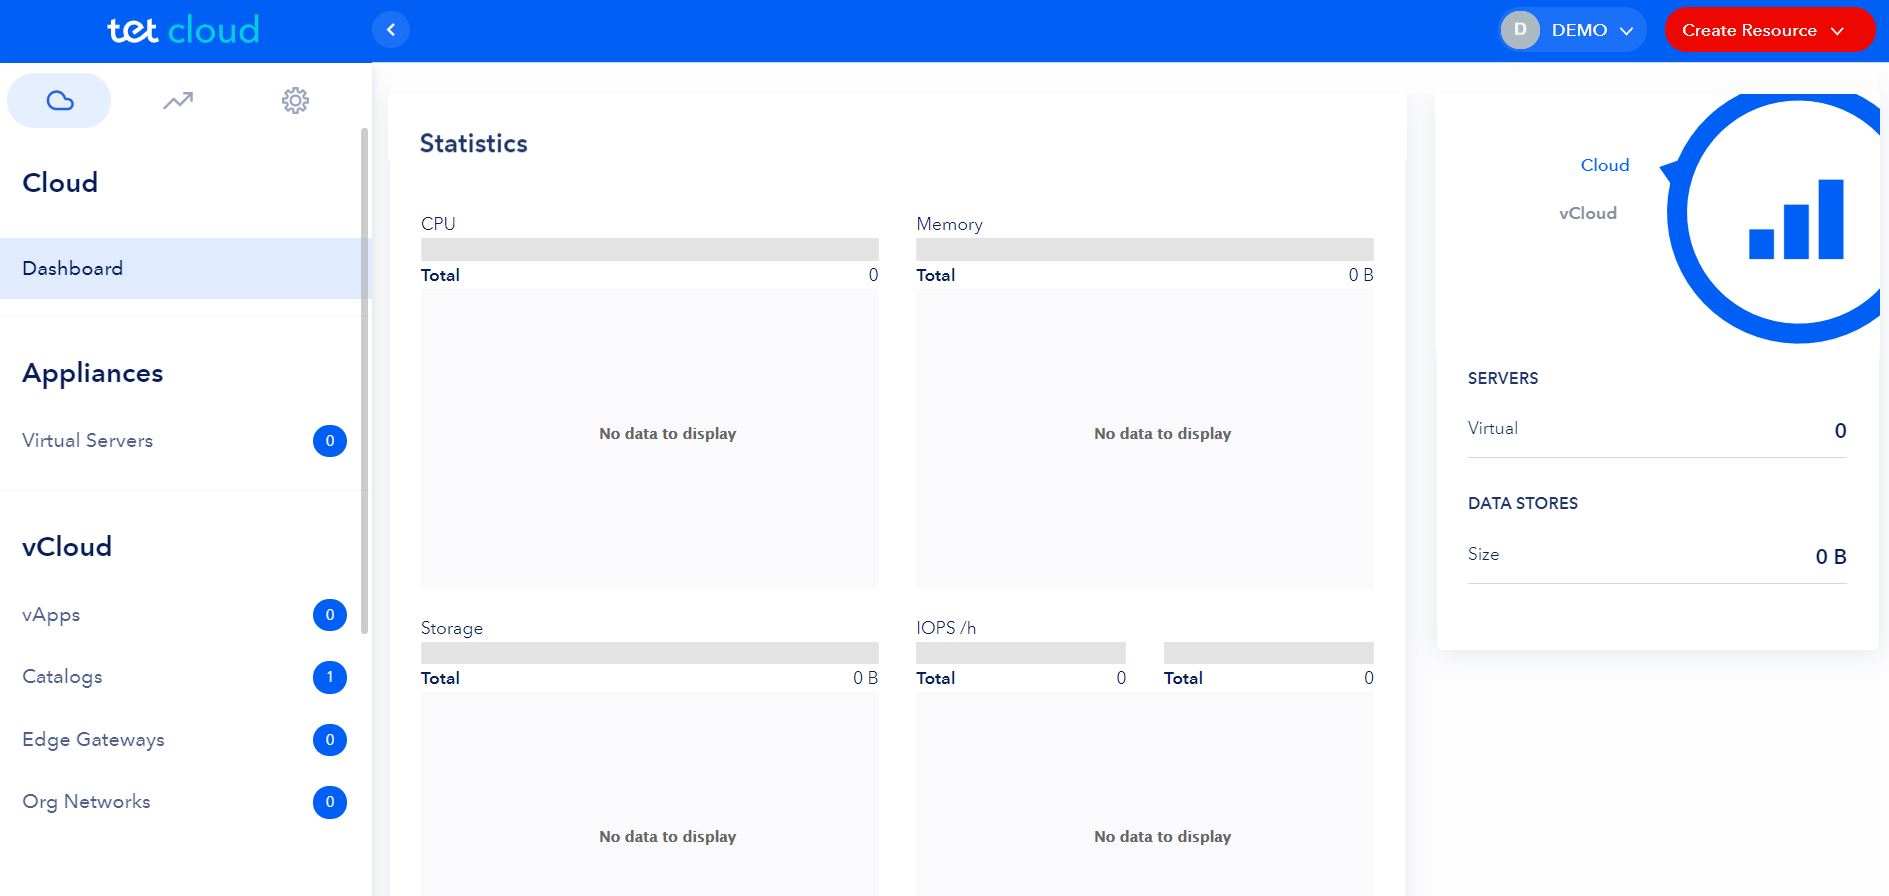
In the “Dashboard” section user can see virtual resources usage statistics in different views. On the bottom part there is an “Activity Log” view, where user can find all statuses on initiated tasks, for more detailed information on how to read and understand “Activity Log” please refer to the "Logs" section of this manual.
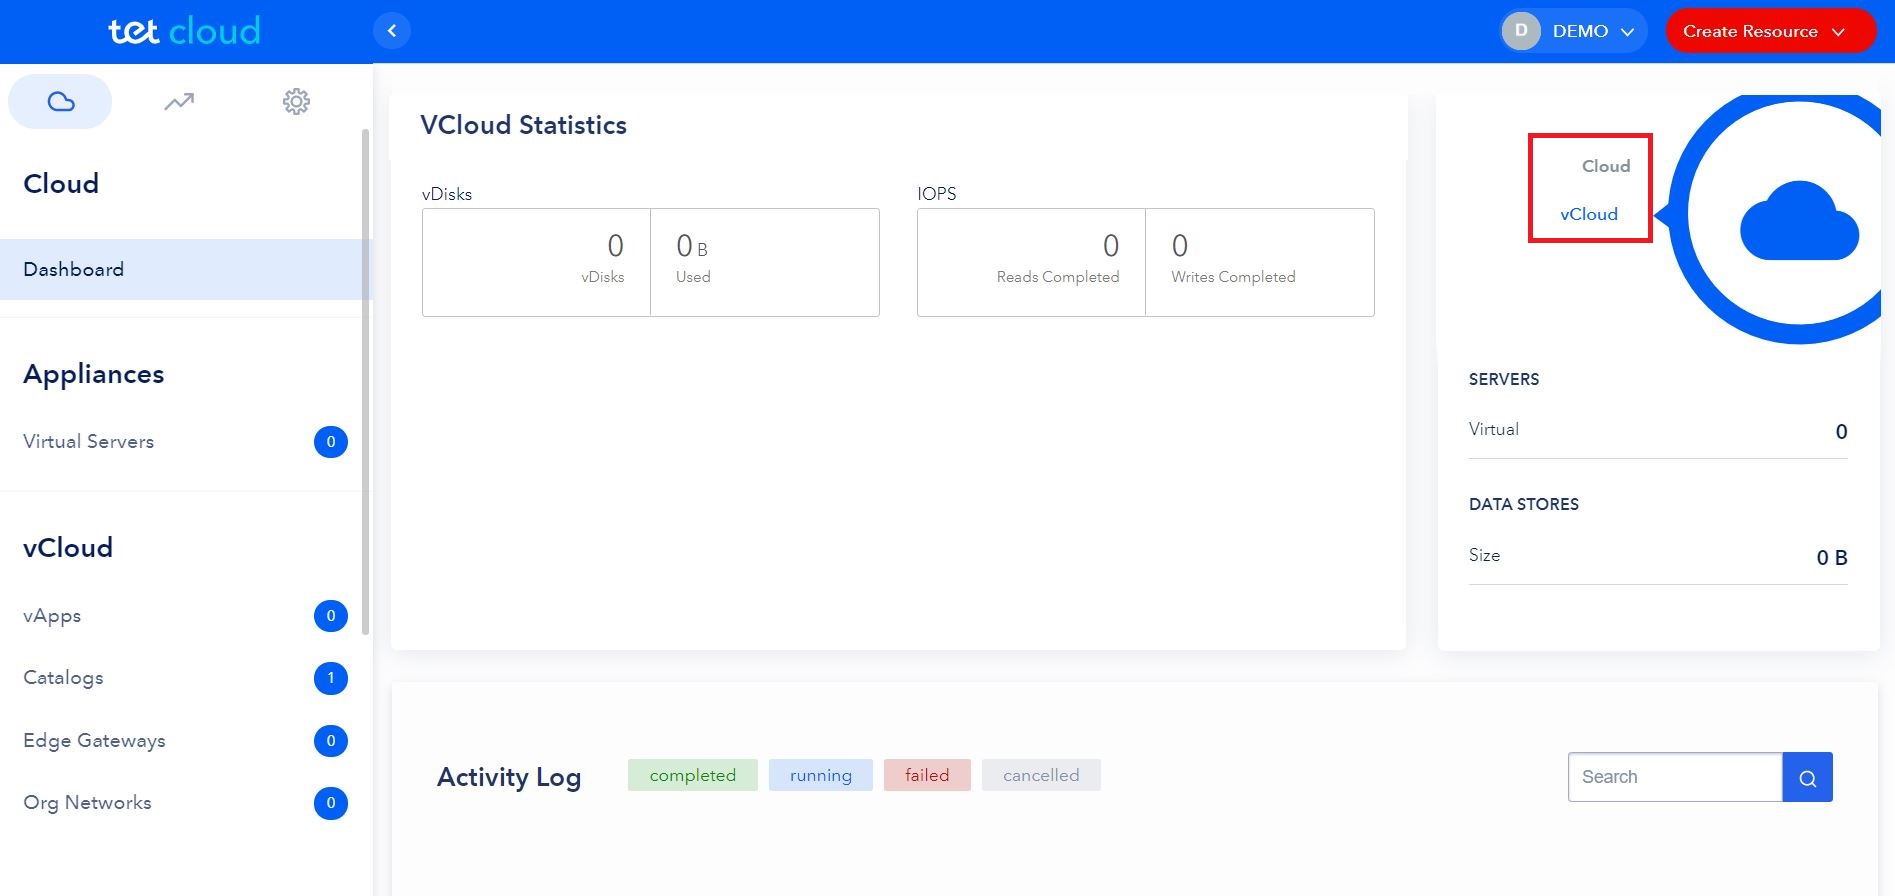
Cloud resources usage statistics in different view:
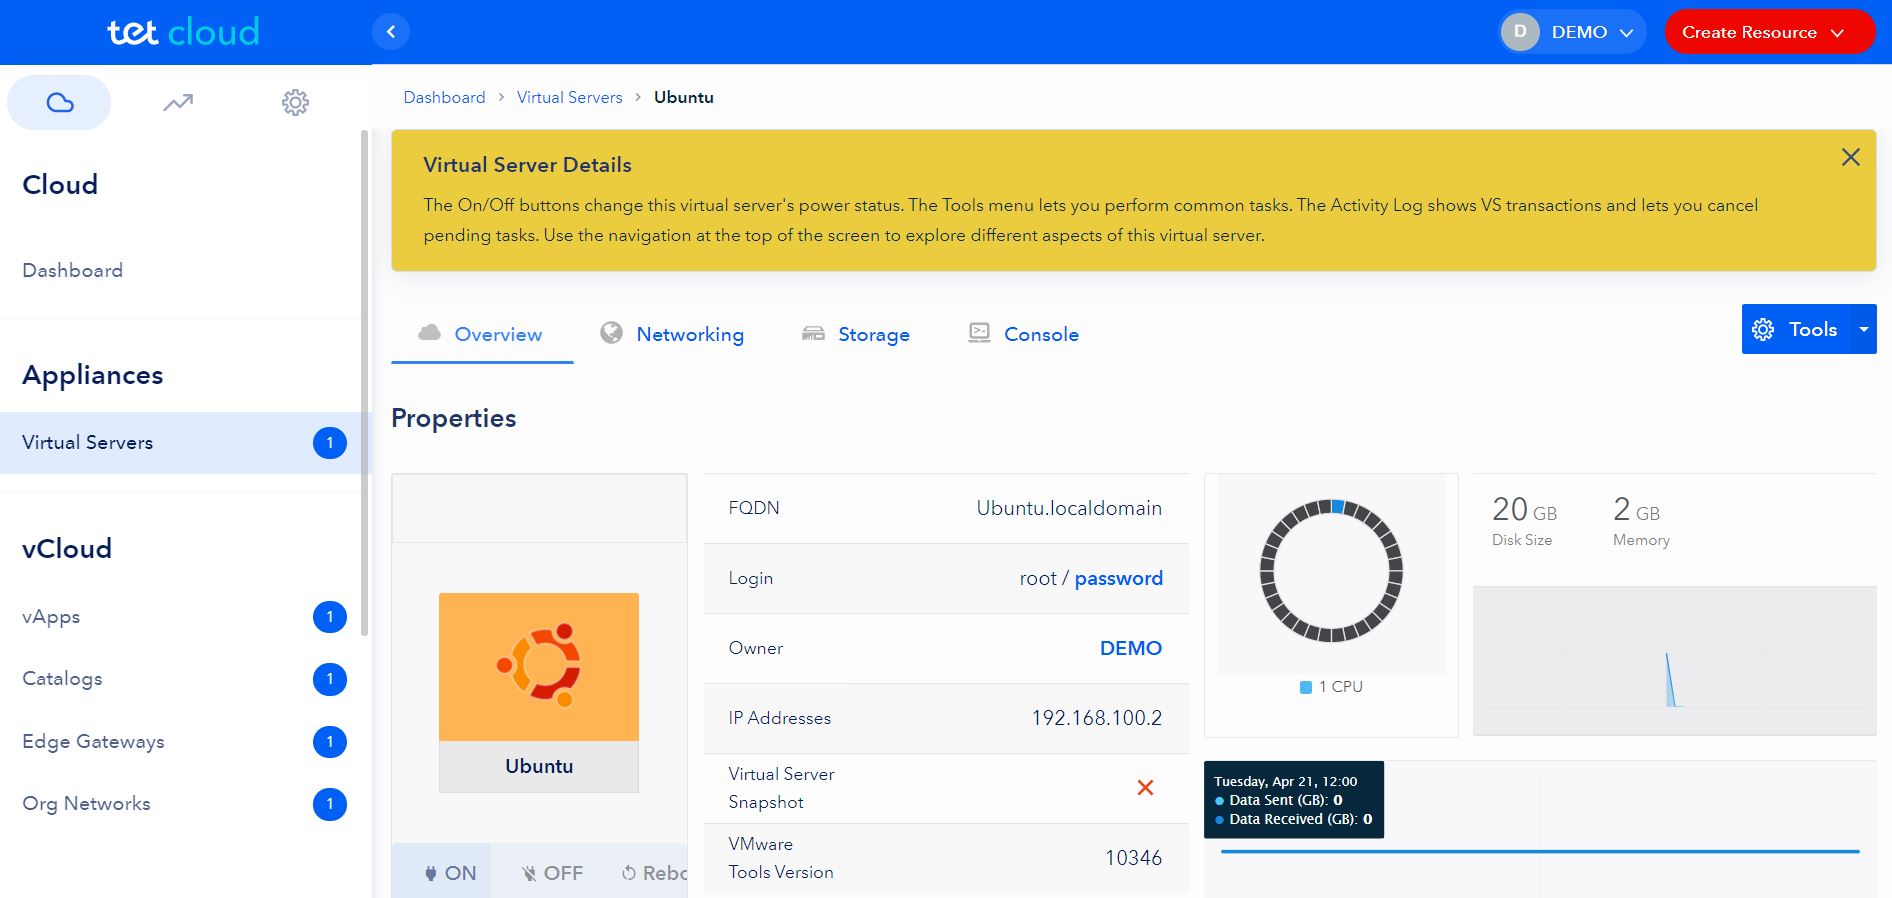
Virtual Servers
In the “Virtual Servers” section user can see list of created virtual servers and server status (on/off). For each virtual server an action button is available, which allows user to perform the following tasks with the server:
- reboot (standard server reboot process);
- reset (hard reset, equals brutal power off action);
- shutdown (standard server shutdown process).
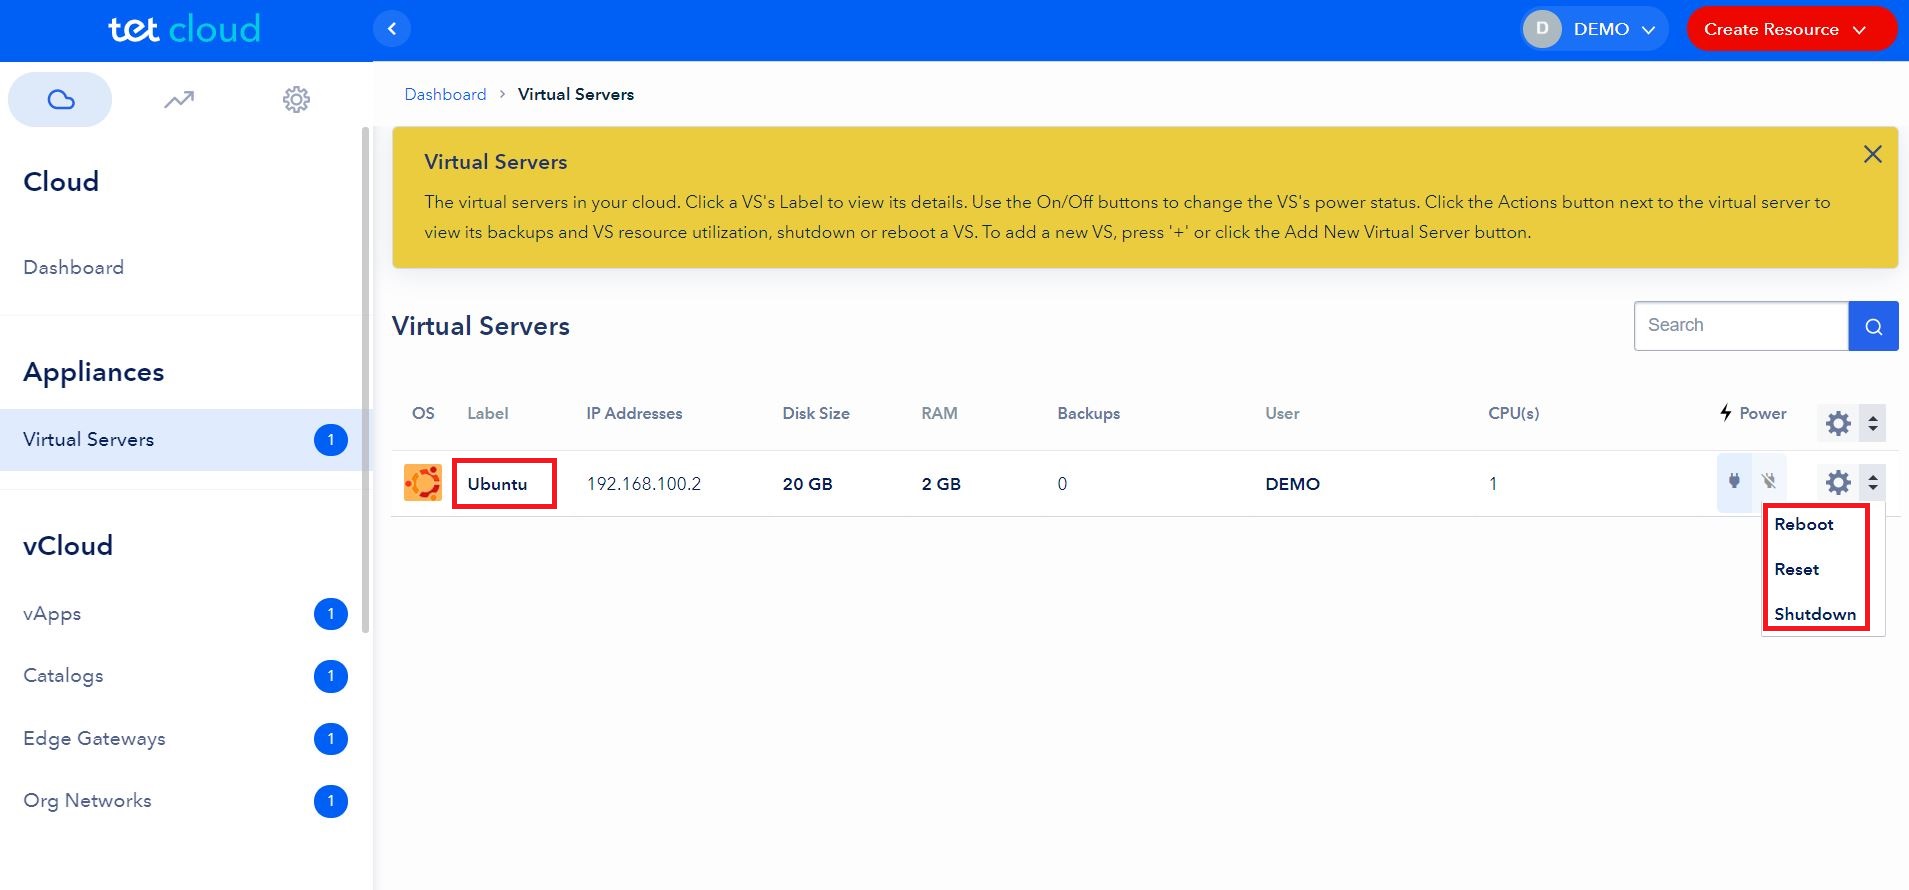
By clicking of the server name, user can see more detailed information for selected server and much more actions to do with the server, for more detailed information on how to customize the virtual server please refer to the "Virtual Servers" section of this manual.
vAPPs
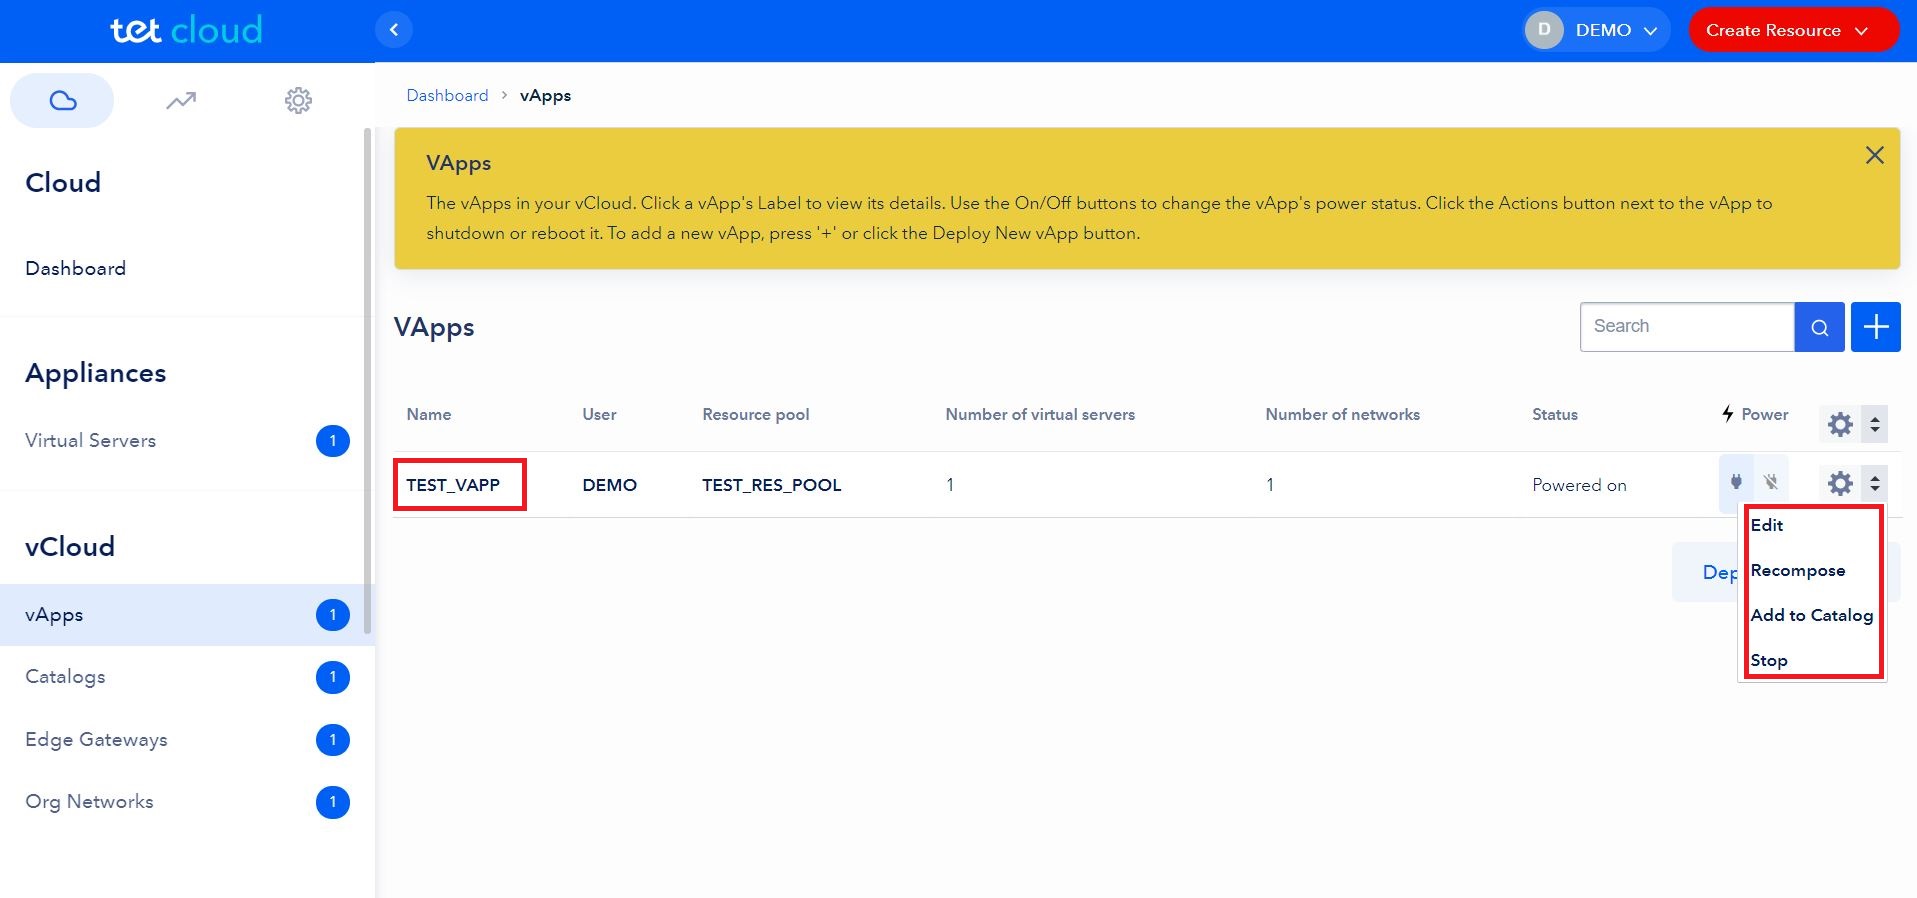
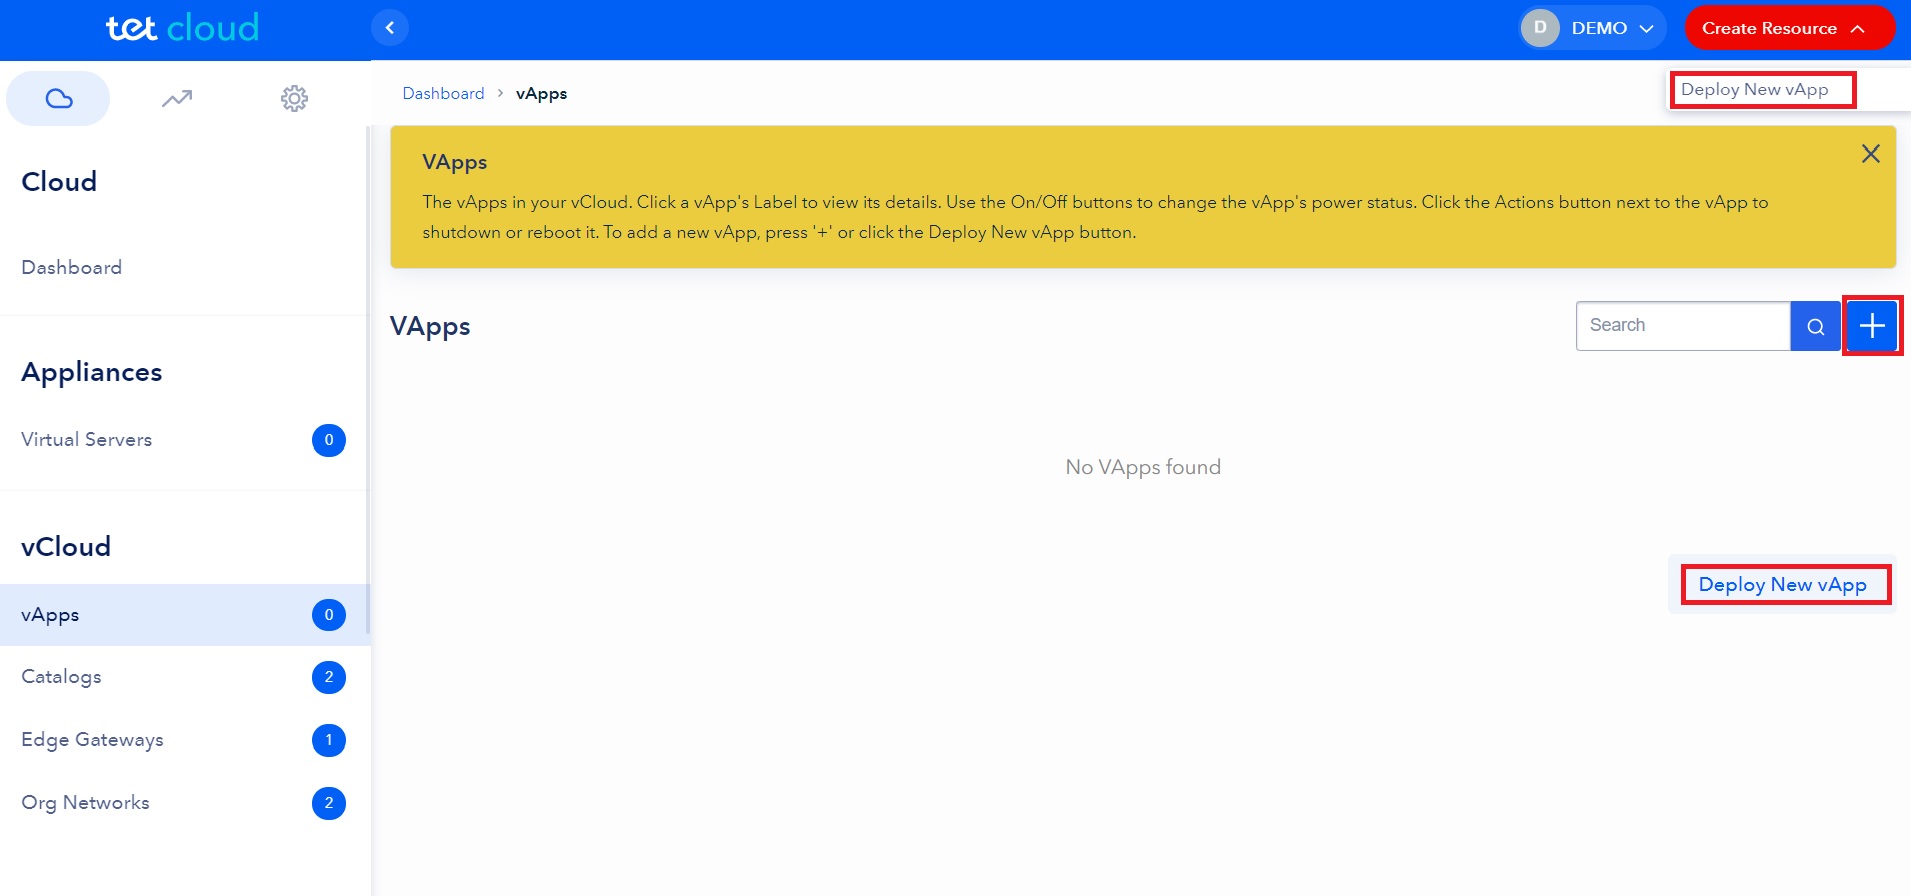
In the “vAPPs” section user can create new vApps by clicking “Deploy new vApp” button or blue button with [ + ] and see list of already created vAPPs with status (on/off). For each vApp an action button is available, which allows user to perform the following tasks with the vApp:
- edit (edit name and description of vApp);
- recompose (recreates the virtual server within vApp using default vApp template from Tet, user data will be deleted);
- add to catalog (add selected vApp to the users catalog as a vApp template);
- stop (stops the vApp and all the virtual servers within specific vApp).
NOTE
vApp can be deleted only after being stopped.
When the vApp is in Powered off state, additional action button appears:
- start (starts the vApp and powers on virtual servers within vApp)
- delete (deletes the vApp and virtual servers within the following vApp);
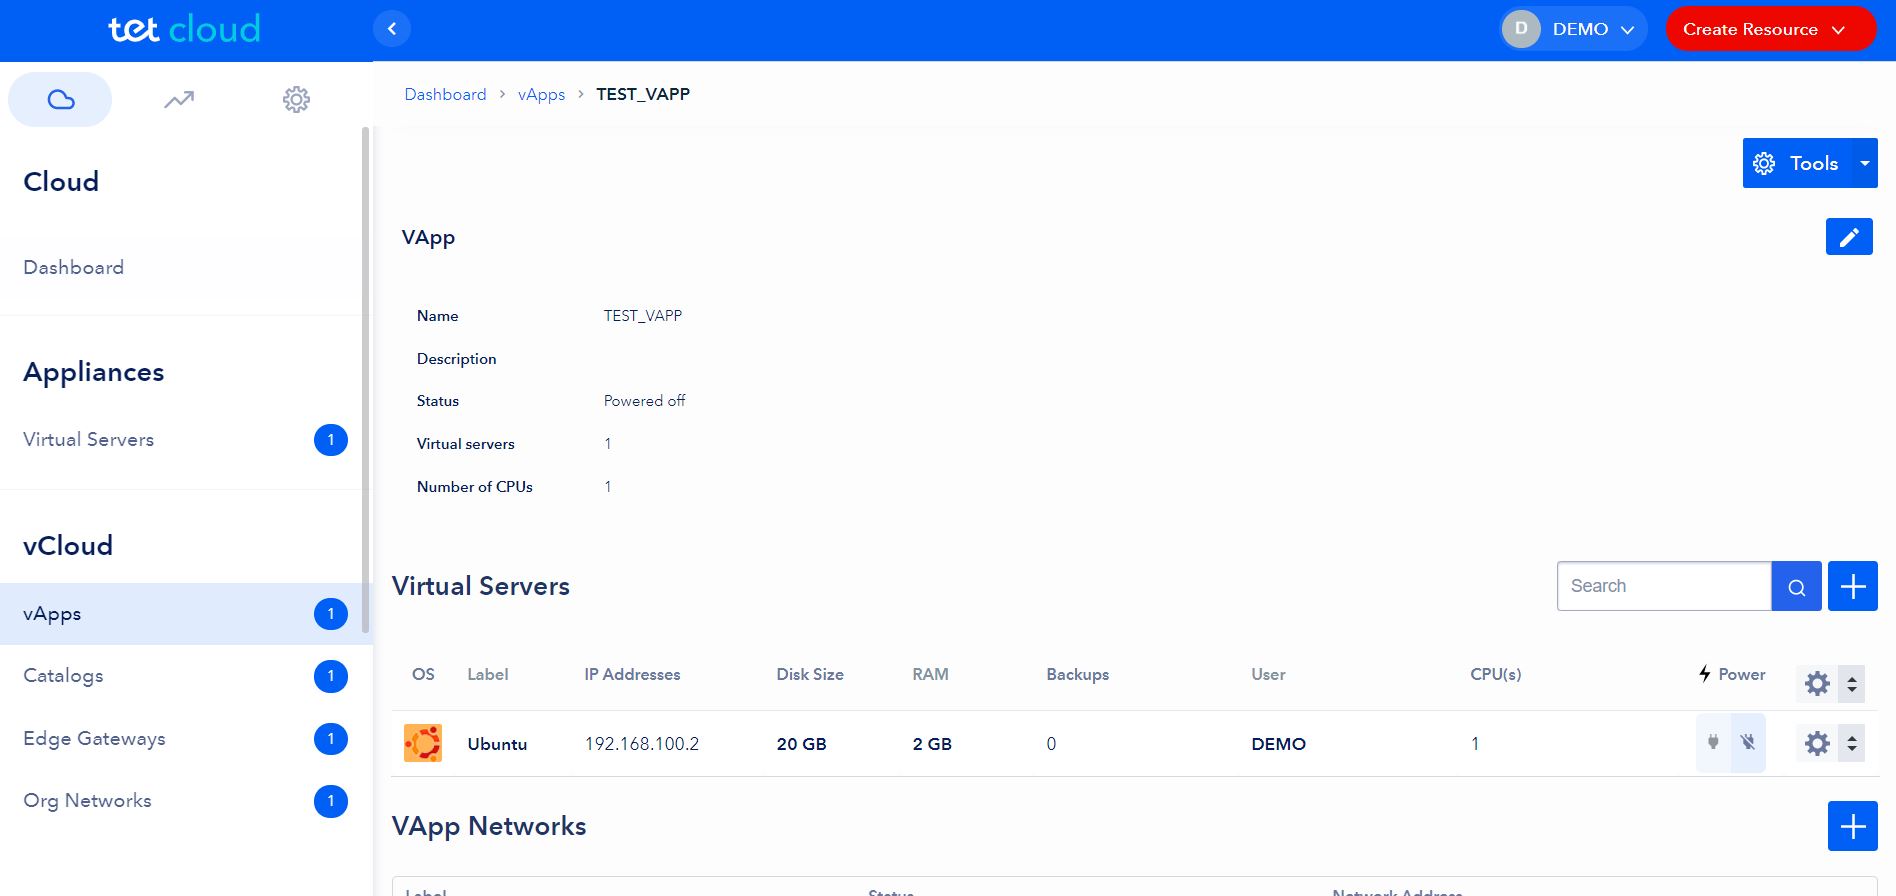
By clicking of the vApp name, user can see more detailed information for selected vApp , virtual servers created under this vApp, networks attached to this vApp and much more actions to do with the vApp, for more detailed information please refer to the "vAPPs" section of this manual.
Catalogs
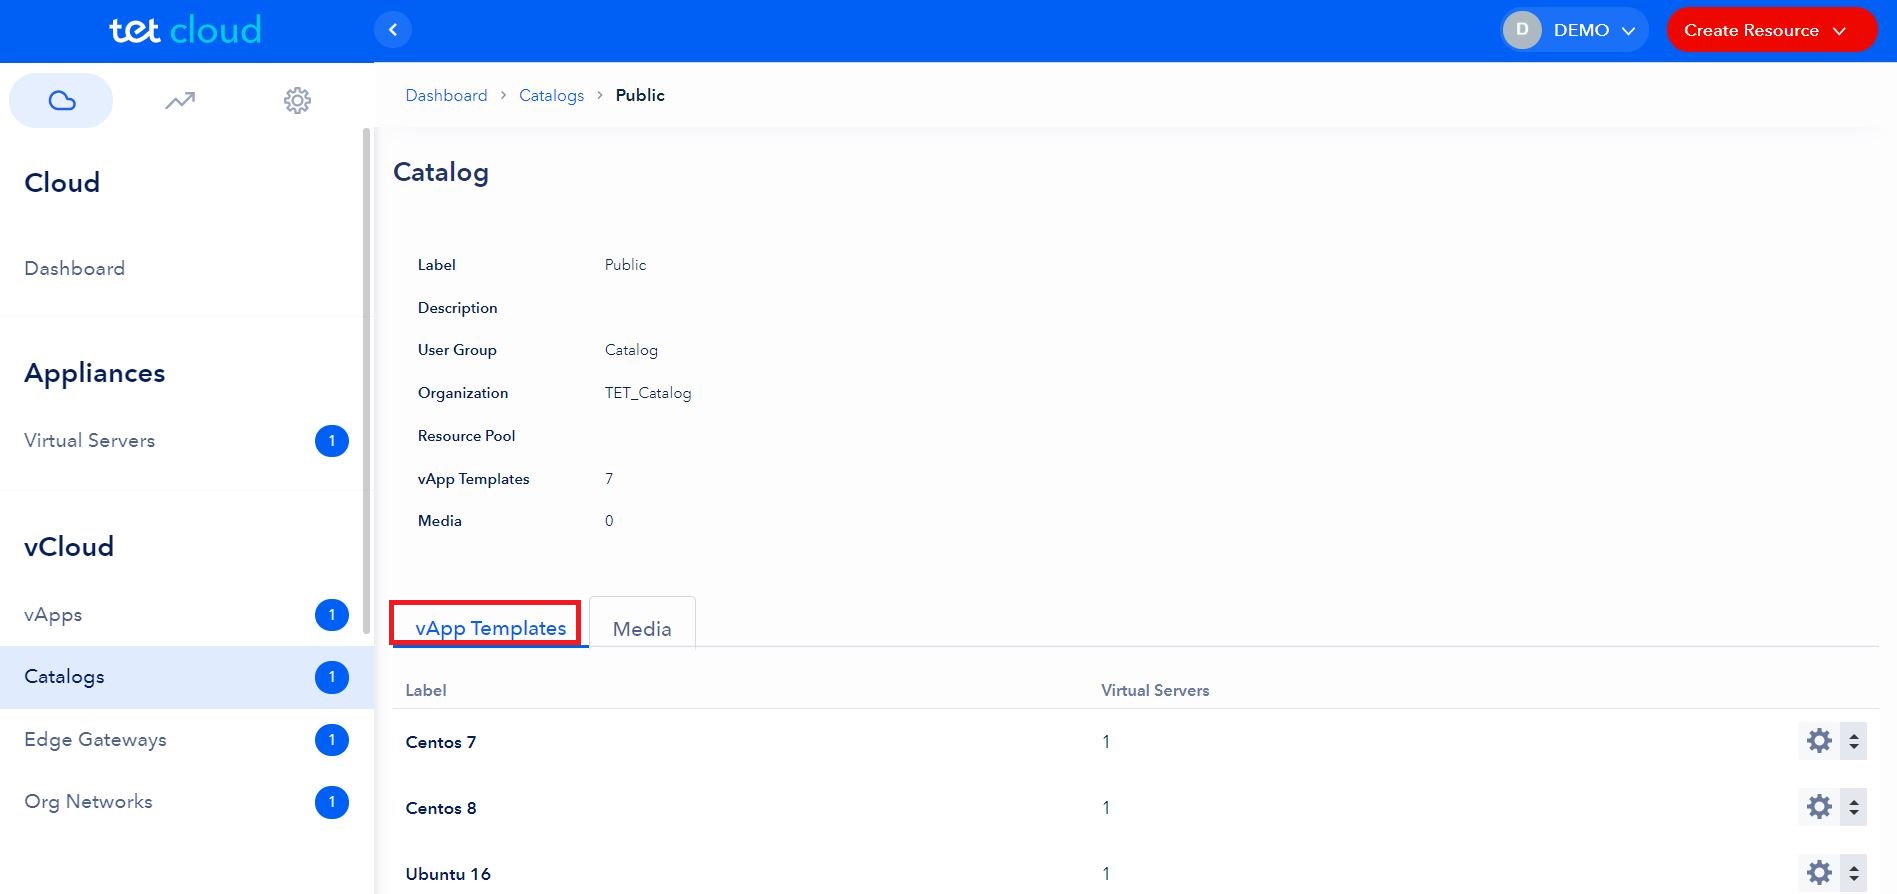
In the “Catalogs” section user can see Public Catalog with OS templates, shared for use with all platform users.
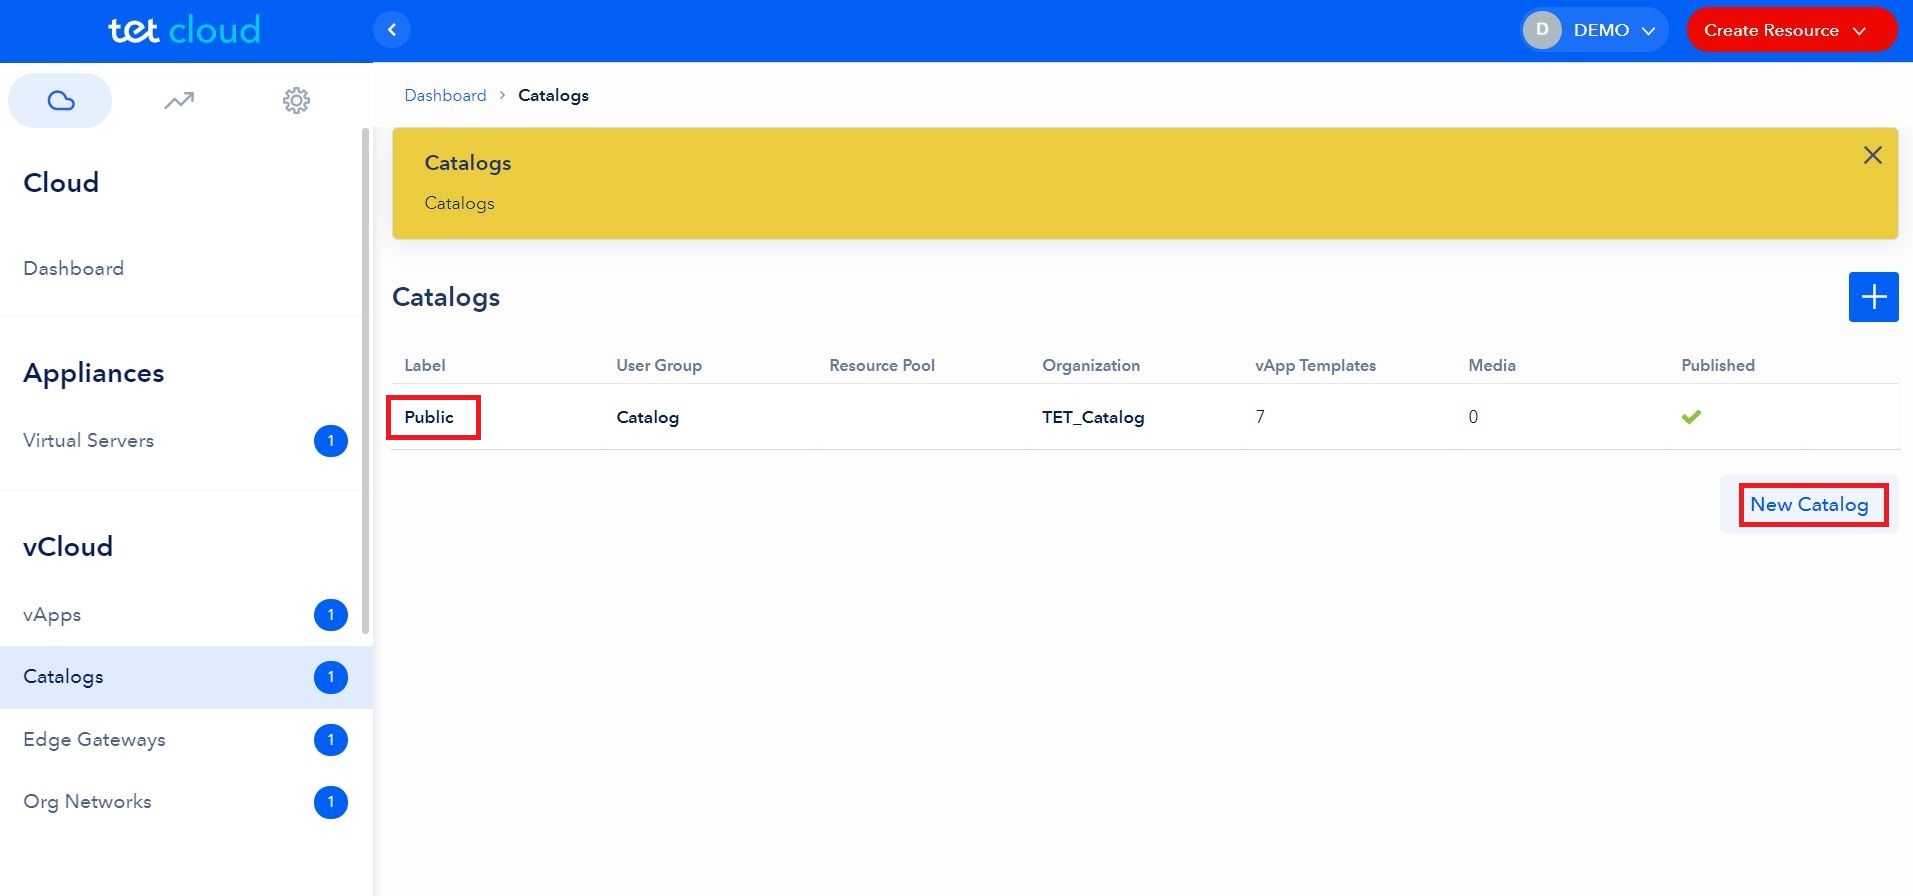
By clicking on Catalog name user can see the contents within the specific Catalog.
EDGE Gateways
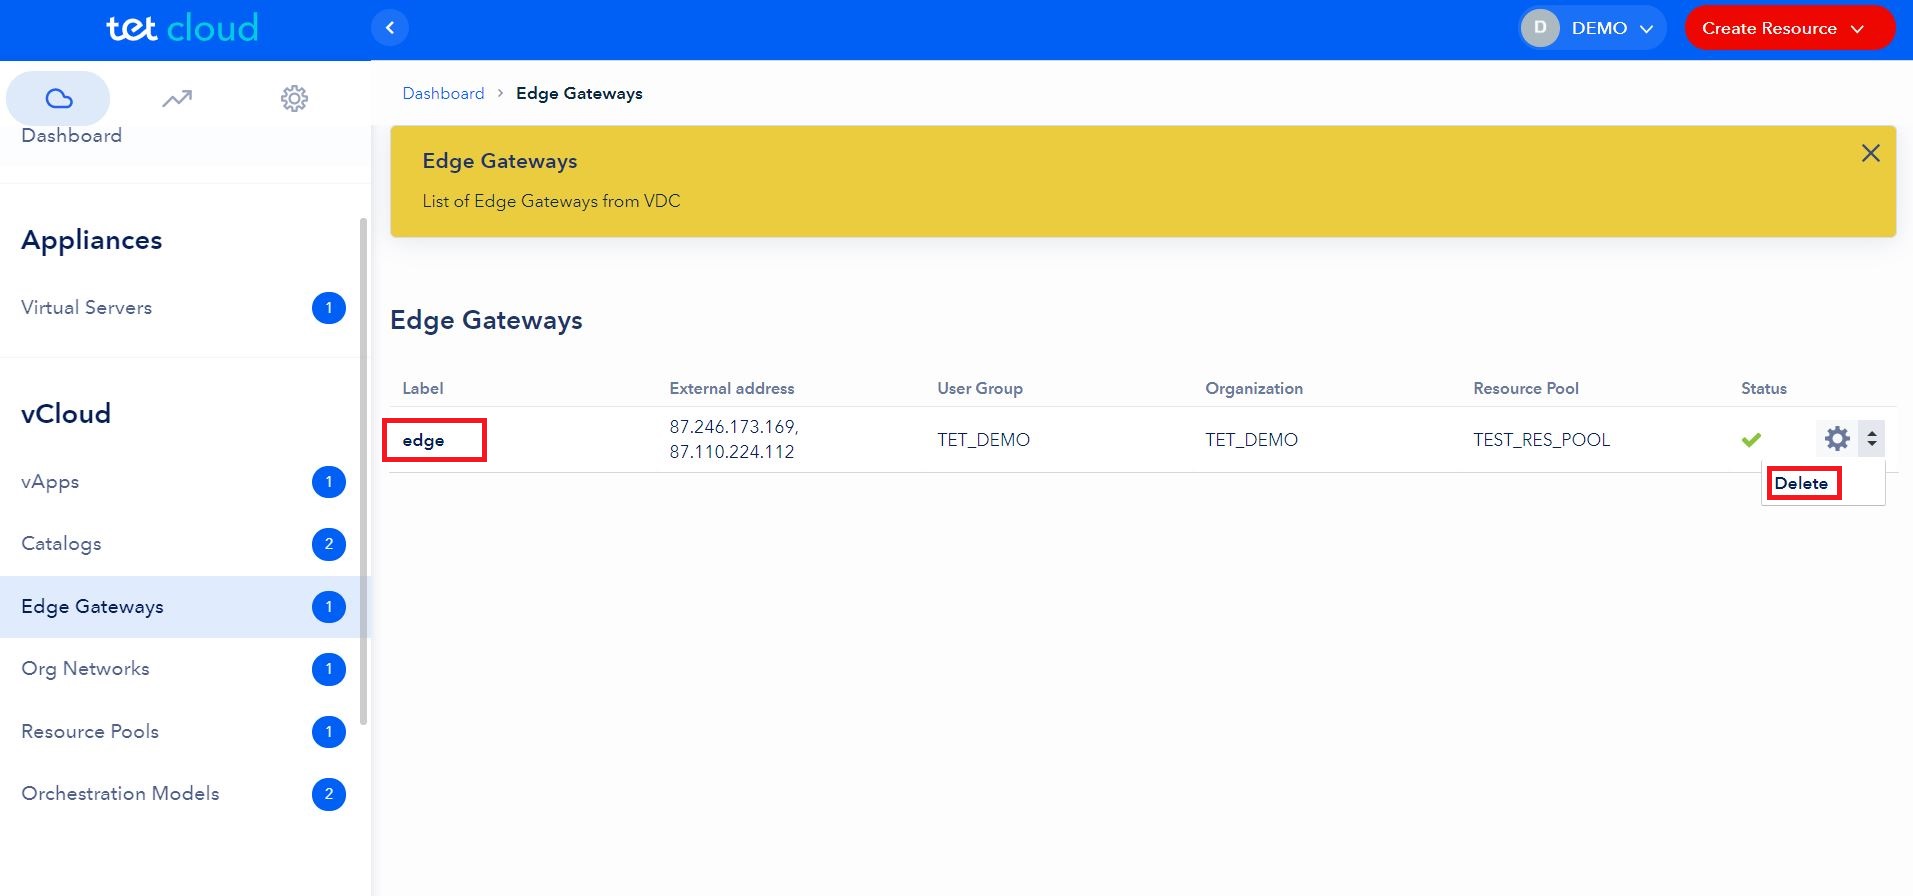
In the “EDGE Gateways” section user can see EDGE Gateways (virtual routers).
NOTE: user is not allowed to edit existing or create additional Edge Gateways, only delete. In the following scenarios user should contact Tet ServiceDesk for assistance, because current user rights do not allow to perform the following actions:
- Create new EDGE Gateway;
- Change the name of the existing EDGE Gateway
- Change Rate limits of an EDGE Gateway (Bandwidth speed, default is 50 Mbps with possibility to increase up to 1 Gbps)
- Modify EDGE Gateway form factor (default is Compact)
- Add additional external IP addresses for EDGE Gateway (Sub-Allocate IP Pools)
- Change the Internet connection type, from Public to DDoS Protected Internet connection and vice versa (external IP address will change during switching between connection types )
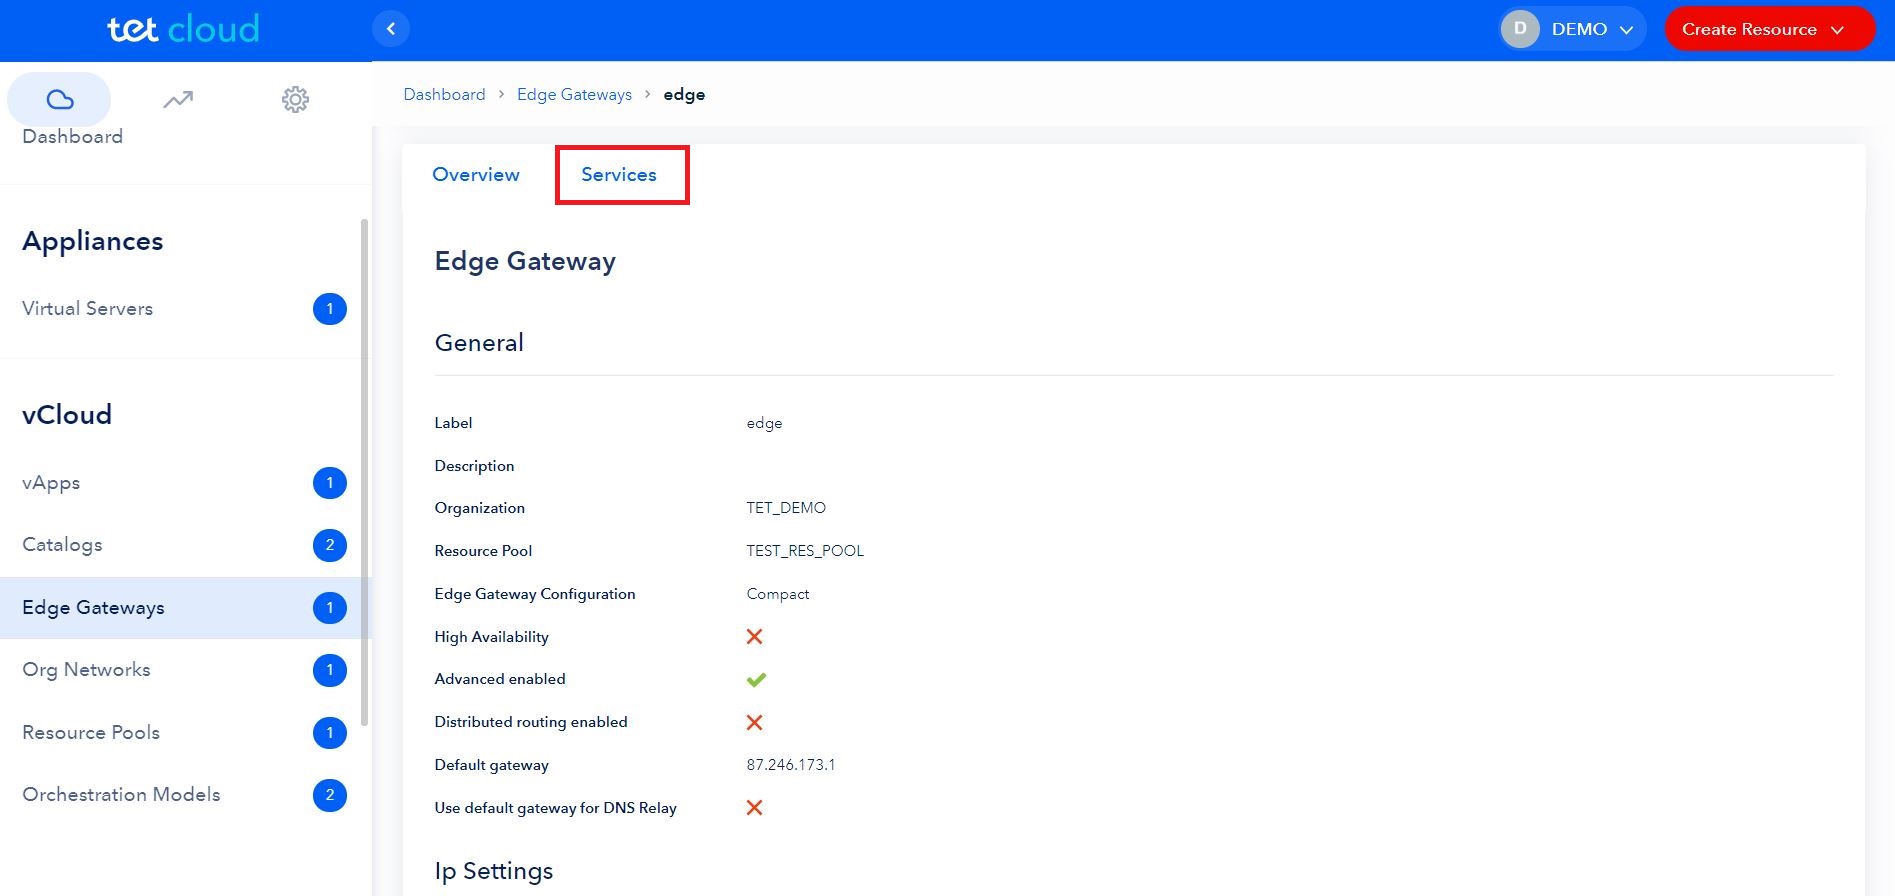
By clicking on the EDGE Gateway label user has possibility to see additional information about EGDE Gateway: General information, IP settings and Rate limits. By clicking on the Services button, user can setup and modify network services like: Firewall, NAT, Load Balancer rules and other settings. For more detailed information on how to configure EDGE Services please refer to the "EDGE Gateway Services" section of this manual.
NOTE: please take in mind that due to security reasons all the incoming and outgoing connections on the Edge Gateway are restricted by default. In order to get your Virtual Servers connected to the Internet you will need to configure the Edge Gateway properly. For more detailed information on how to configure Edge Gateway please refer to the “How to configure Edge Gateway Services” section of this manual.
Org Networks
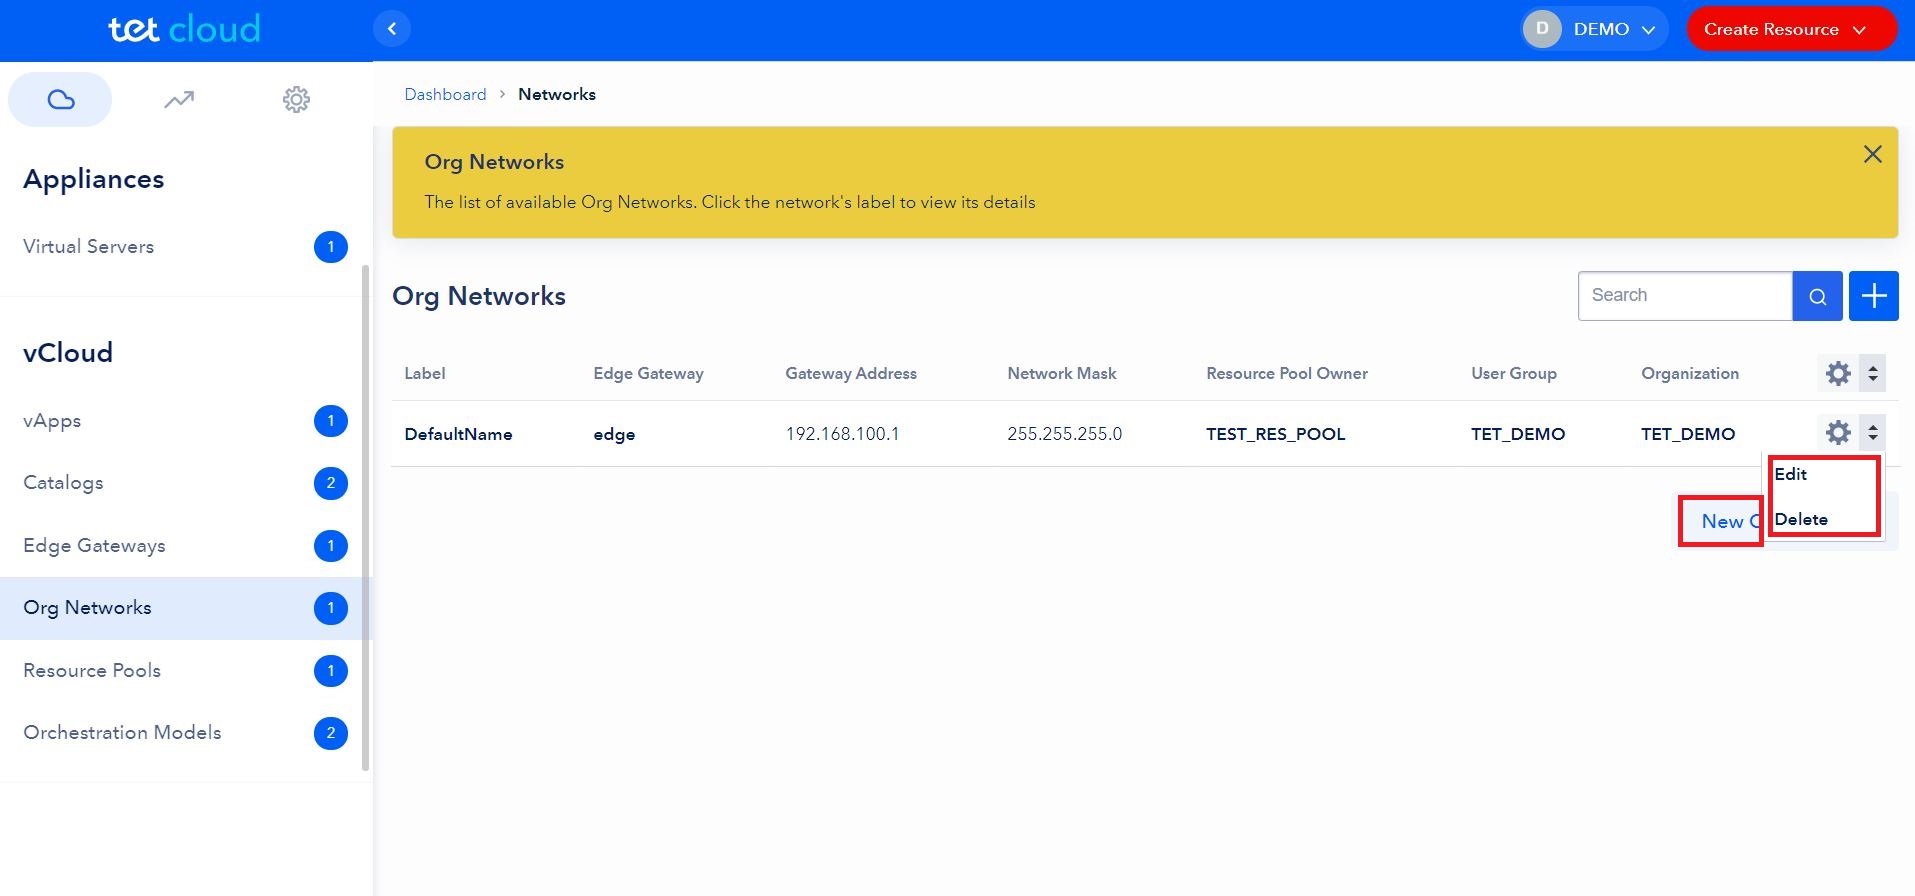
In the “ORG Networks” section user can see the list of available Organization Networks (vLANs).
NOTE: user can perform the following actions with Org Networks:
- Create new Org Network;
- Edit settings of the existing Org Network;
- Delete Org Network.
On how to create New Org Network please refer to the “How to create New Org Network” section of this manual.
Resource Pools
In the “Resource Pools” section user can see the list of available Resource Pools. When clicking on the Resource Pool label user can see Resources utilization and quotas (VS Quota, Network Quota, CPU, vCPU Speed, Memory, Data Stores)
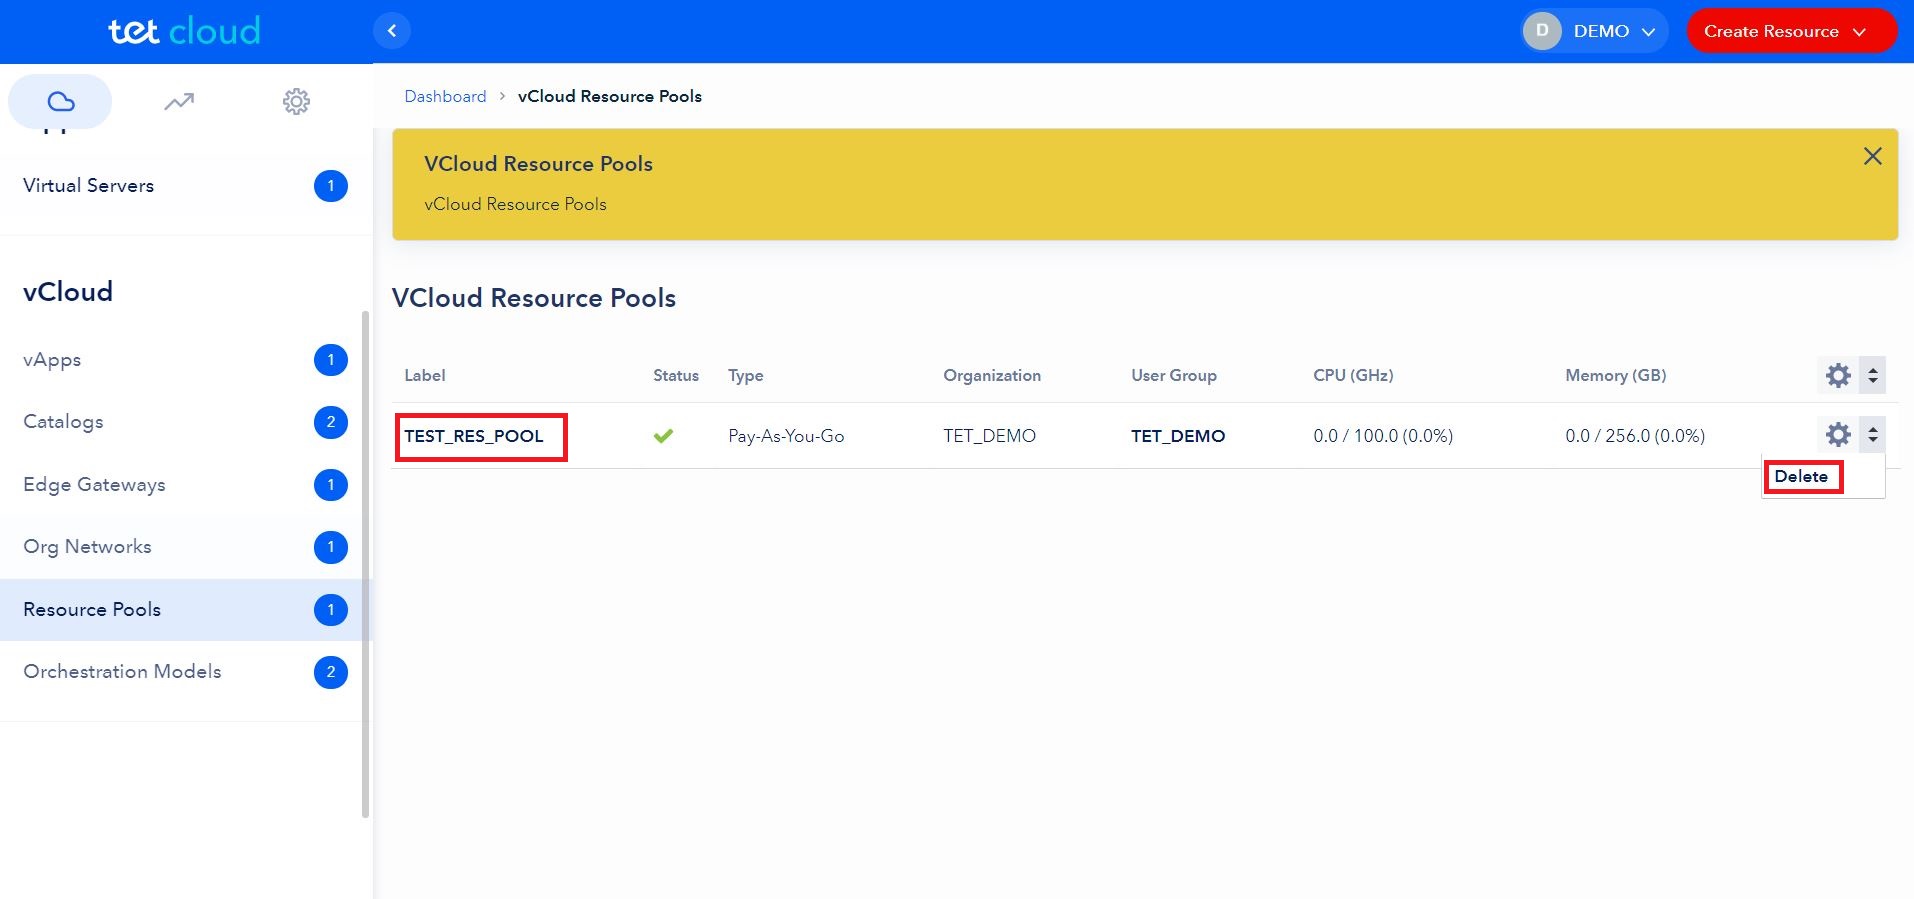
NOTE: user is not allowed to edit existing or create additional Resource Pools, only delete. Resource Pool is being created during Orchestration Model deployment with default parameters for virtual resources limits and quotas. If you need to increase the following paraments, then you should contact Tet ServiceDesk for assistance:
- CPU limits, GHz;
- Memory limits, GB;
- Datastore limits, GB.
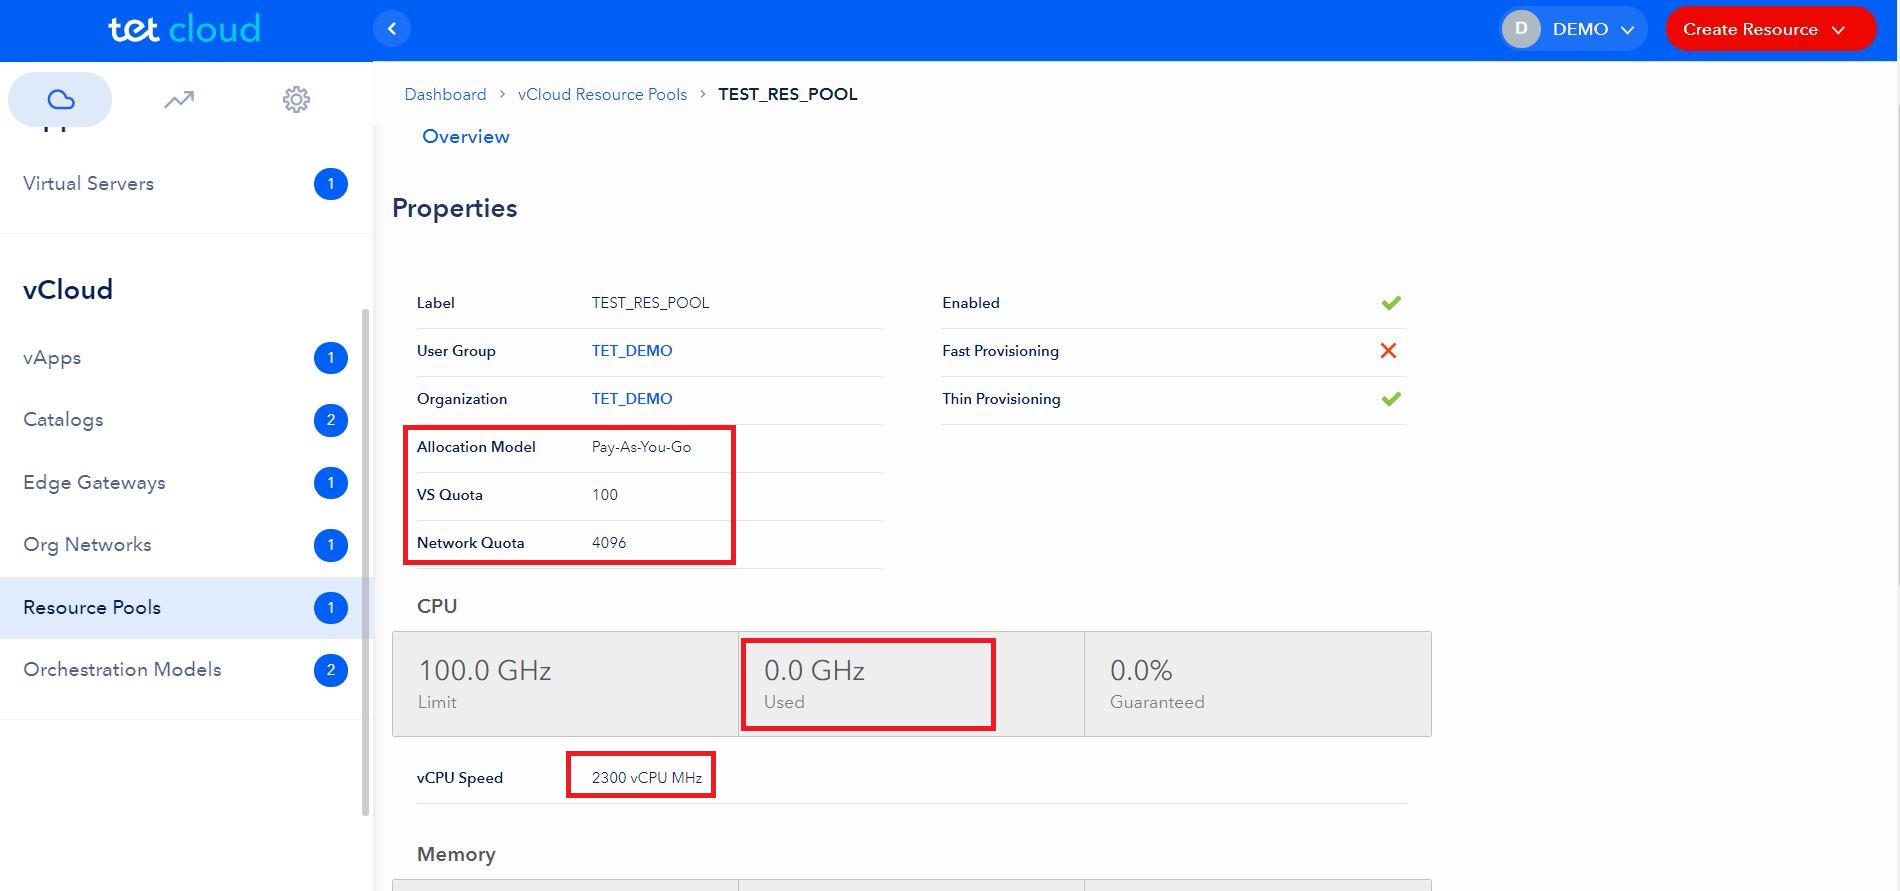
Resource Pool utilization statistics: Resource Pool type, VS Quota, Network Quota, CPU usage and vCPU speed
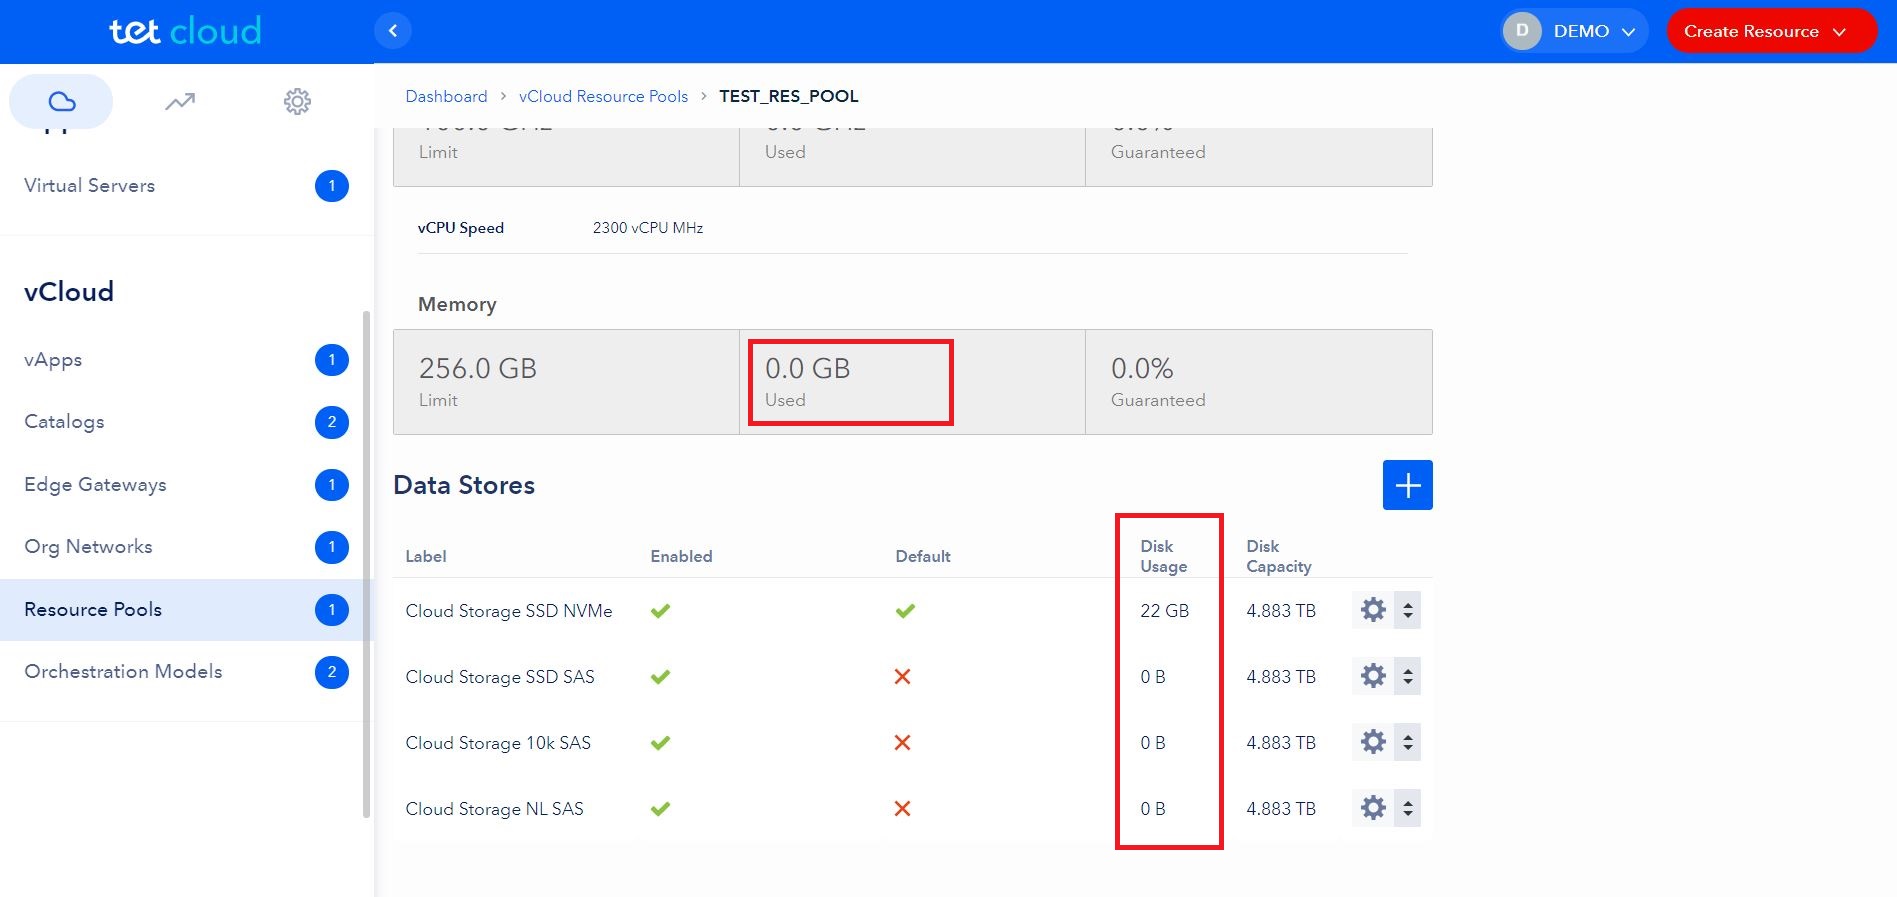
Resource Pool utilization statistics: Memory usage and Data Stores usage
Orchestration Models
In the “Orchestration Models” section user can see the list of available Orchestration Models for deployment.
NOTE: Users have no rights to create, edit, delete, copy existing Orchestration Models, only option to DEPLOY
Orchestration Model is used to easily deploy Resource pools (on Standard or High-Performance cluster), EDGE gateway and Organization Network (vLAN)
NOTE
There are different orchestration models available, depending on users billing plan:
30 days TRIAL billing plans:
- TRIAL_PayGo_STD – resource pool will be deployed on the STANDART physical hosts with vCPU speed = 2.3Ghz (deployment includes: resource pool, EDGE gateway, organization network (vLAN))
- TRIAL_PayGo_HIPERF – resource pool will be deployed on the HIGH-PERFORMANCE physical hosts with vCPU speed = 3.1Ghz (deployment includes: resource pool, EDGE gateway, organization network (vLAN))
Production billing plans:
- TetCloud_PayGo_STD - resource pool will be deployed on the STANDART physical hosts with vCPU speed = 2.3Ghz (deployment includes: resource pool, EDGE gateway, organization network (vLAN))
- TetCloud_PayGo_HIPERF_w/out_EDGE&NET – resource pool will be deployed on the HIGH-PERFORMANCE physical hosts with vCPU speed = 3.1Ghz (deployment includes resource pool only with the idea that customer will use High Performance cluster as an addition to Resource Pool already deployed on Standard cluster and utilize existing EDGE gateway and organization network, by making one of the existing organization networks SHARED between resource pools)
Hidden billing plans:
- TetCloud_Preconfigured_STD - resource pool will be deployed on the STANDART physical hosts with vCPU speed = 2.3Ghz (deployment includes: resource pool, EDGE gateway, organization network (vLAN))
- TetCloud_Preconfigured_HIPERF_w/out_EDGE&NET – resource pool will be deployed on the HIGH-PERFORMANCE physical hosts with vCPU speed = 3.1Ghz (deployment includes resource pool only with the idea that customer will use High Performance cluster as an addition to Resource Pool already deployed on Standard cluster and utilize existing EDGE gateway and organization network, by making one of the existing organization networks SHARED between resource pools)
IMPORTANT
Hidden (preconfigured) billing plans are conceived for users with fixed resource amount and fixed monthly payment for these resources. Users have no rights in portal to modify preconfigured resource pool on their own, only by contacting Tet helpdesk after agreement on new resources amount and monthly price with account manager.
Navigation in the portal METRICS selection
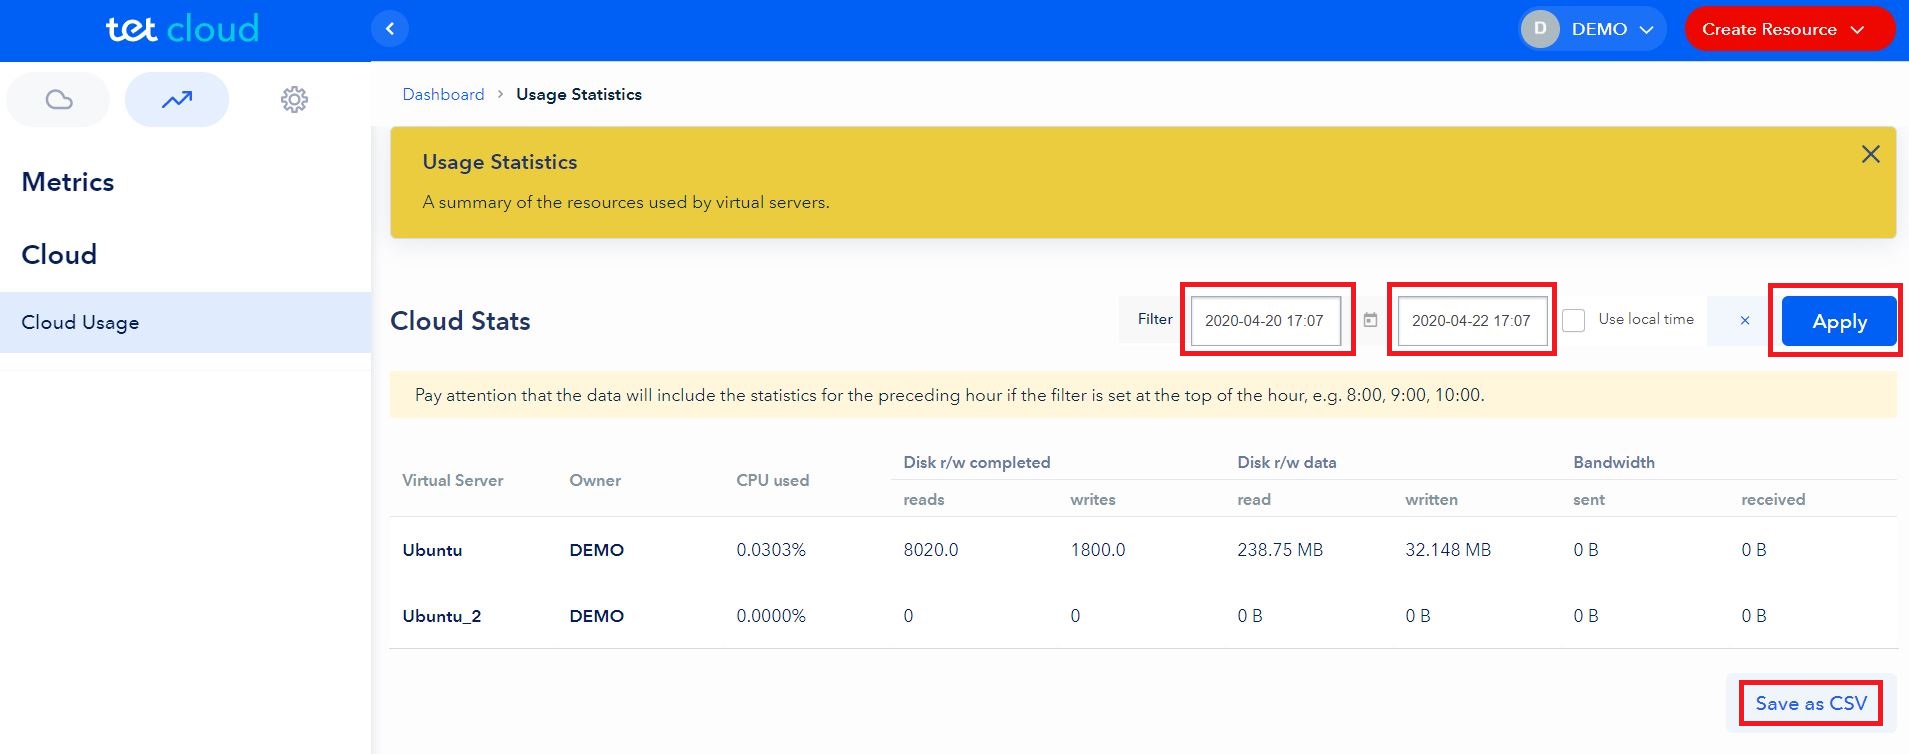
Cloud Usage
In the “Cloud Usage” section you can see the list of Virtual Servers and usage statistics for specific server and period of time.
To see statistics for the specific period of time you should use filter, select the dates [from-to] and click Apply.
You can also export this statistics data as a *.CSV file, for that you need to apply filter with the specific dates and when the statistics is ready and displayed press the “Save as CSV” button.
Navigation in the portal, ADMIN selection (Users, Billing, Tools)
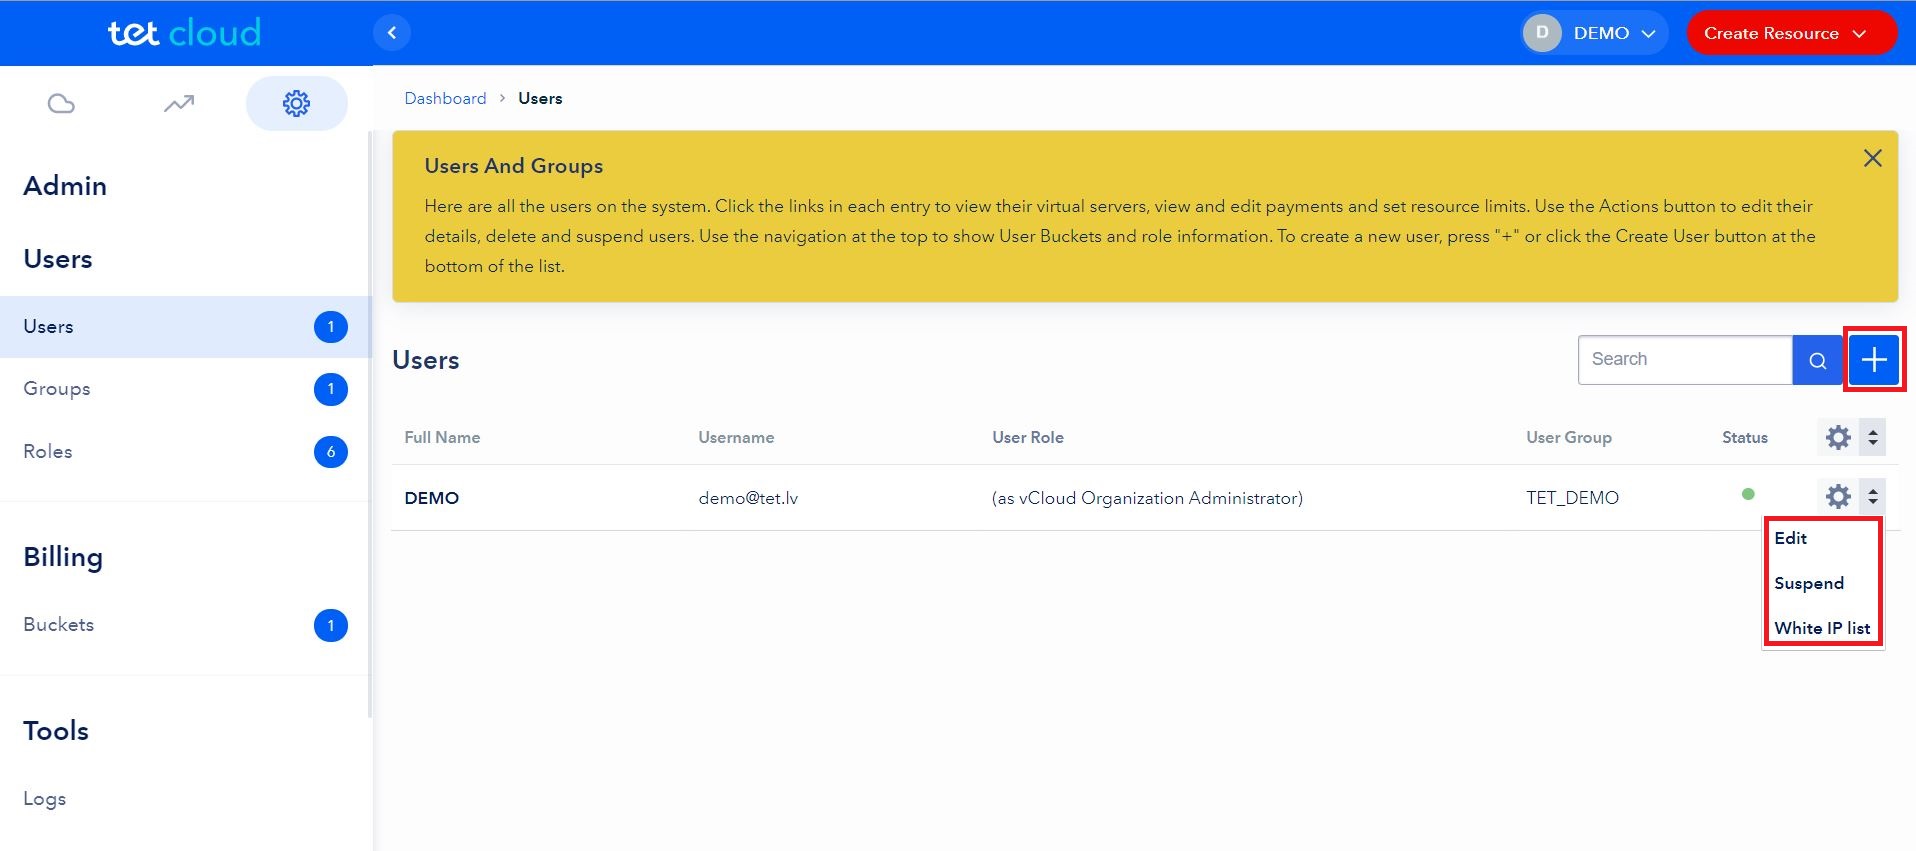
Users
In the “Users” section you can see the list of current Organization Users.
You can apply the following actions for the specific users:
- Edit (allows you to edit users settings. For more detailed information please refer to the “Users -> Edit User” section of this manual)
- Suspend (suspends specific users account, access to the portal for this user will be restricted until the user gets Resumed by applying the Resume action)
- White IP list (allows you to edit White IPs for specific users and control with this list the access to portal for specific users. For more detailed information please refer to the “Users -> White List” section of this manual)
You can add new User by pressing blue [ + ] button. For more detailed information on how to add new User please refer to the “Users -> Create additional user” section of this manual
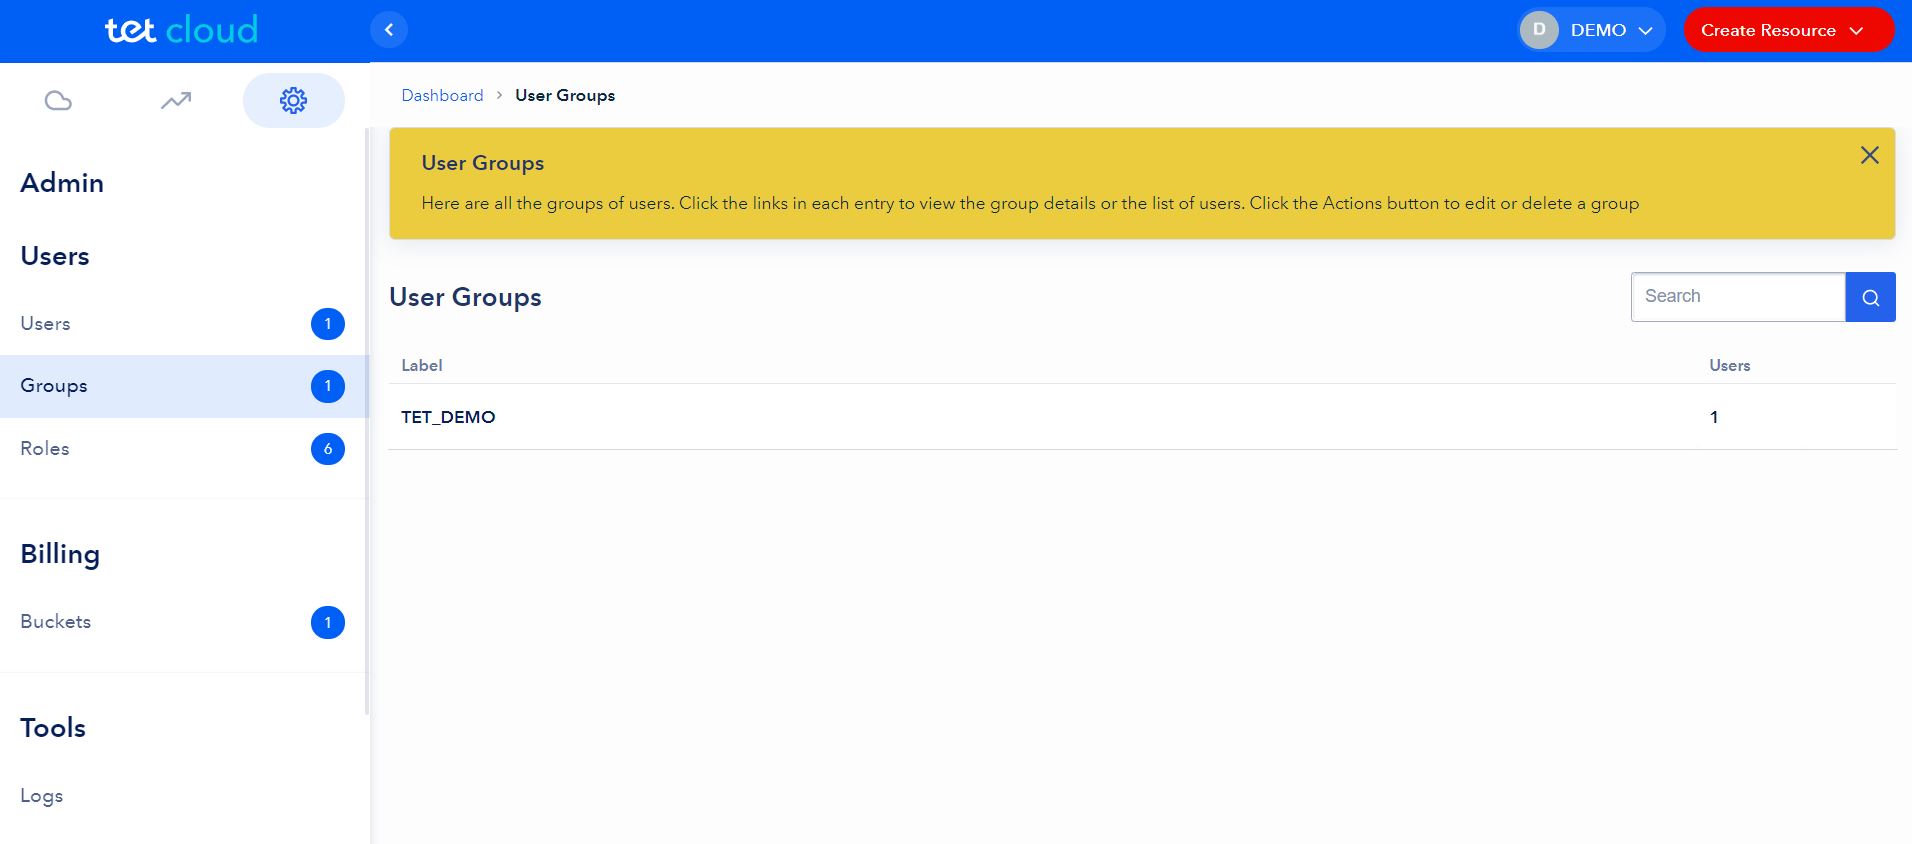
Groups
In the Tet Cloud platform every Customer and their Organization has a User Group assigned. Almost always the name or the User Groups is the same as the name of the Organization.
User is not allowed to modify assigned User Group, only the details of a User Group and number of Users within a User Group. Every new User created by Customer will be located under Customers User Group.
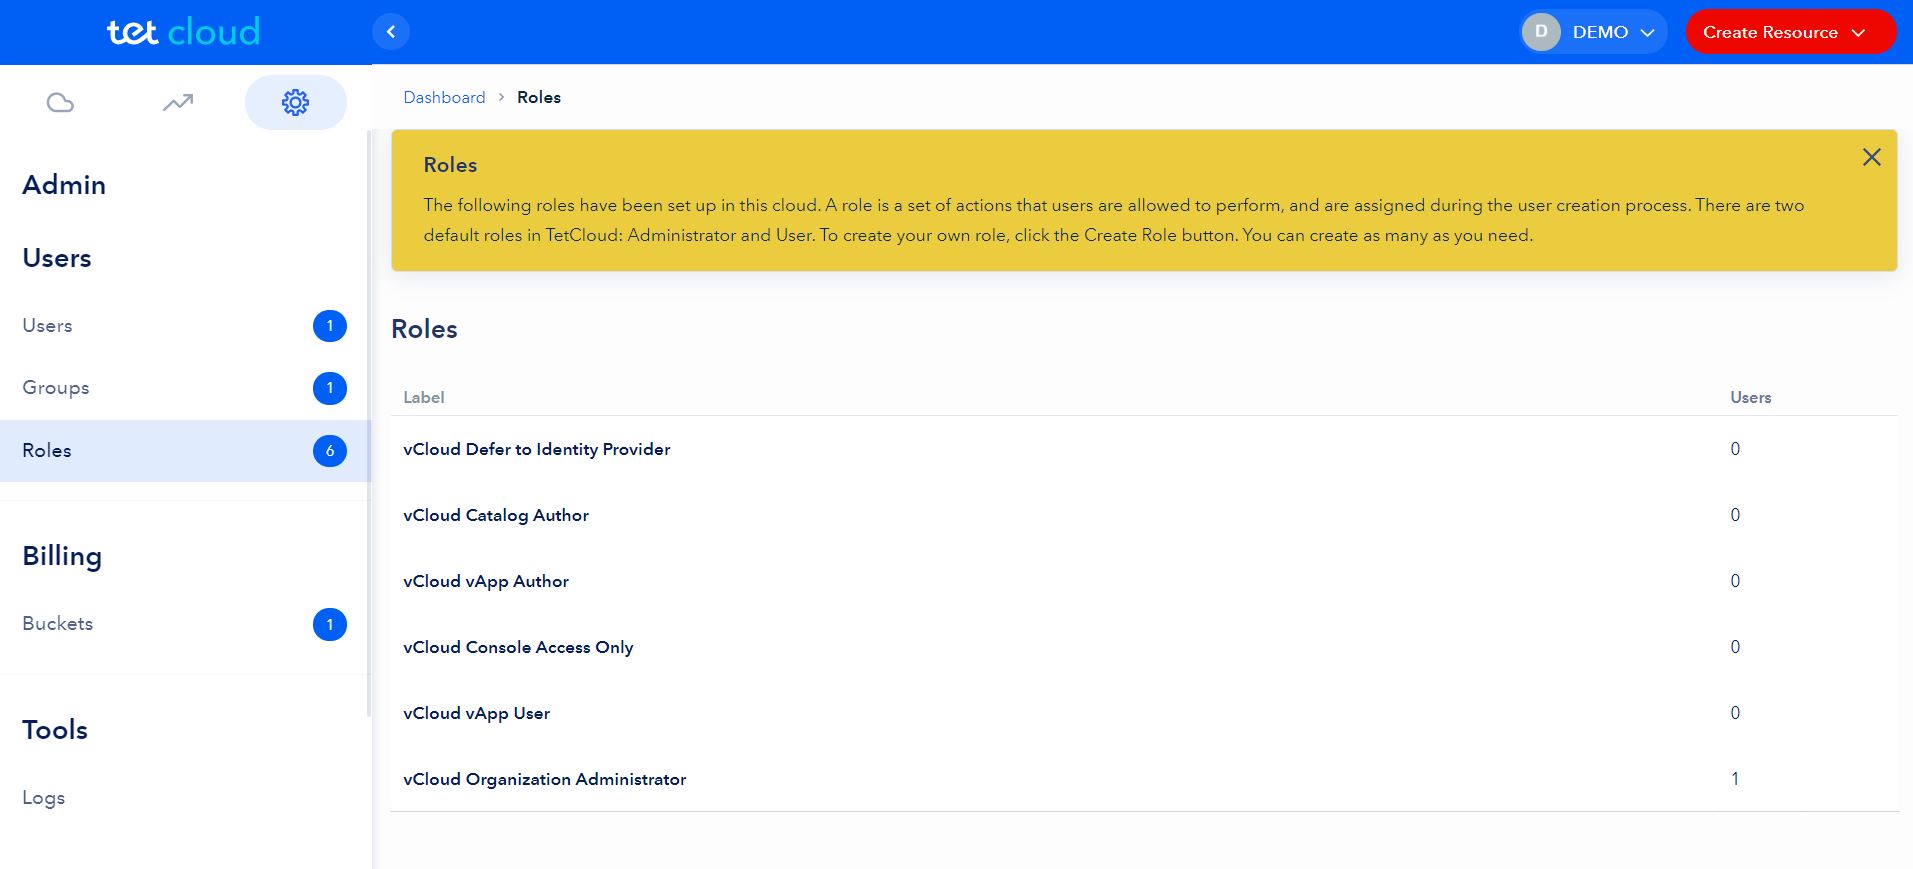
Roles
In the “Roles” section you can see the list of current User Roles available for assignment for new Users. In front of every Role you can see the number of Users in Organization with this Role.
These Roles are directly inherited from VMware vCloud Director and have some minor changes implemented to align with Tet Cloud portal User restrictions policies. By clicking on the Role Label you can see the detailed User Permissions in the Portal.
Detailed information from VMware vCD documentation on Predefined Roles and Their Rights you can here.
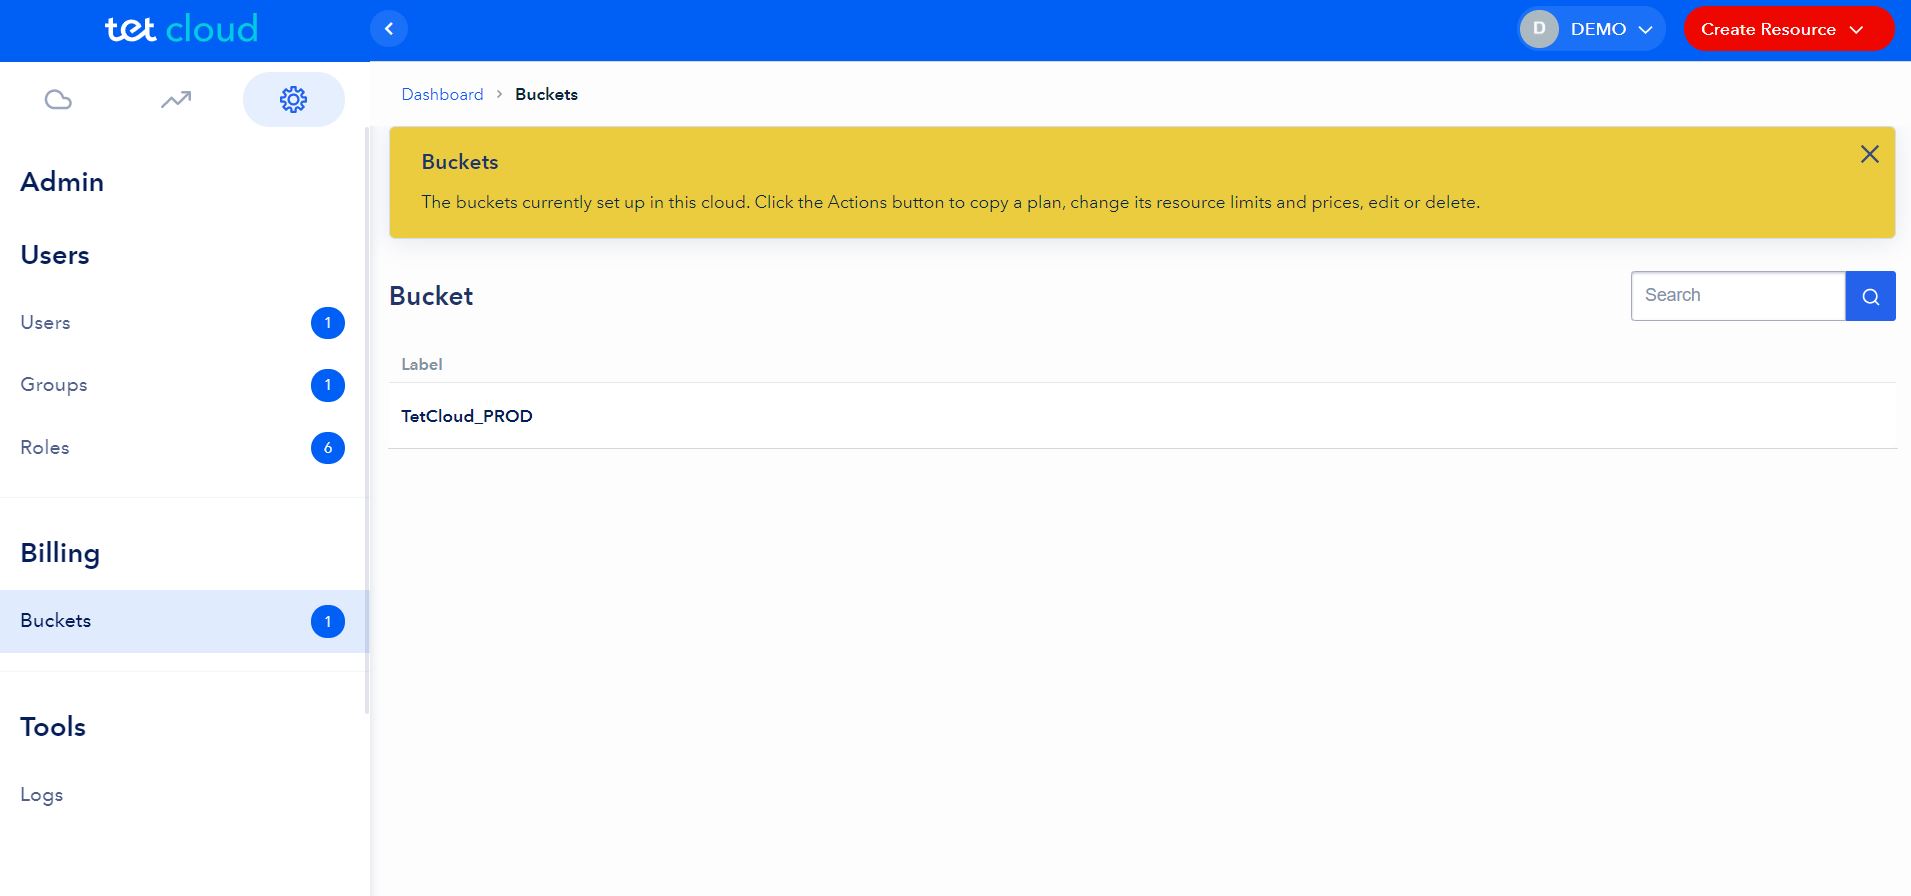
Buckets
In the “Buckets” section you can see current assigned Bucket (tariff plan) for Organization. There are two types of Buckets:
- TetCloud_TRIAL (Bucket with restrictions on virtual resources amount and DDoS protected Internet connection)
- TetCloud_PROD (Bucket without any restrictions)
By clicking on the Bucket Label you can see full list of Bucket restrictions and limits.
NOTE: user is not able to change Organization Bucket.
Logs
In the “Logs” section you can see all currently performing or already performed or failed tasks initiated earlier.
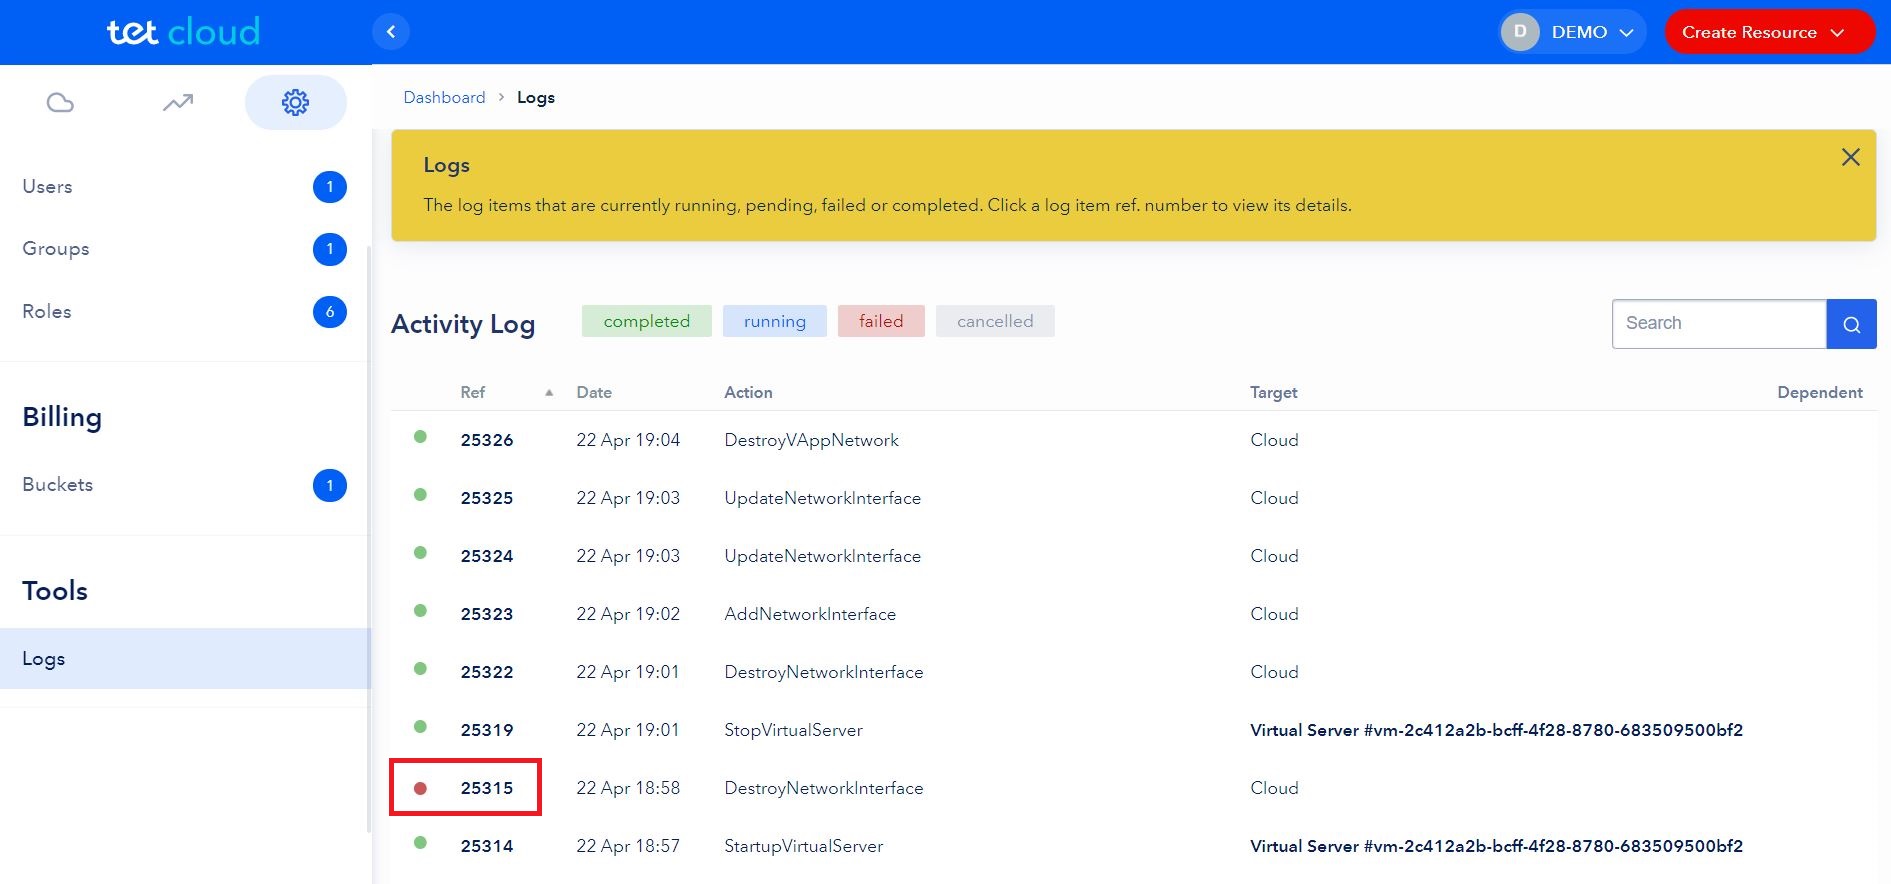
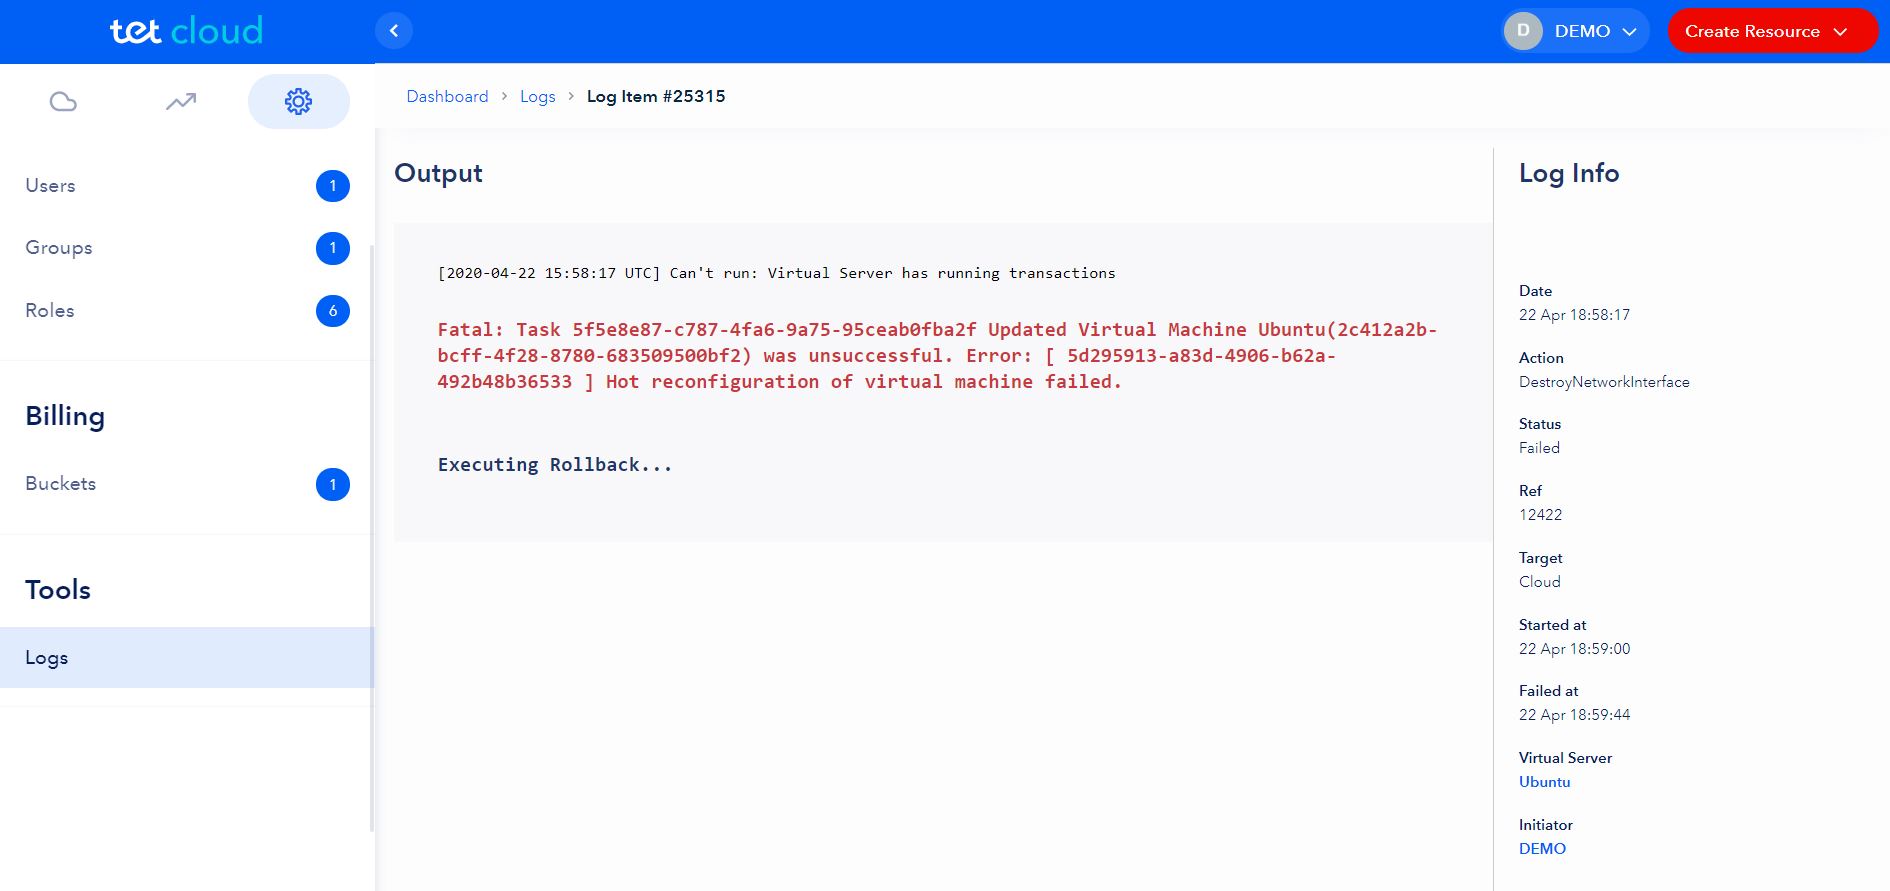
By clicking on the Log Record ID you can view more detailed Log information.
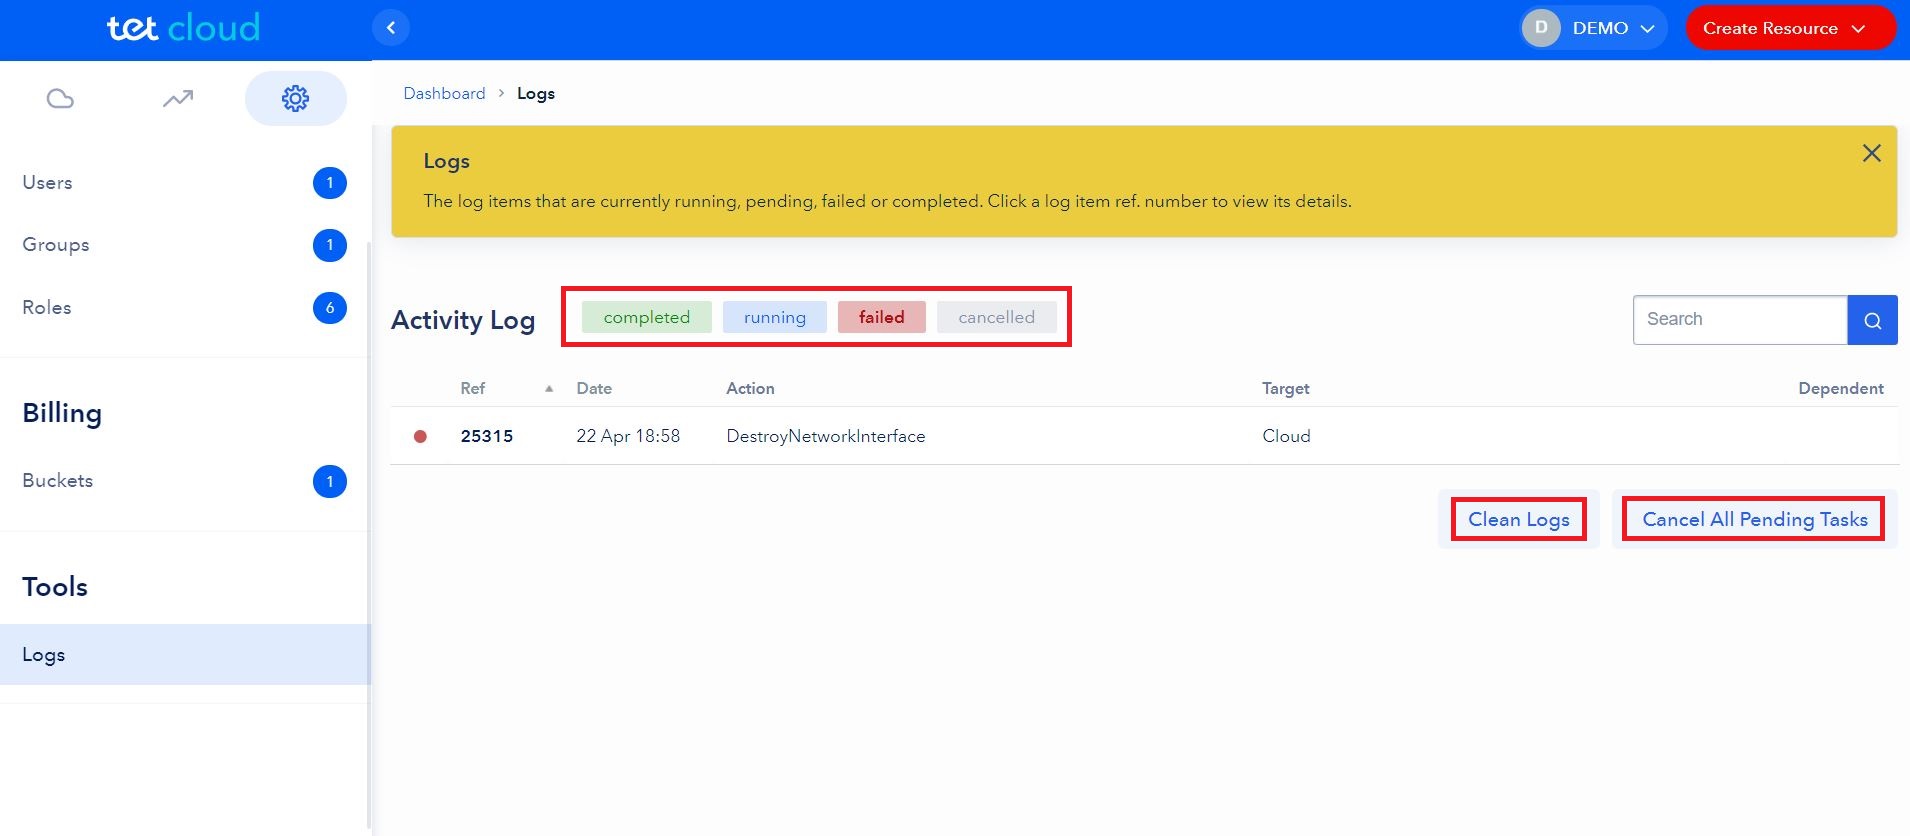
You can filter all Records in the Activity Log by clicking on corresponding Record status you want to view: completed, running, failed or canceled.
By using the action buttons you can “Clean Logs” or “Cancel All Pending Tasks”.
vApps
Read First
Due to VMware and vCloud Director particularity, to create a Virtual Server you need to create a vApp first. In Tet Cloud we have merged these actions and you only need to Deploy a new vApp and a Virtual Server will be created in background.
NOTE: for each Virtual Server you will need to have separate vApp.
STEP 1. Deploy New vApp
To deploy new vApp you need to go to vApps section in the left menu and press Deploy New vApp or blue [ + ] button. You can also use red Create Resource -> Deploy New vApp button, which is always available in Top Menu from any section of the portal.
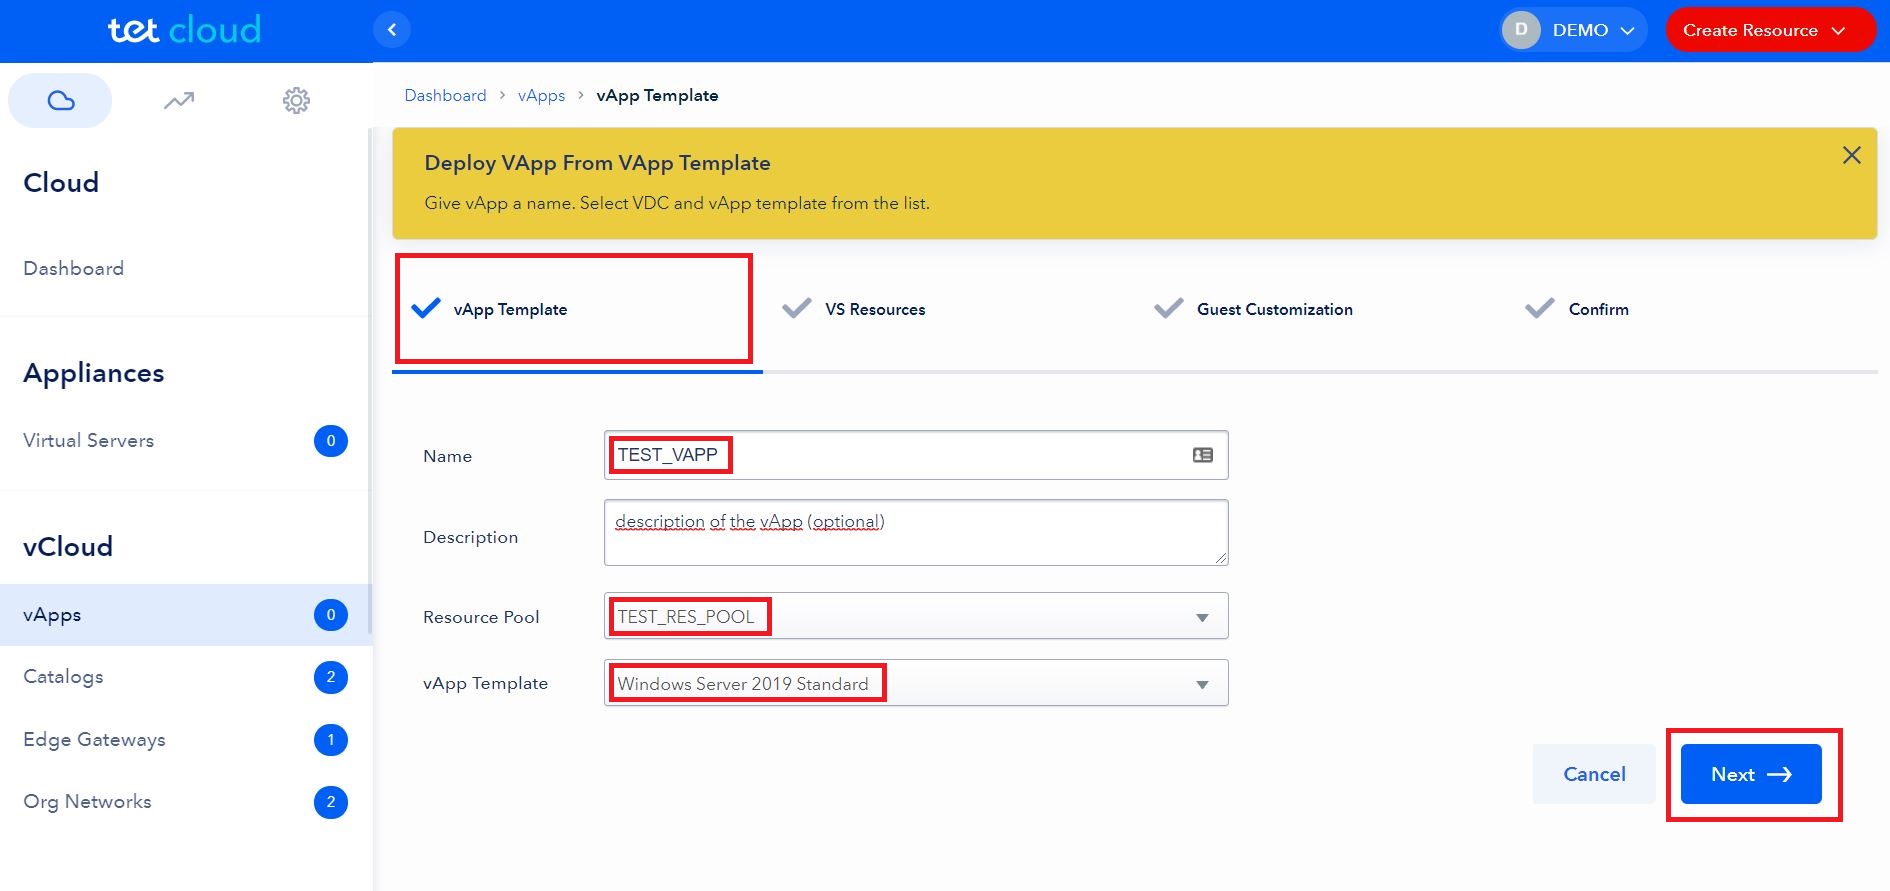
On the first step (vApp Template) you need to give a Name and Description (optional) for a vApp you create and define a Resource Pool, in which vApp will be created and select a proper Operation System Template from the drop down list.
NOTE
vApp can be created in any Resource Pool, if you have several Resource Pools with different vCPU speed (Standard or High-Perf), or for different projects. For more detailed information on Resource Pools please refer to the Navigation in the portal MAIN page (Cloud, Appliances, vCloud) -> Resource Pools section of this manual.
STEP 2. Manage VS Resources
In the next step you need to click the OS Template name to open the list with additional Virtual Server parameters.

- Label (name of the Virtual Server. We advise to change the default name, so you can later identify servers in the list. Label can be changed later, after the VS is deployed);
- CPU Cores (number of vCPUs to be assigned to VS). Maximum number of vCPU cores per one VS is 32;
- Сores per Socket (amount of vCPU Cores per one Socket, e.g. if you have 4 Cores you can specify, how these will be presented to VS OS: 1CPU with 4 Cores, 2 CPUs with 2 Cores each or 4 CPUs with one Core each);
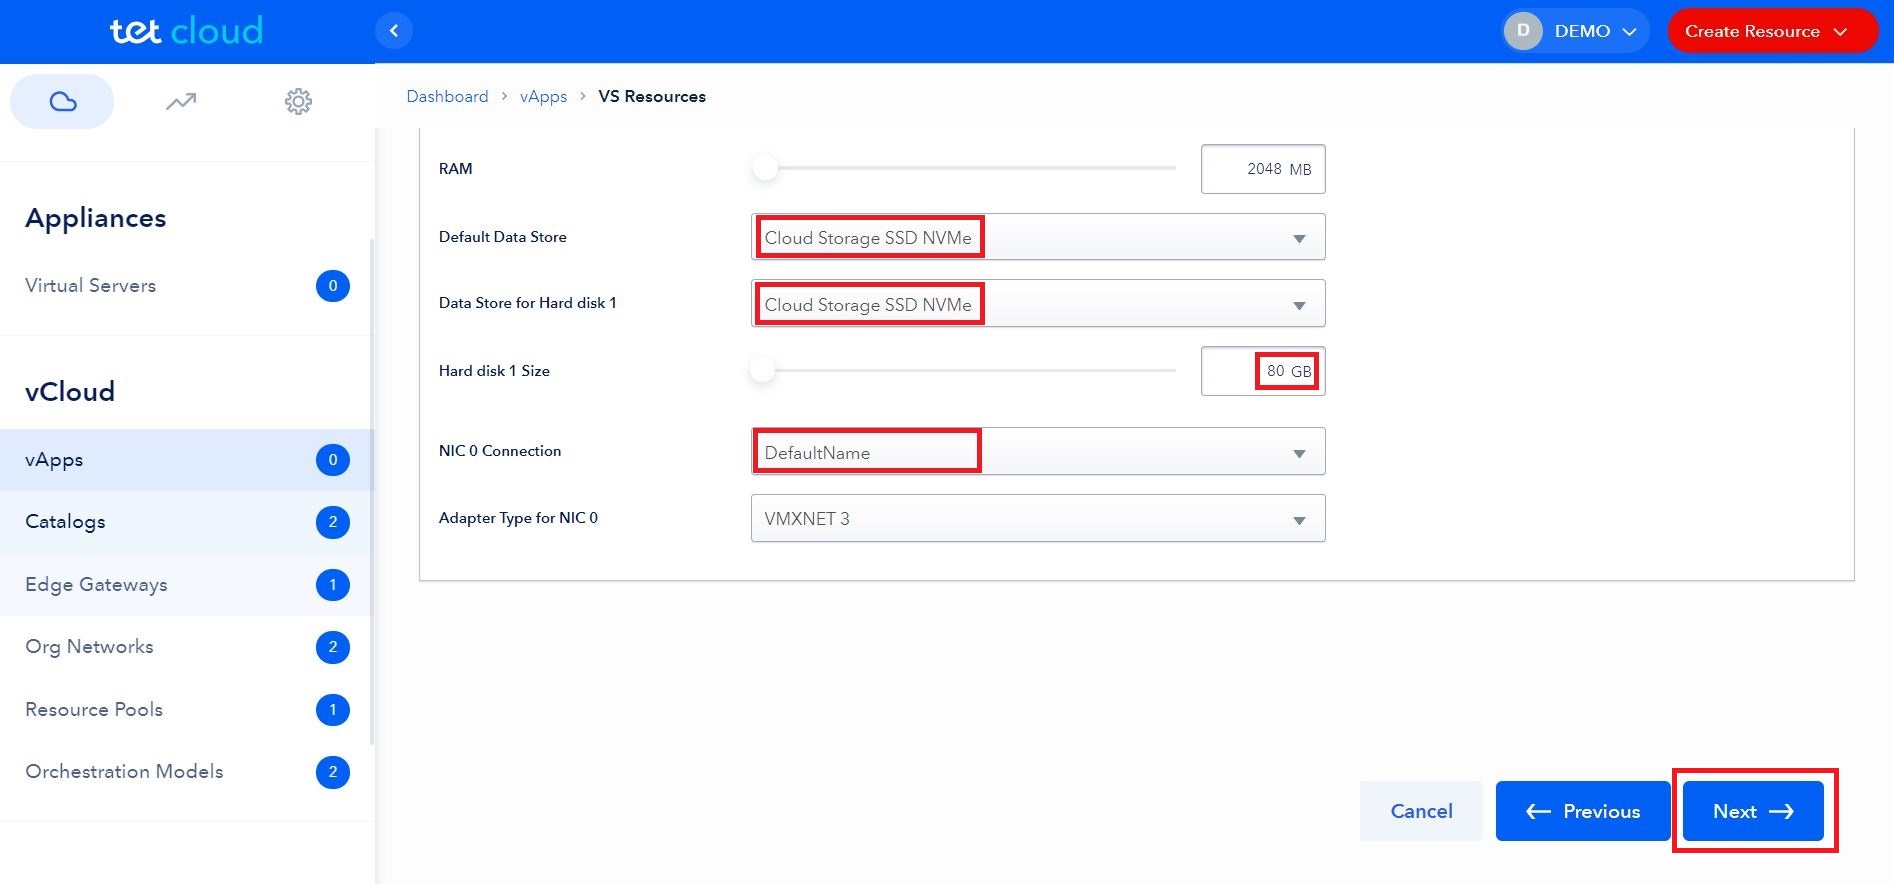
- RAM (amount of RAM to be assigned to VS). Maximum amount of RAM per one VS is 262144Mb or 256Gb.
- Default Data Store (this parameter specifies where VS RAM swap file will be created. Selected Data Store type will be as a default Data Store to all the new HDDs you will create later for this VS, but it will be still possible to change the Data Store type during new HDD creation process);
- Data Store for Hard Disk 1 (Data Store on which the Root disk of VS will be placed, possible to change later);
- Hard Disk 1 size (size of the Root (main, system) disk of a VS). Disk can be resized later. You will be able only to increase the disk size. Disk size decrease is not supported by VMware.;
- NIC 0 Connection (select from the drop-down menu the name of vLAN, which needs to be connected to NIC 0 port). If you select None, then no Network will be attached to VS, but you can do it later;
- Adapter Type for NIC 0 (always leave default Network driver interface - VMXNET 3).
NOTE
Default Hard Disk 1 size depends on the Operating System type Template you selected before. For Linux OS the minimum Hard Disk 1 size is 20Gb, for Windows Server OS the minimum is 80Gb, according to vendors minimal system requirements. Hard Disk 1 default minimum size cannot be decreased.
STEP 3. Guest Customization
In this step you need to click the VS name (defined in previous step) to open the list with OS Guest Customization parameters.
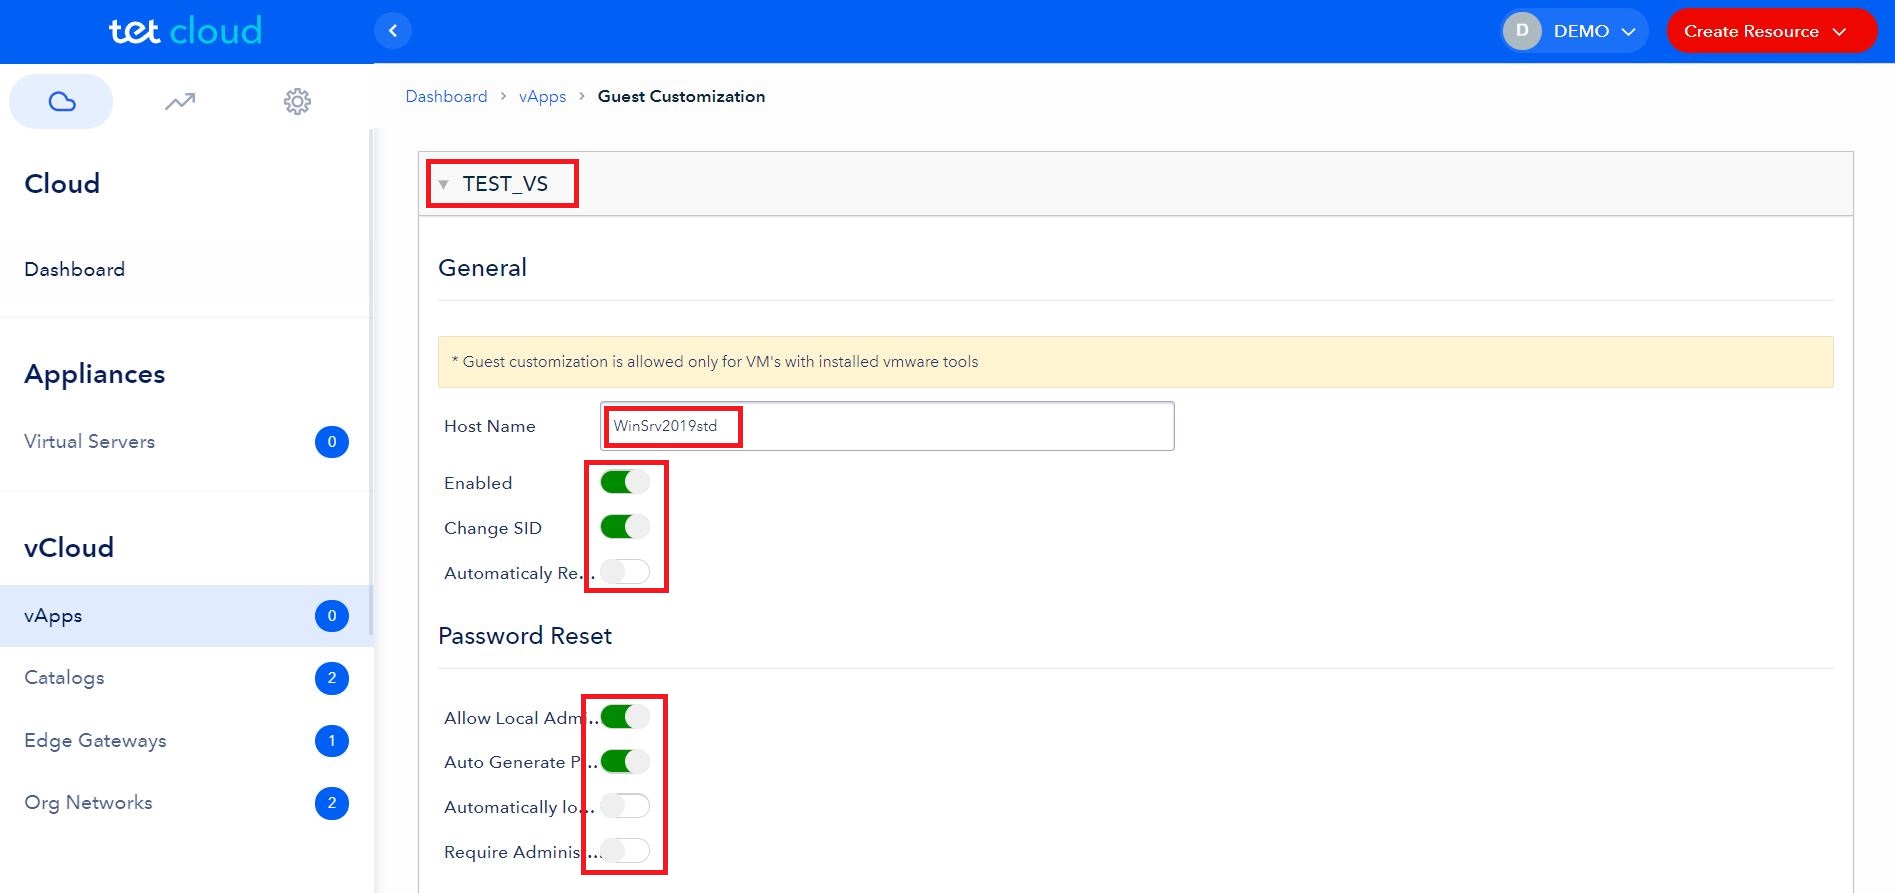
- Host name (specify the host name for VS);
- Enabled (this button defines either Guest Customization enabled or not, leave ON, as by default);
- Change SID (you can change SID for the OS Templates which allow you to do this);
- Automatically Restart (when the option is Enabled, VS will restart after the Guest Customization is done);
- Allow Local Admin Password (this option allows you to define password for local admin account);
- Auto Generate Password (if this option is Enabled, then admin password will be autogenerated, or you can specify it manually by Disabling this option, then additional field for Admin Password specification appears);
- Automatically log on as Administrator (if option is Enabled, then after Guest Customization is done, VS console will stay unlocked with Local Administrator credentials);
- Require Administrator to Change Password on First Logon (if option is Enabled, OS will ask Administrator to change password after first logon);
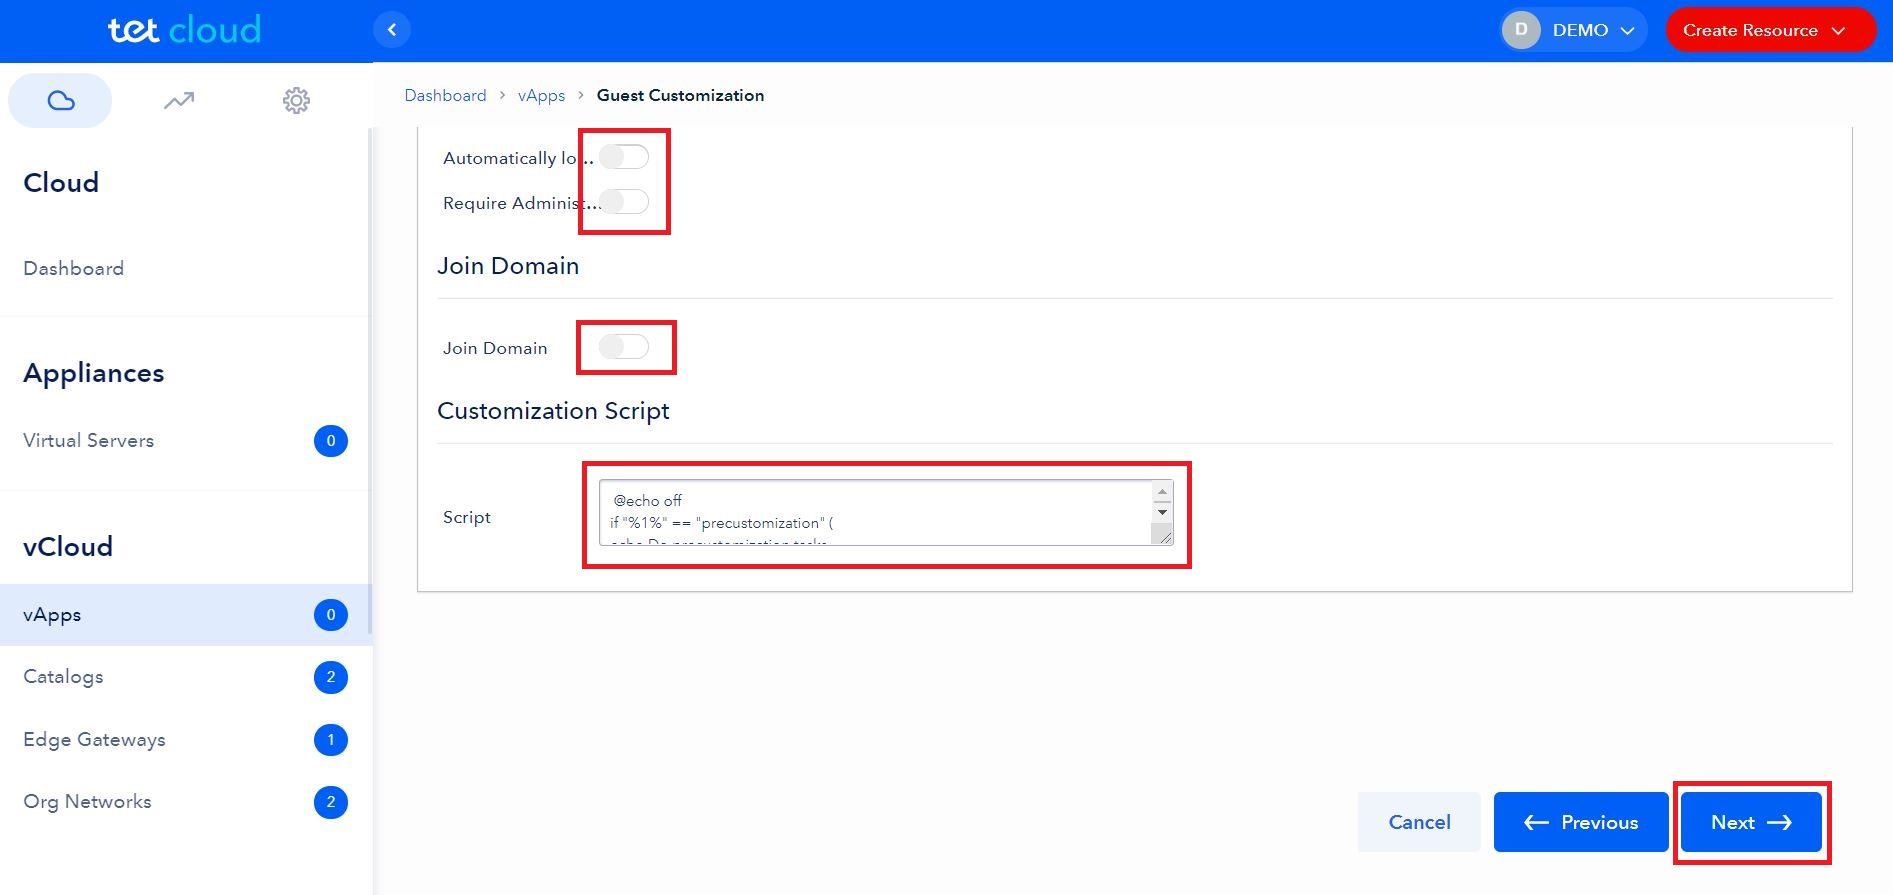
- Join Domain (this option appears for Windows Server OS Templates only, you can schedule to join a domain while creating VS, if this option is Enabled, you will be asked to fill additional fields with Domain credentials);
- Customization Script (leave the default script unchanged. The script is used to perform Guest Customizations tasks on VS. Any changes in the script may directly impact the correct execution of Guest Customization as a result you can get faulty created VS);
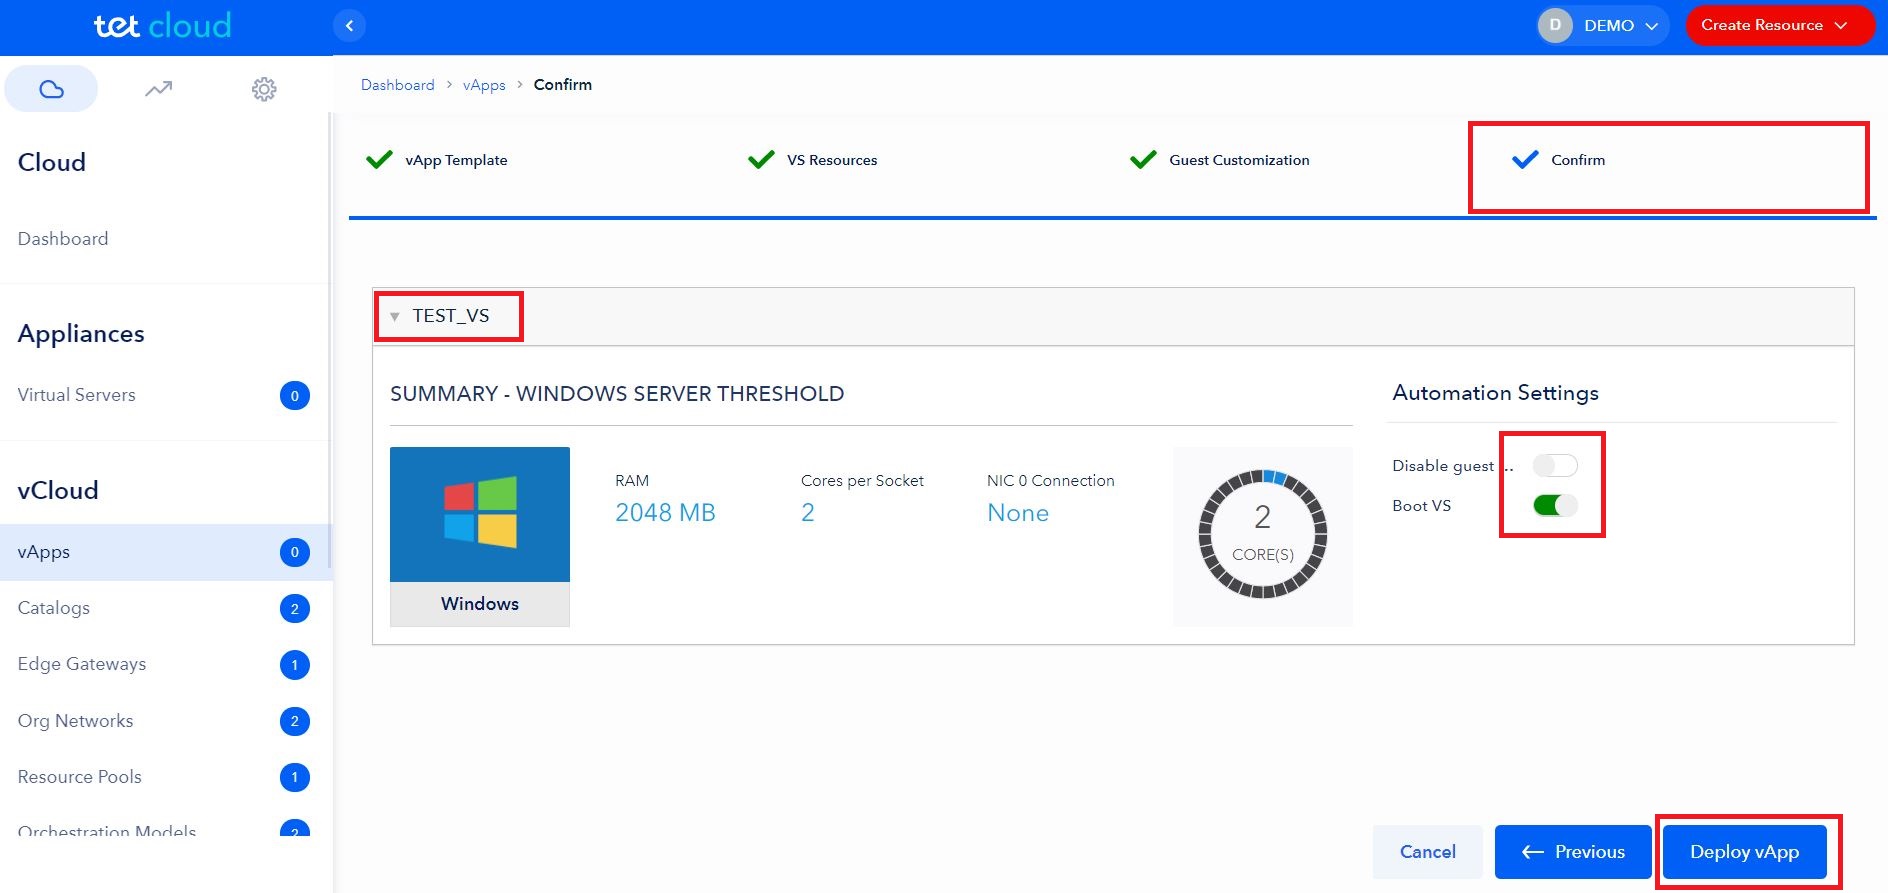
STEP 4. Confirmation
In this step you can view Summary and double-verify the VS parameters before creating the VS. To do this you need to click the VS name (defined in previous step) to open the list with VS parameters (selected OS, RAM, CPU and NIC).
NOTE
On the right side of the Summary, there is an Automation Settings menu, with the following options:
- Disable guest customization (if this option is Enabled, then Settings defined prior in STEP 3 – Guest customization will be Disabled, leave this option Disabled as it is by default);
- Boot VS (if this option is Enabled, then VS and OS will be automatically booted after deployment);
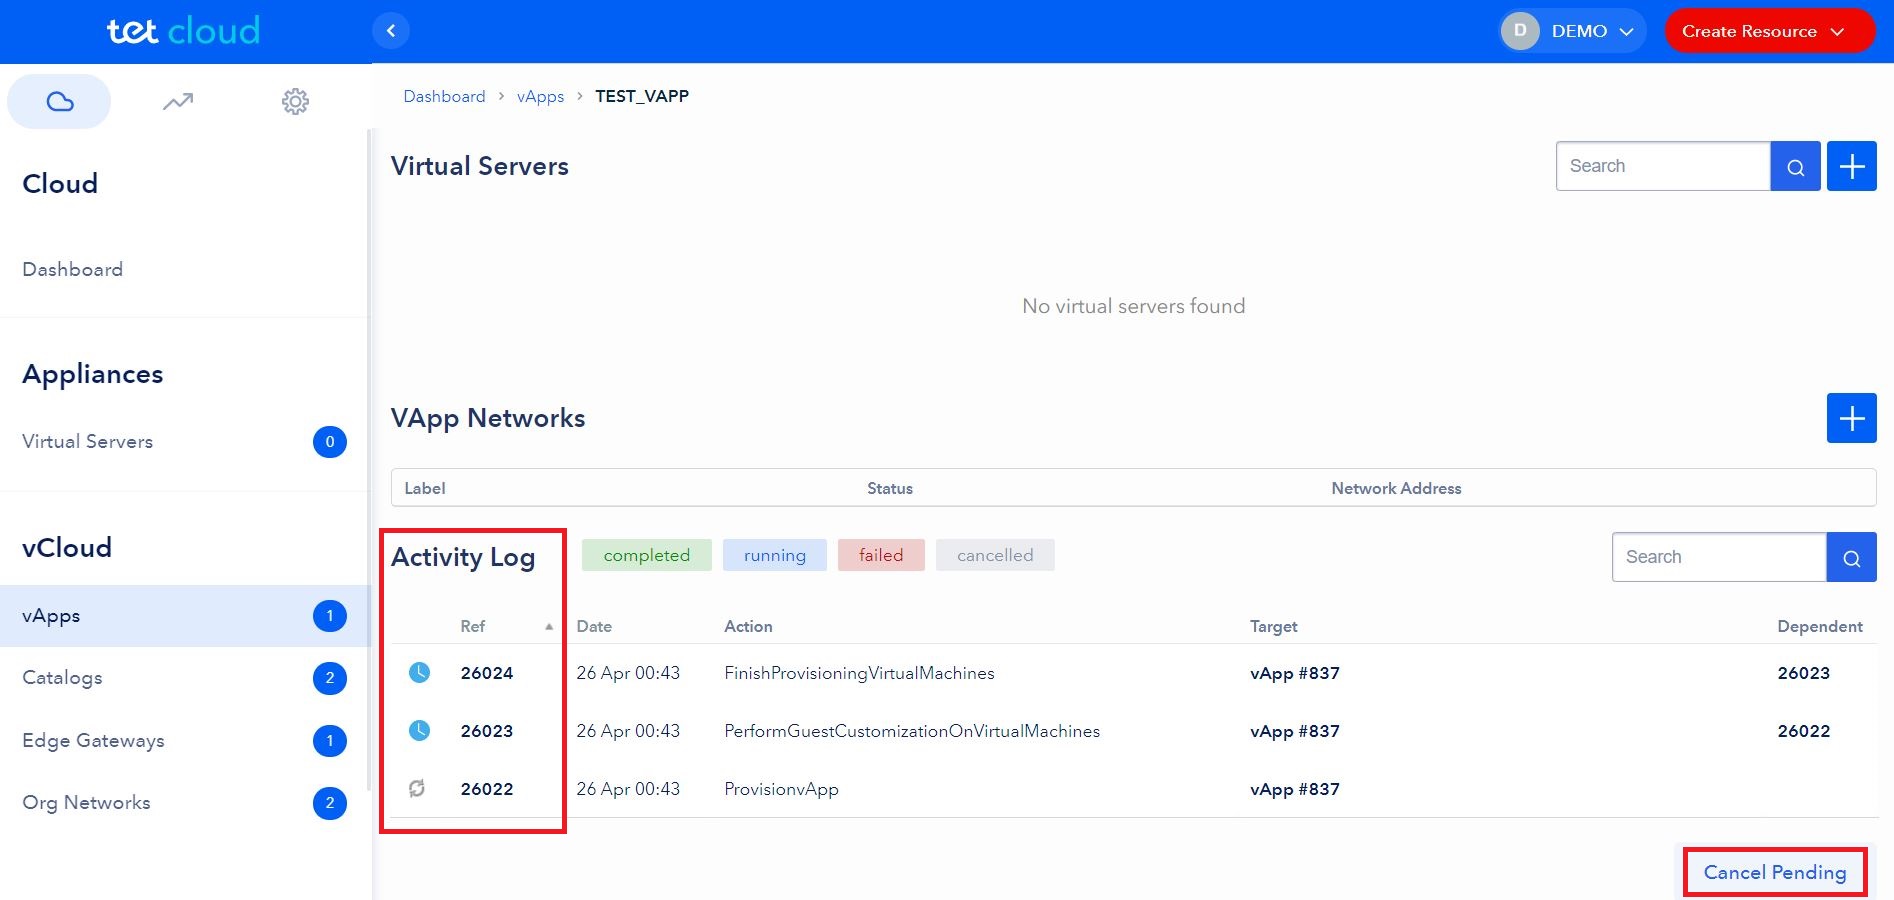
After the Deployment of vApp is confirmed you will be redirected to vApps section and you are able to track the vApp Deployment process by viewing Activity Log with currently ongoing and pending (dependent) tasks.
NOTE: You can cancel all ongoing and pending tasks by clicking Cancel Pending button in the bottom of the page.
NOTE: Depending on the OS type and Guest Customization settings, after deployment, VS can restart automatically up to 5 times, performing Guest Customization tasks. Expect all OS customization tasks to be finished within first 5-10min, after VS is deployed.
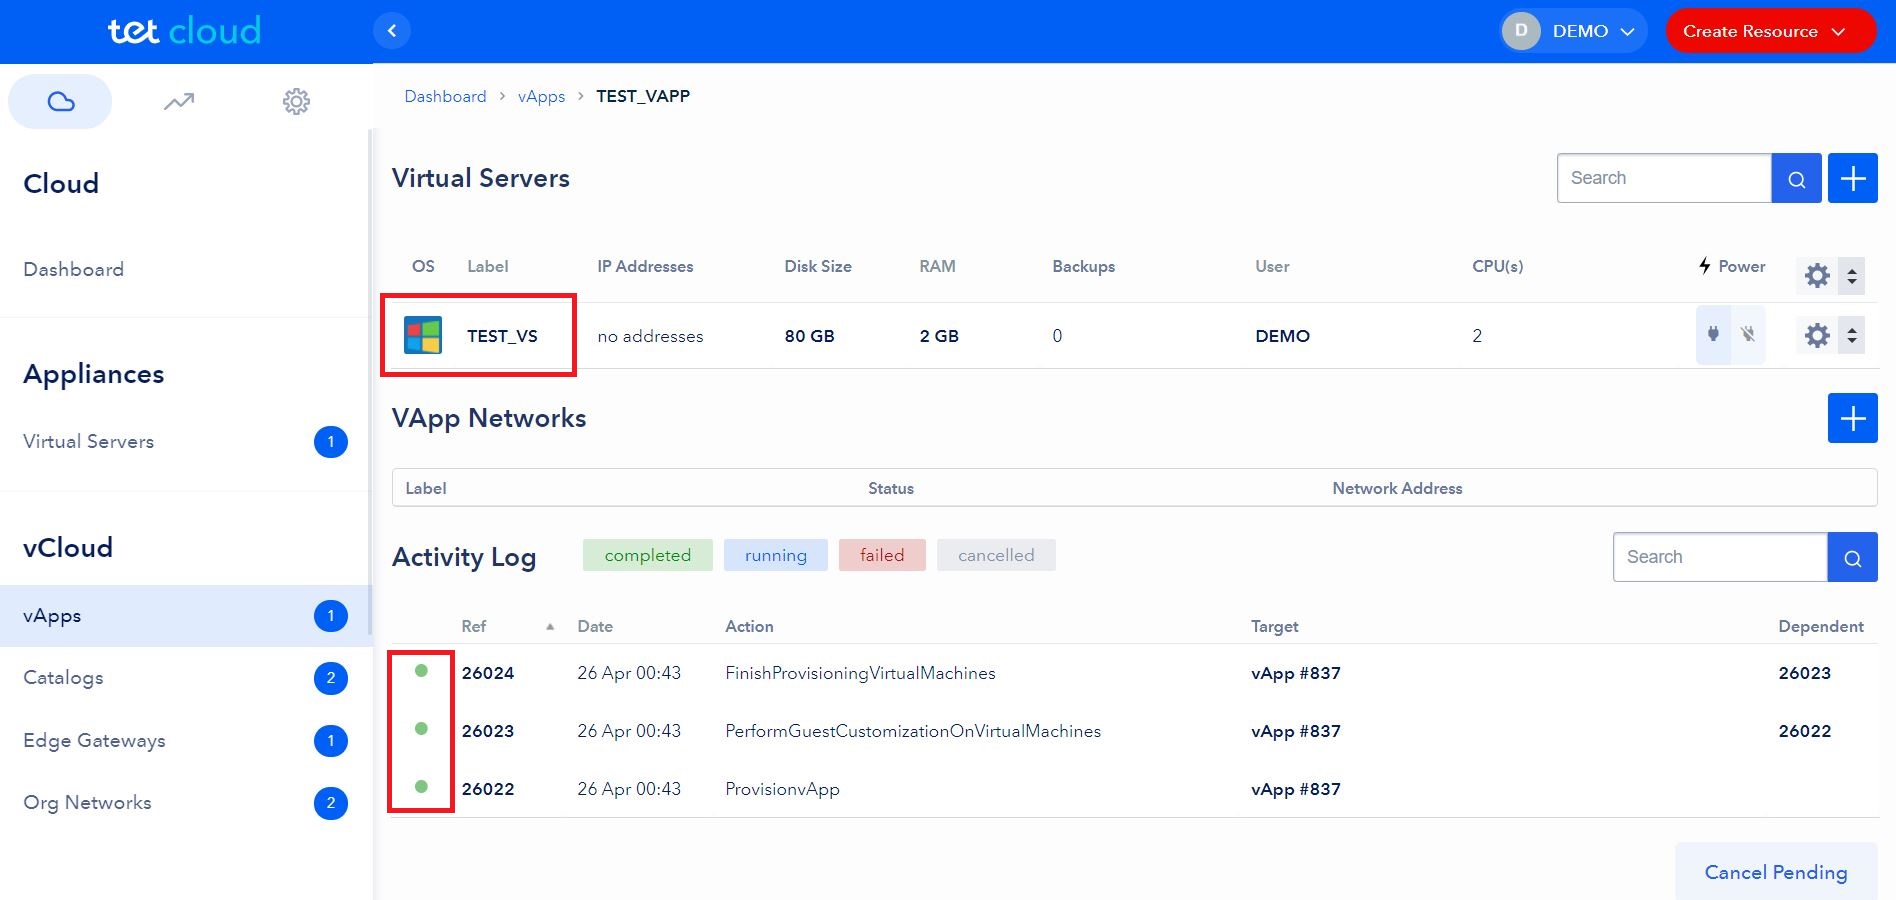
When the VS is successfully created, all tasks from Activity Log will have green status dot in front of each task and recently created VS will appear in the Virtual Servers list. For more detailed information on how read Activity Log and Log records, please refer to the Logs section of this manual.
Windows Server OS activation
Windows Server OS provided within Tet Cloud Template has integrated task for OS activation, as soon as VS will have outgoing connection to Public Internet to reach Microsoft activation servers the OS will activate automatically, and the automatic OS activation script will delete itself from OS scheduler.
Catalogs
How to create new personal Catalog
You can create new “Catalog” by clicking “New Catalog” button or blue button with [ + ]. In order to successfully create your own “Catalog”, you need to specify:
- Label (name of the Catalog);
- Description (description of the Catalog – optional field);
- Organization (under which Organization unit Catalog should be created);
- Resource Pool (if user has multiple Resource Pools created, then proper Resource Pool should be selected, because storing images and templates in Catalog consumes disk space (Gb) so the user should specify within which Resource Pool disk space should be utilized).
- Data Store (with this selection user specifies the disk type where all the Catalog data will be stored)
When the Catalog is created, you can upload various vApp Templates or Media (ISO Images) to Catalog, by clicking Upload vApp Template (in vApp Templates selection) or Upload Media (in Media selection)
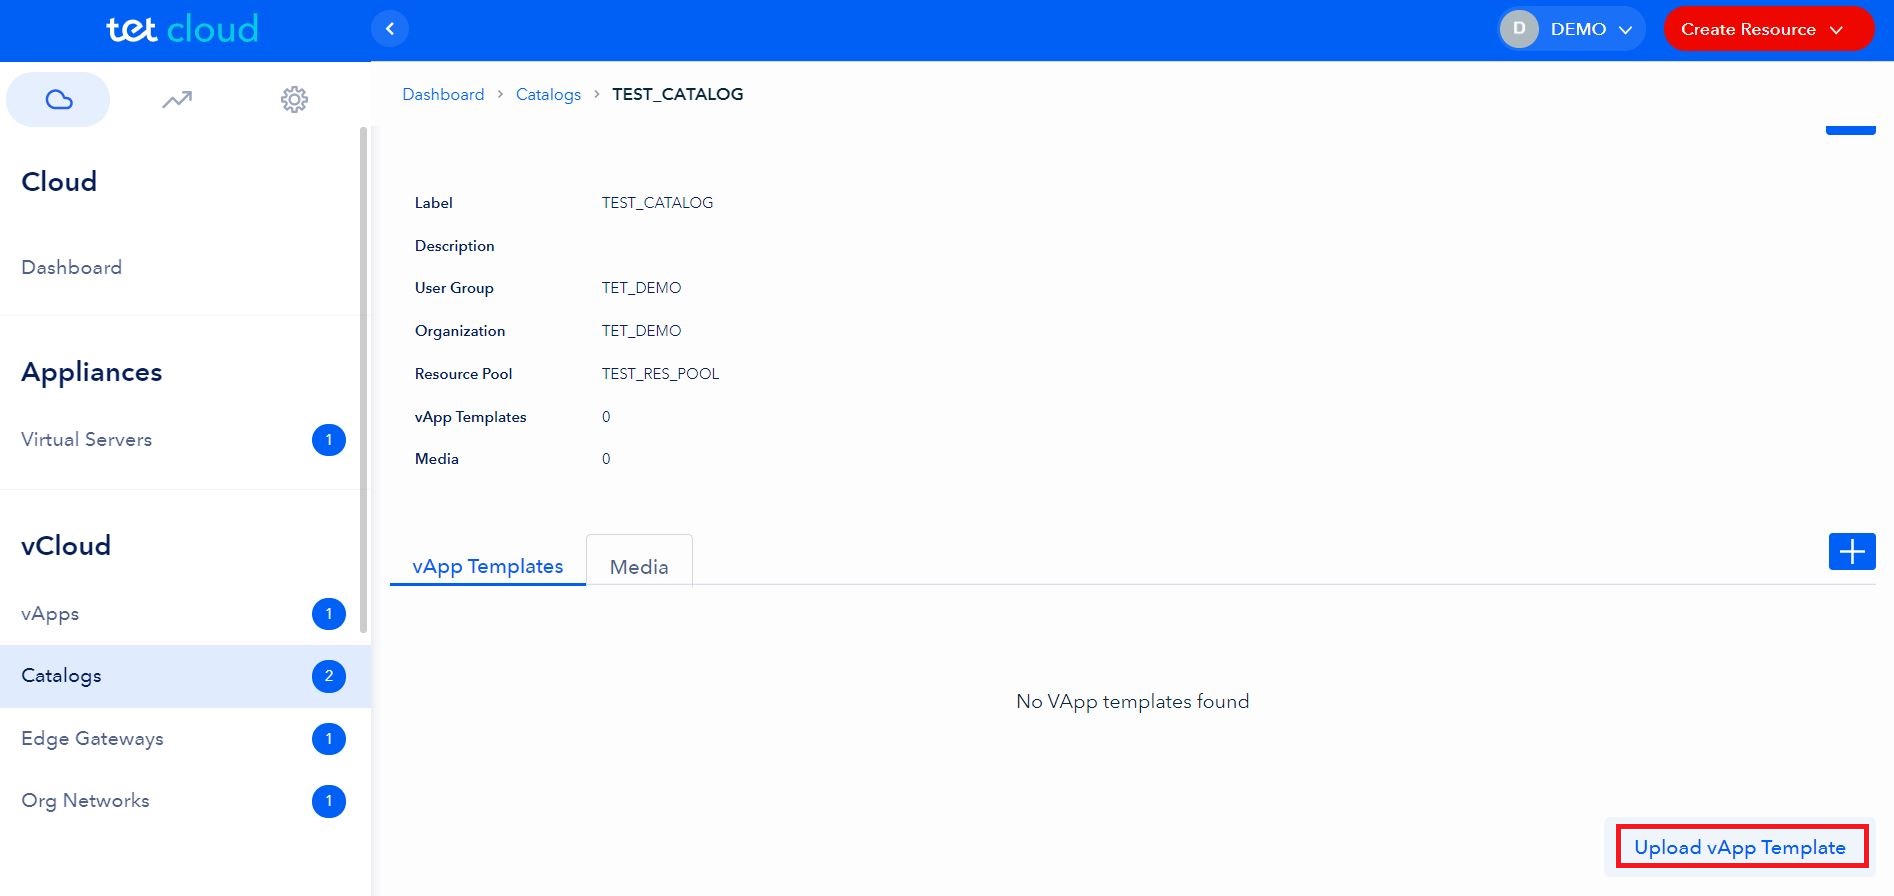
When selecting a file upload function in the next step you should specify a Label for an uploaded content, then specify a file path on local storage by licking Browse button. When the proper file is selected click the Upload button, after that the upload process progress bar should appear
NOTE: Do not close the browser during upload process, otherwise the upload will fail.
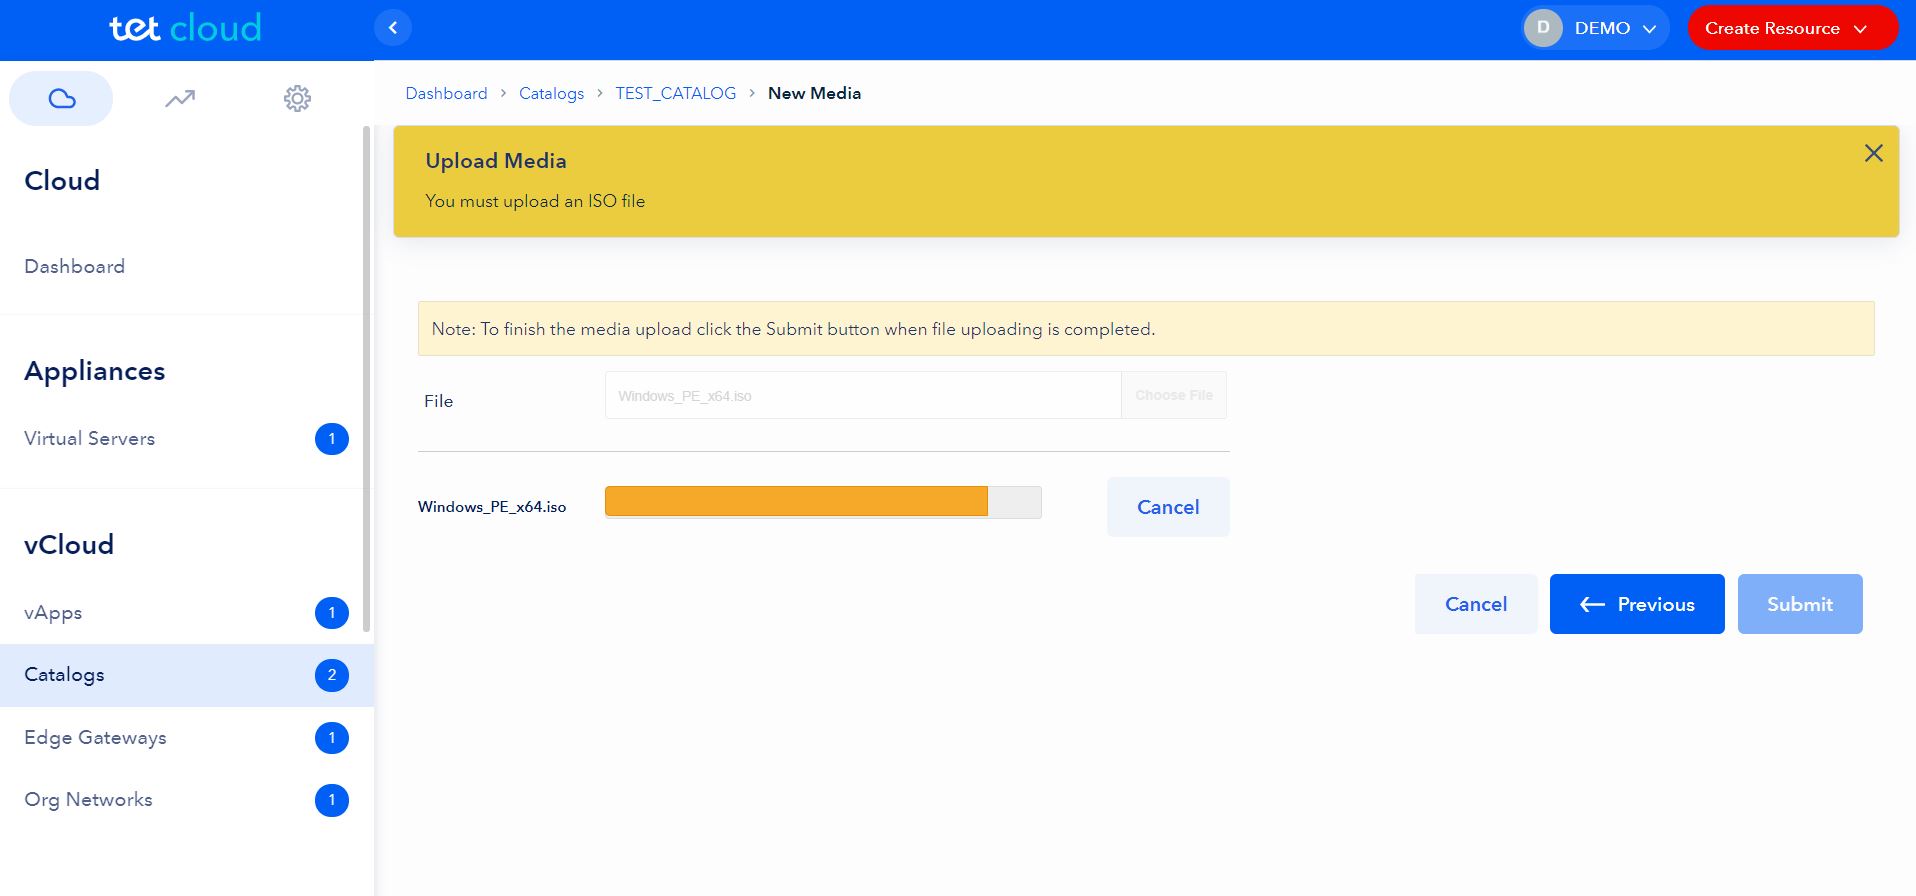
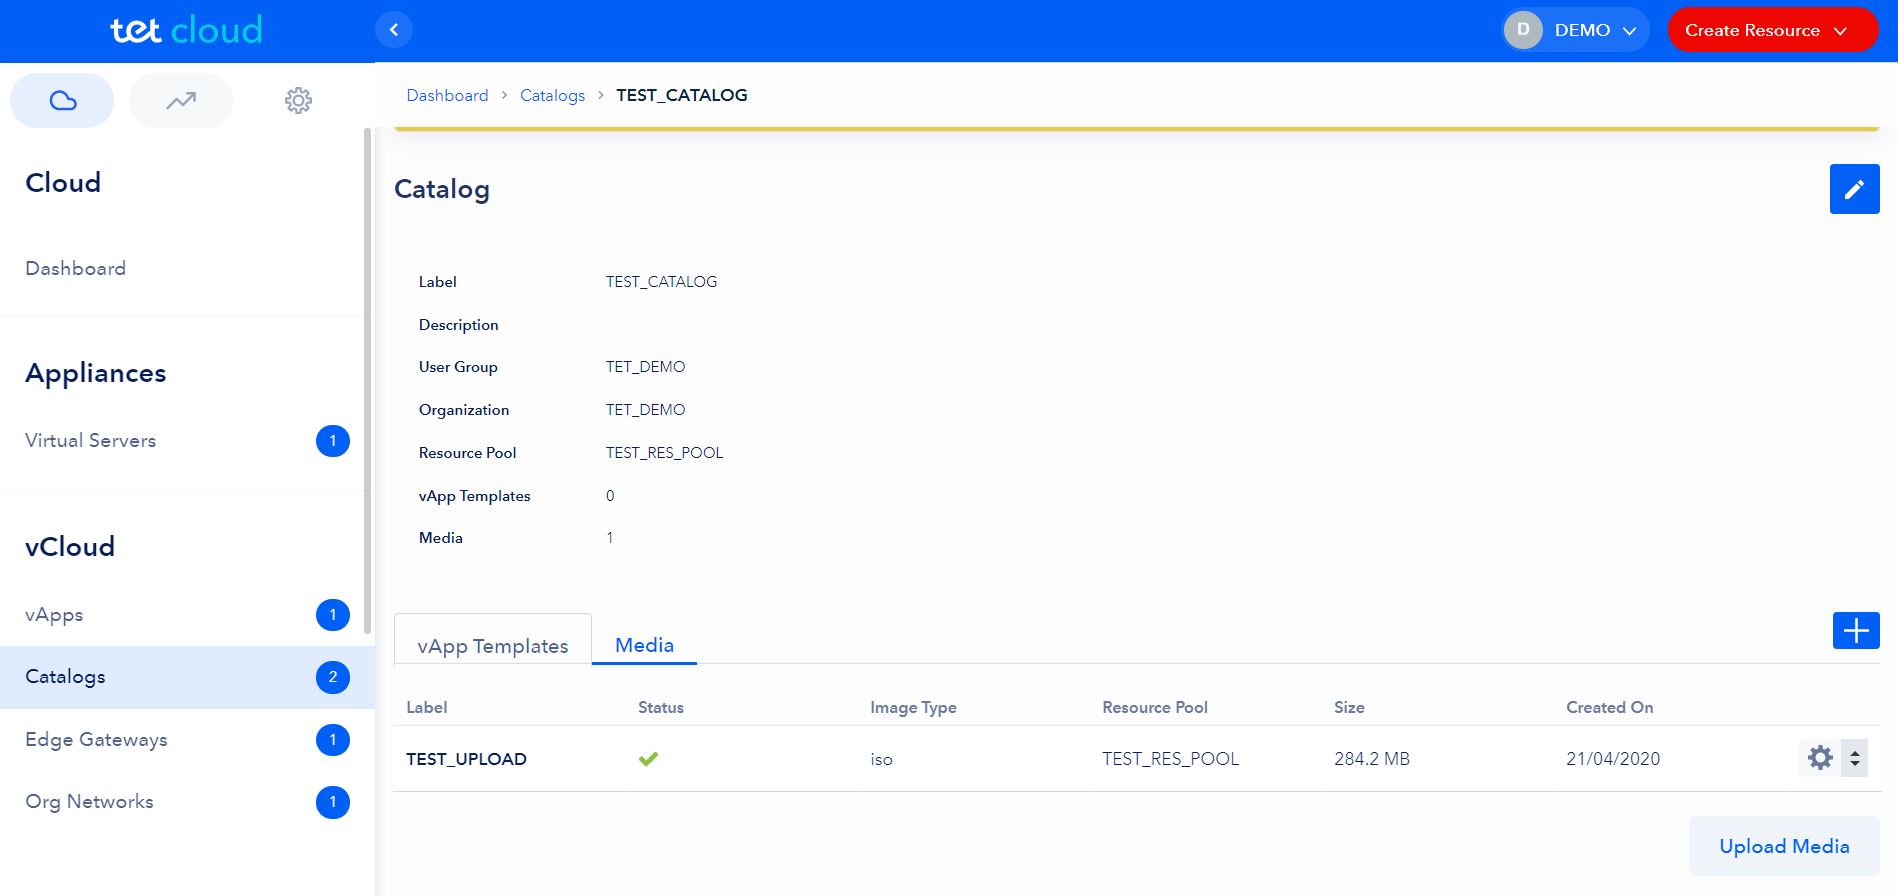
When the upload process is completed, the Submit button becomes active, click the Submit button and you will be able to see uploaded files under the vApp Templates or Media section. By pressing action button for specific uploaded file user is able to Edit (edit Label or Description) or Delete the uploaded file.
EDGE Gateway Services
How to configure Edge Gateway Services
NOTE: please take in mind that due to security reasons all the incoming and outgoing connections on the Edge Gateway are restricted by default. In order to get your Virtual Servers connected to the Internet you will need to configure the Edge Gateway properly.
To configure Edge Gateway Service for specific Edge Gateway, you should go to the Edge Gateways section and click on the specific Edge Gateway Label and then on the Services button.
You will be redirected to the VMware vCloud Director Edge Gateway Services configuration menu, where you can continue configuring relevant rules on your own or using provided examples.
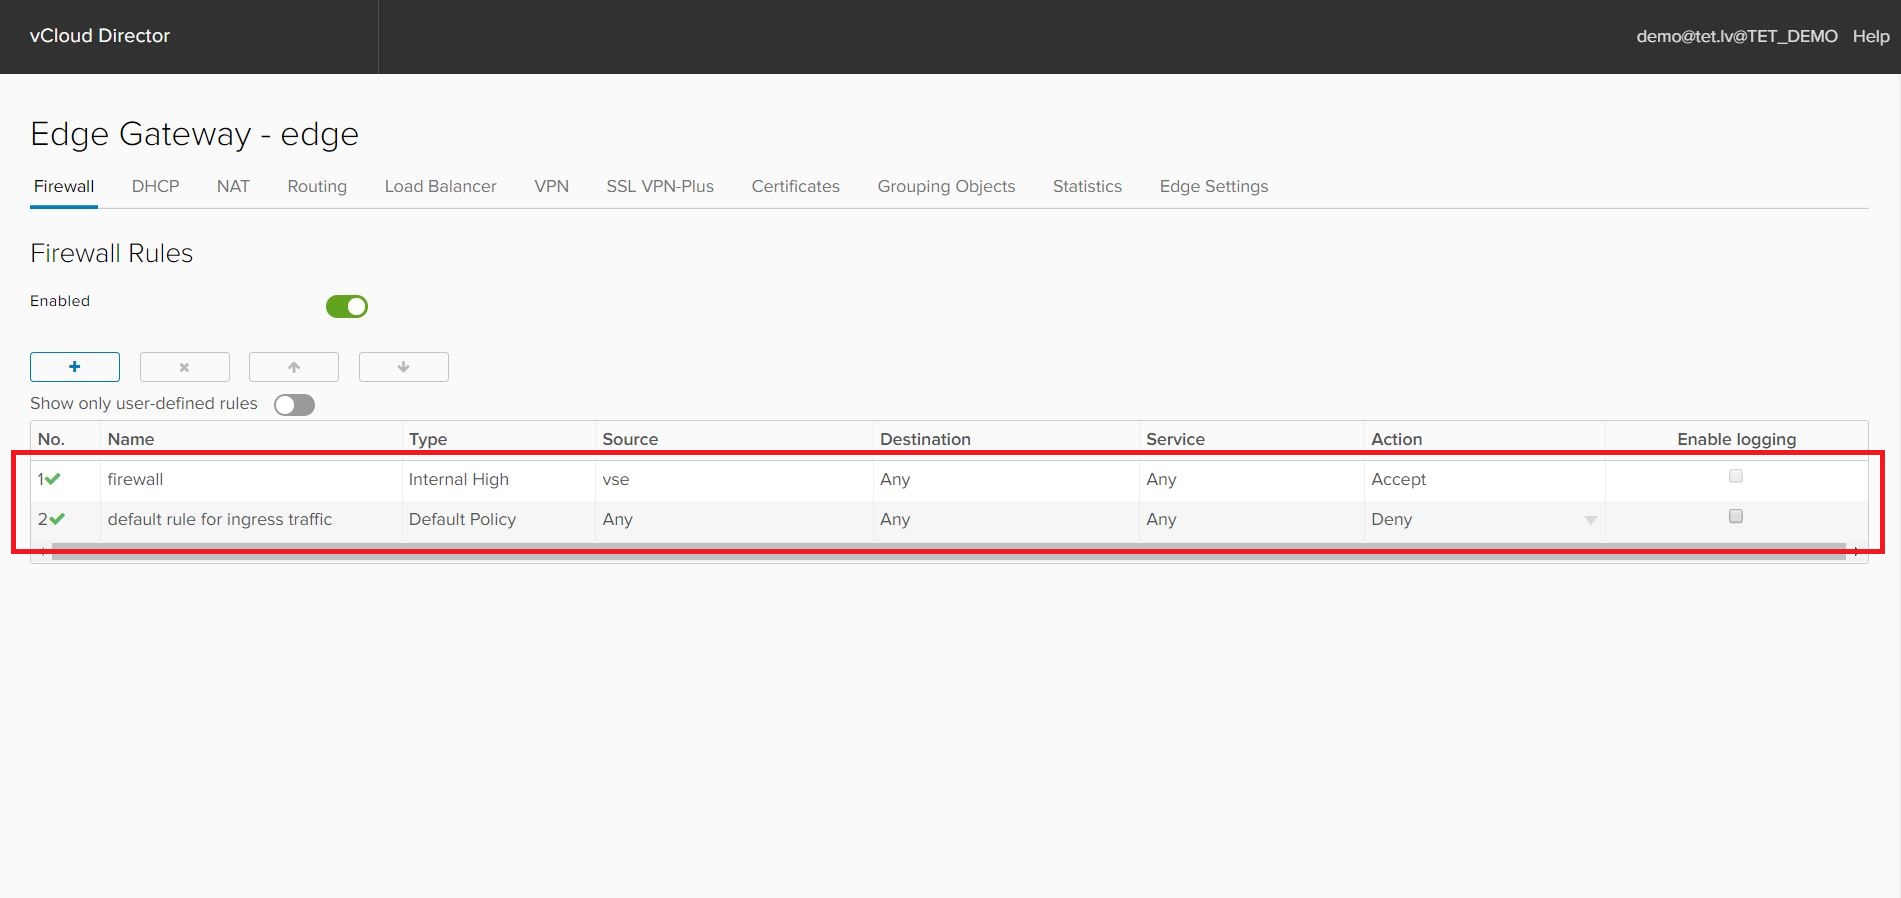
NOTE: Edge Firewall has already 2 preconfigured rules. All rules are divided into following types:
- Internal – this is a built-in rule which cannot be changed;
- Default Policy – this is a built-in rule that defines the default filter behavior for connections that do not fit other rules. Accept - allow such connections, Deny - discard them;
- User – rules created by user.
Open all outgoing connections
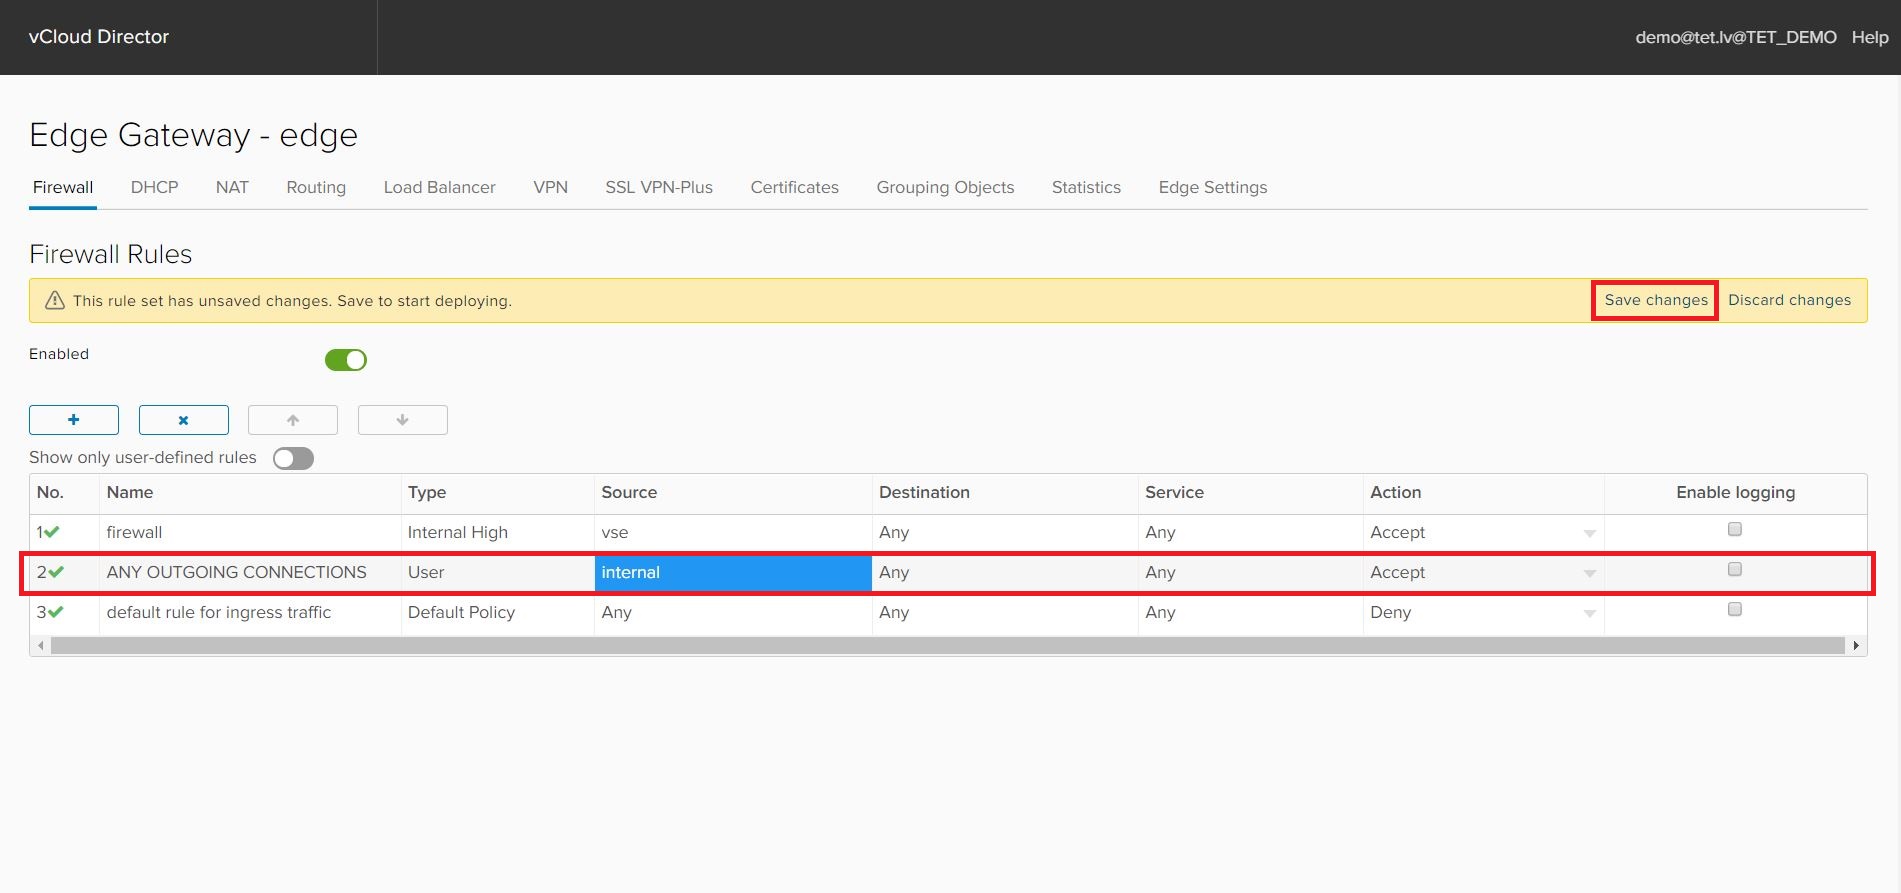
To open all outgoing connections you need to add certain rules to Firewall and NAT sections. To do this, first to the Firewall Tab and add new rule by pressing [ + ] button.
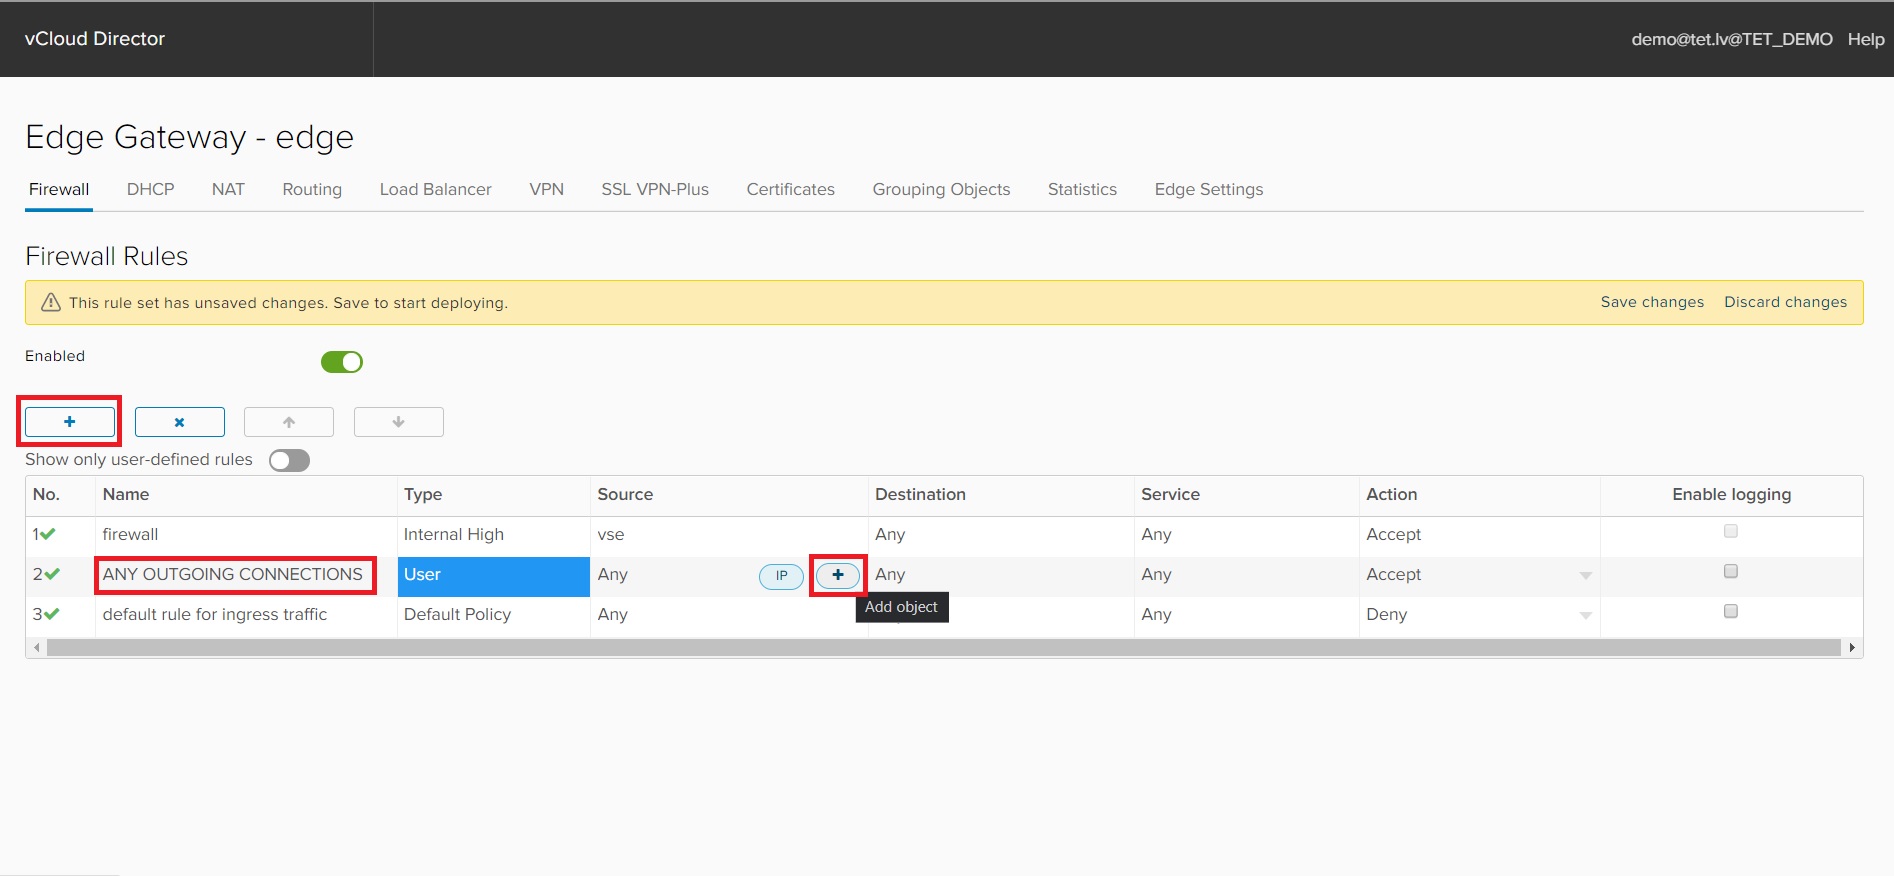
- Define the name for the rule, in our case it could be “ANY OUTGOING CONNECTIONS”;
- Type – User;
- Source – press on a [+] button (add an object) and select Internal, move it to the right ride with [ -> ] button and press Keep to save changes;

- Destination – Any;
- Service – Any;
- Action – Accept;
- Enable Logging – this option only works if you have a logging server configured.
Created rule should look like this:
NOTE: do not forget to save all the changes made to Edge Gateway rules by clicking Save changes.
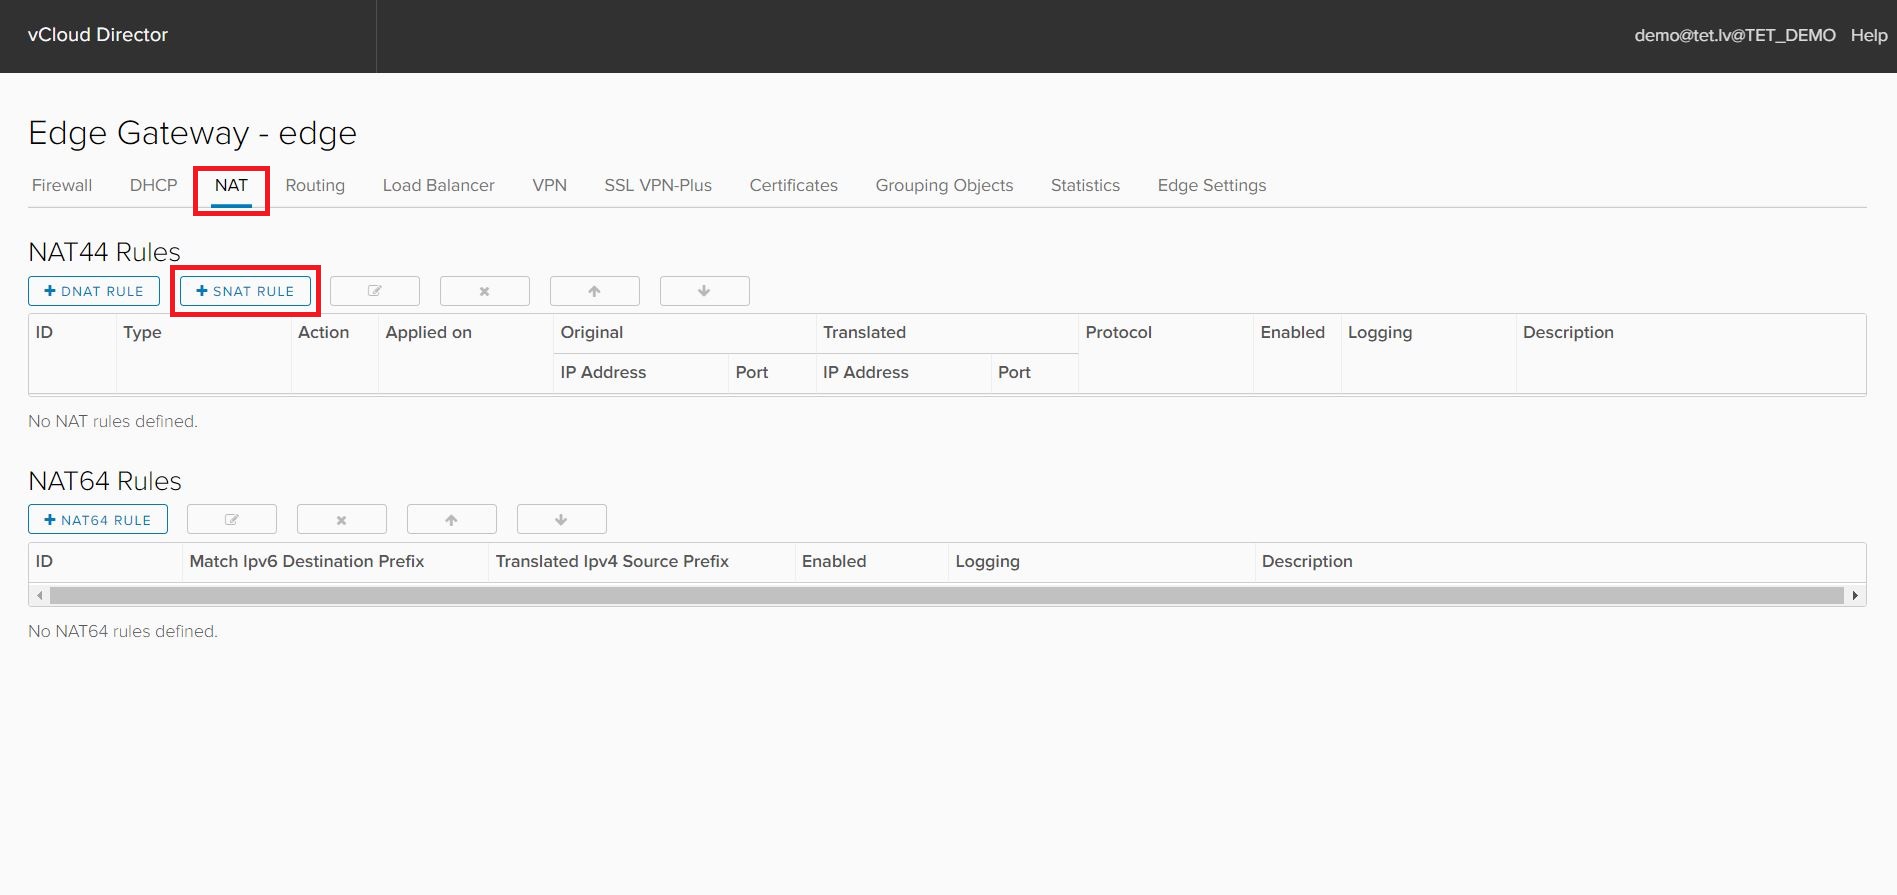
Then go to NAT section and add first SNAT rule, by clicking [ + ] SNAT RULE.
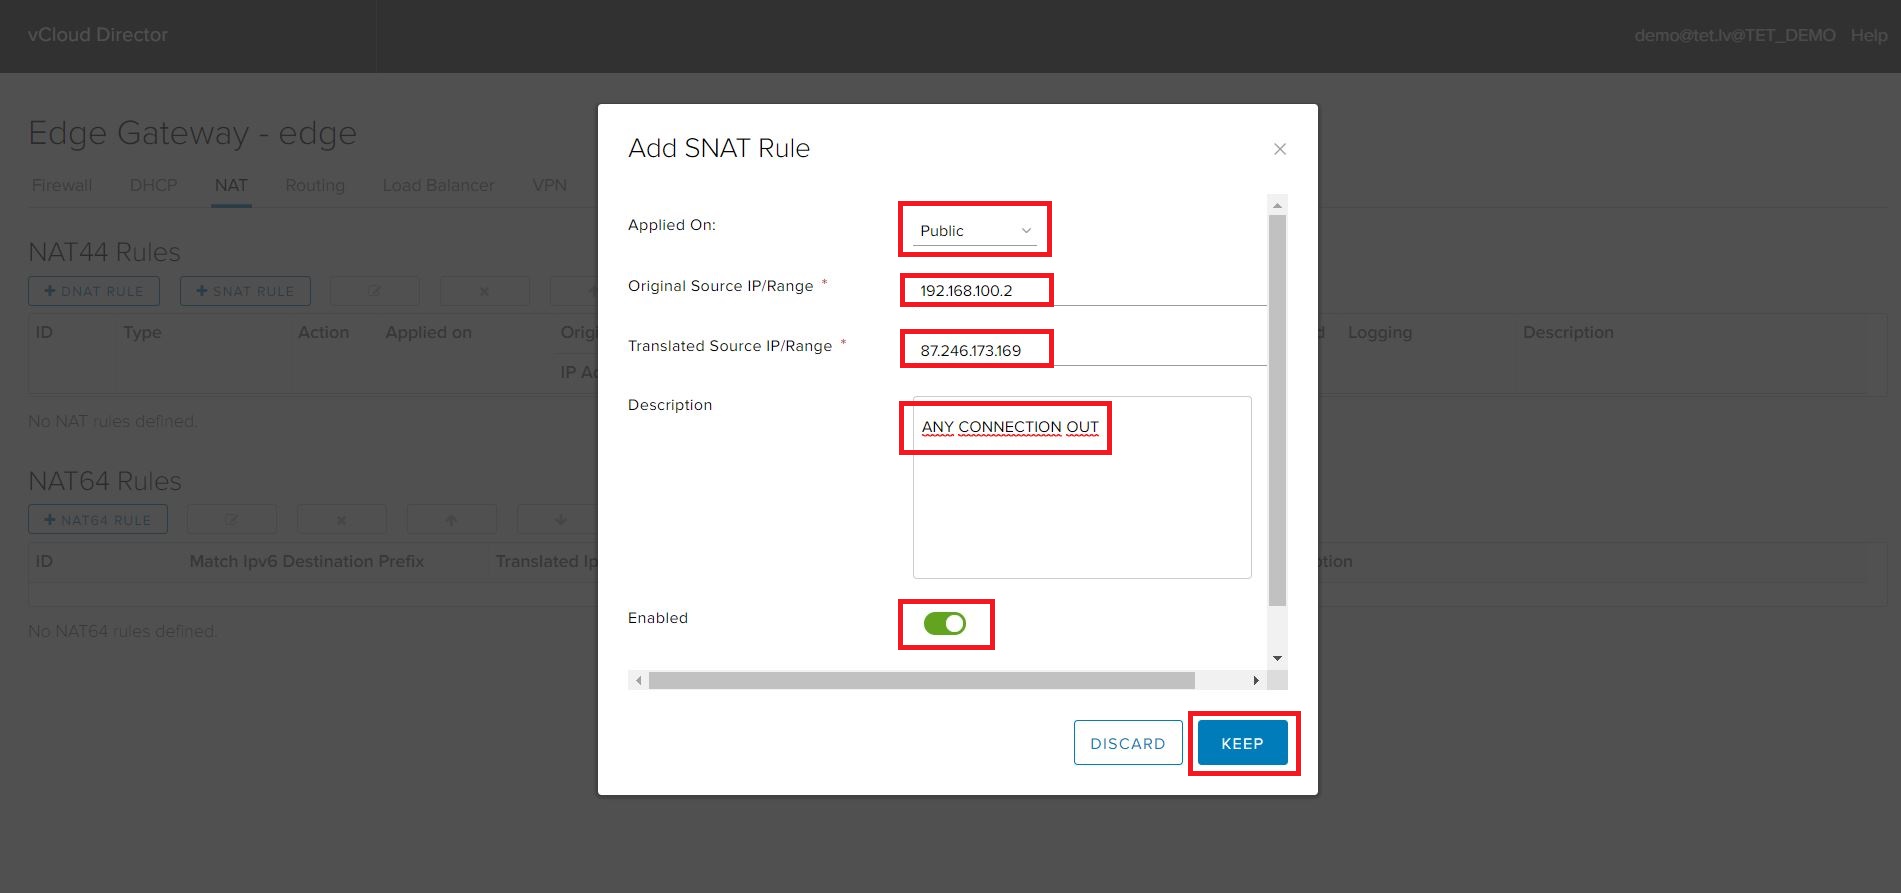
Fill in all the fields required:
- Applied On - the network interface on which to apply rules. Either Public or select the specific Org Network;
- Original Source IP/Range – internal IP address or your certain VS or Range with multiple IPs;
- Translated Source IP/Range – external IP address assigned to Edge Gateway;
- Description – you can leave it black or fill the Description to understand later what for a certain rule was created;
- Enabled – if the selector is green that means the certain rule is Enabled, if grey – Disabled;
- Enable logging – this option only works if you have a logging server configured.
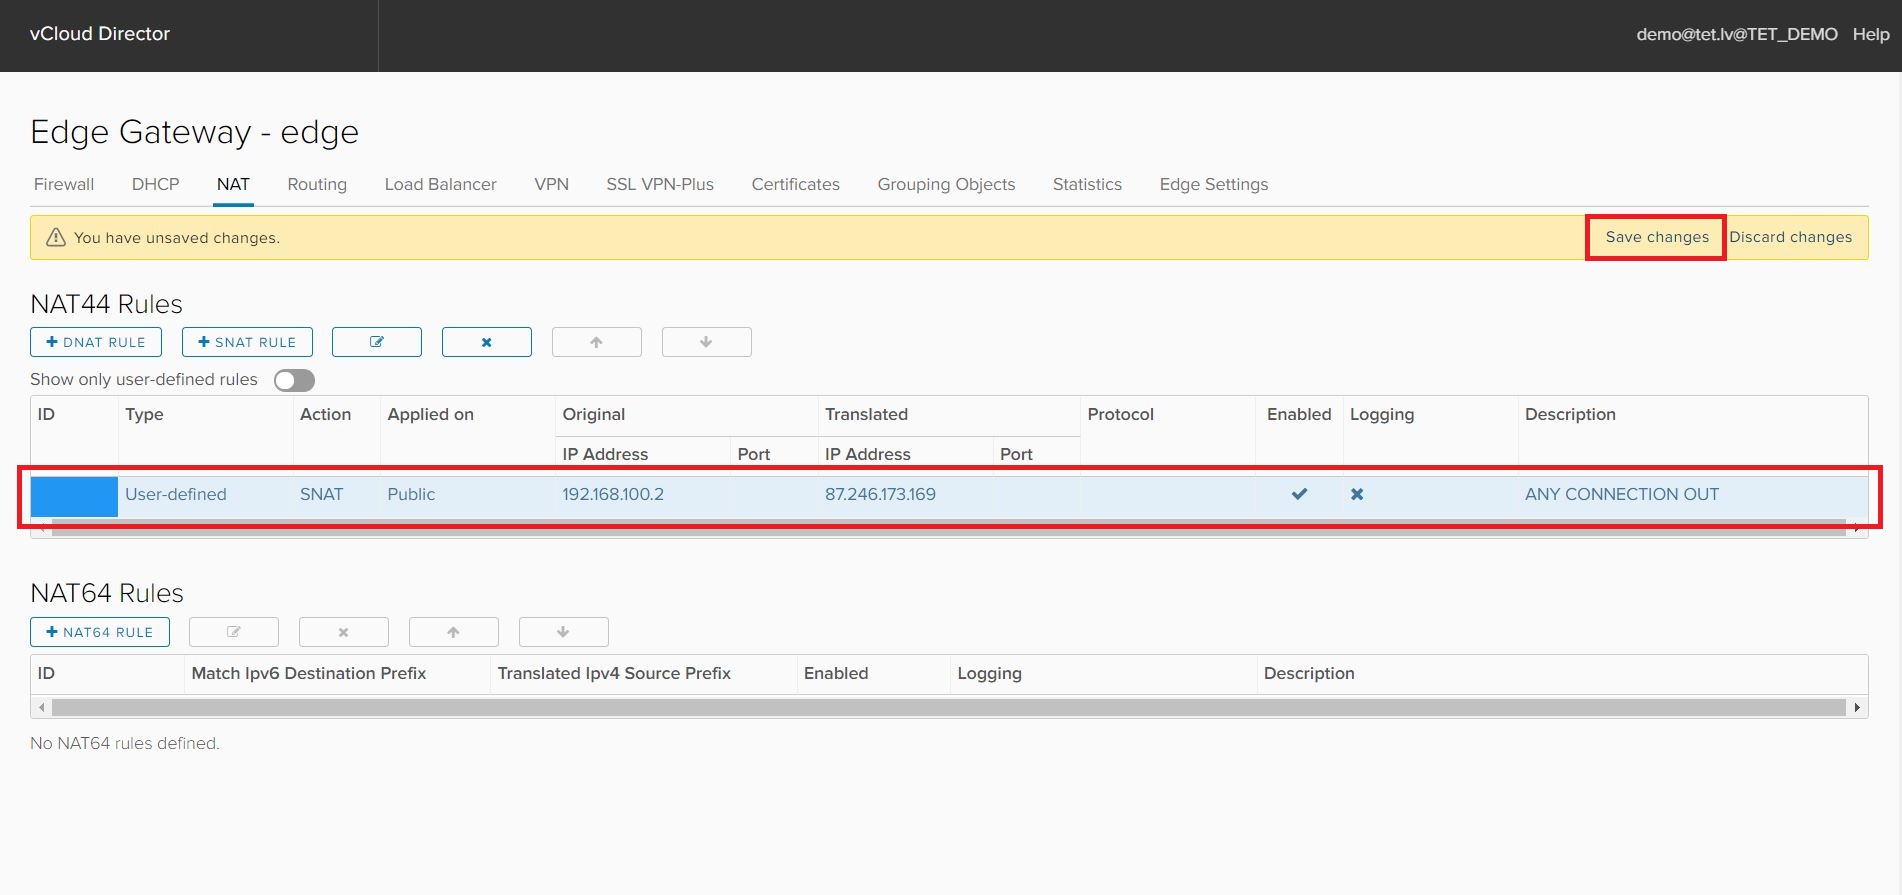
When you have filled all the forms required, press Keep, to save the changes.
NOTE: do not forget to save all the changes made to Edge Gateway rules by clicking Save changes.
IMPORTANT
IP addresses 87.246.173.169 and 192.168.100.2 are given as an example, please use your actual IP addresses instead.
Other Edge Gateway Services rules examples
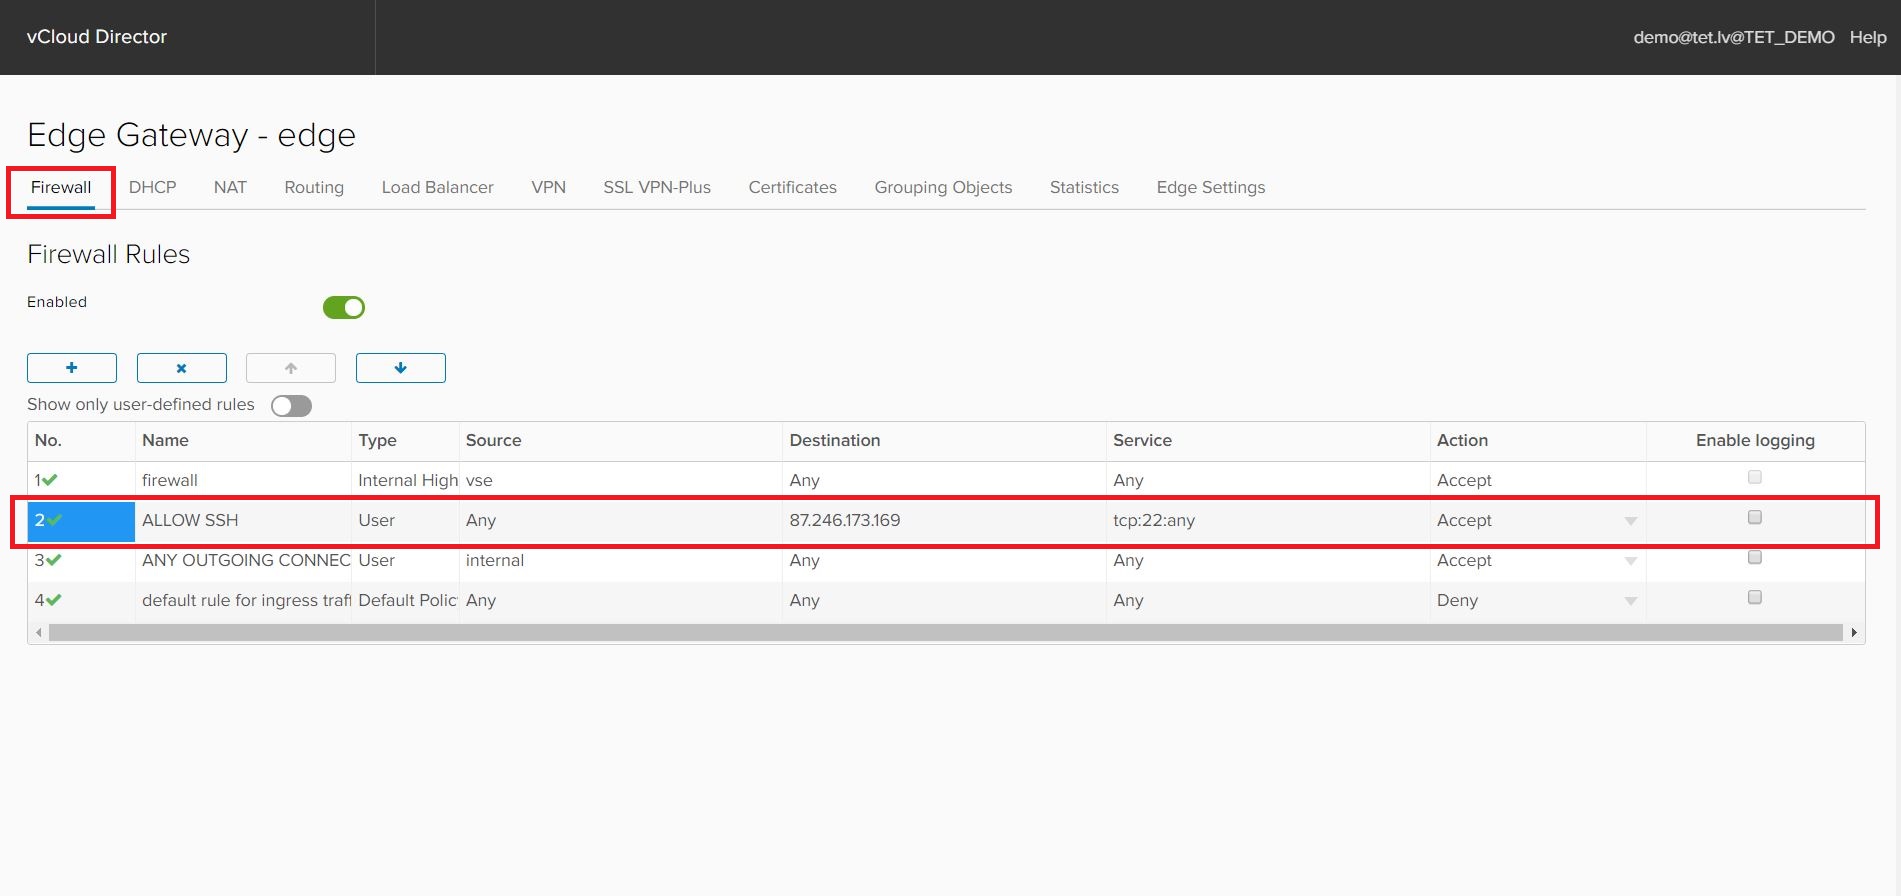
Allow SSH connection (port 22) to the VS.
Firewall rule should look like this:
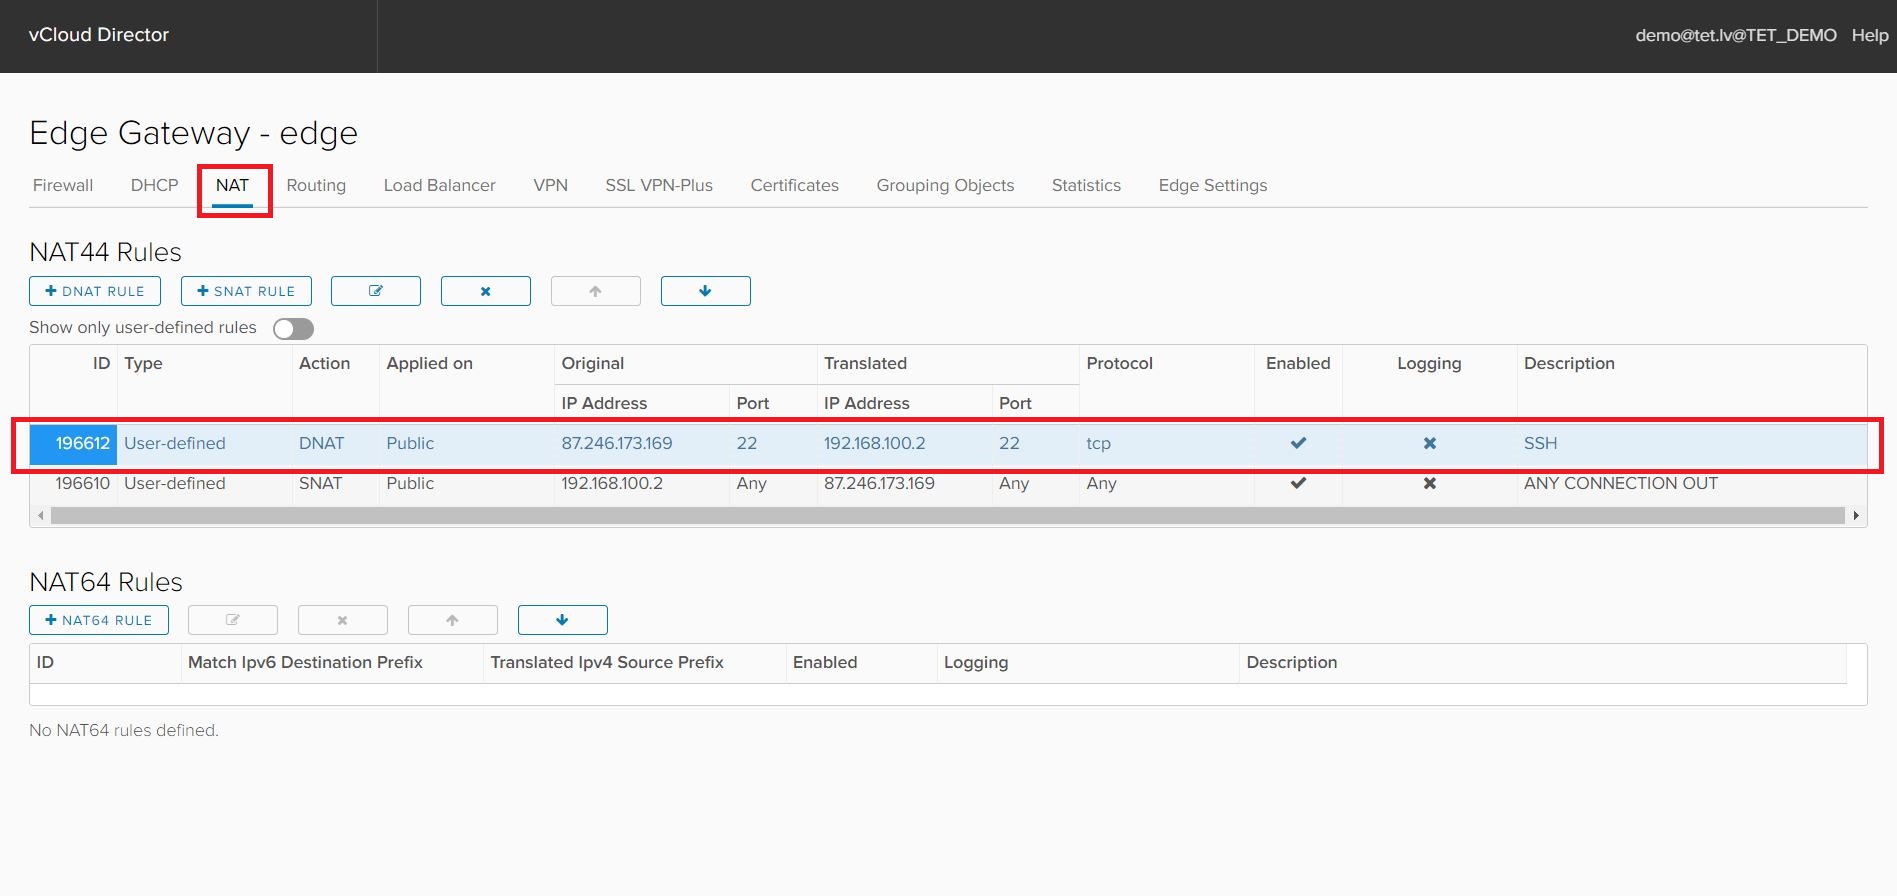
NAT rule should look like this:
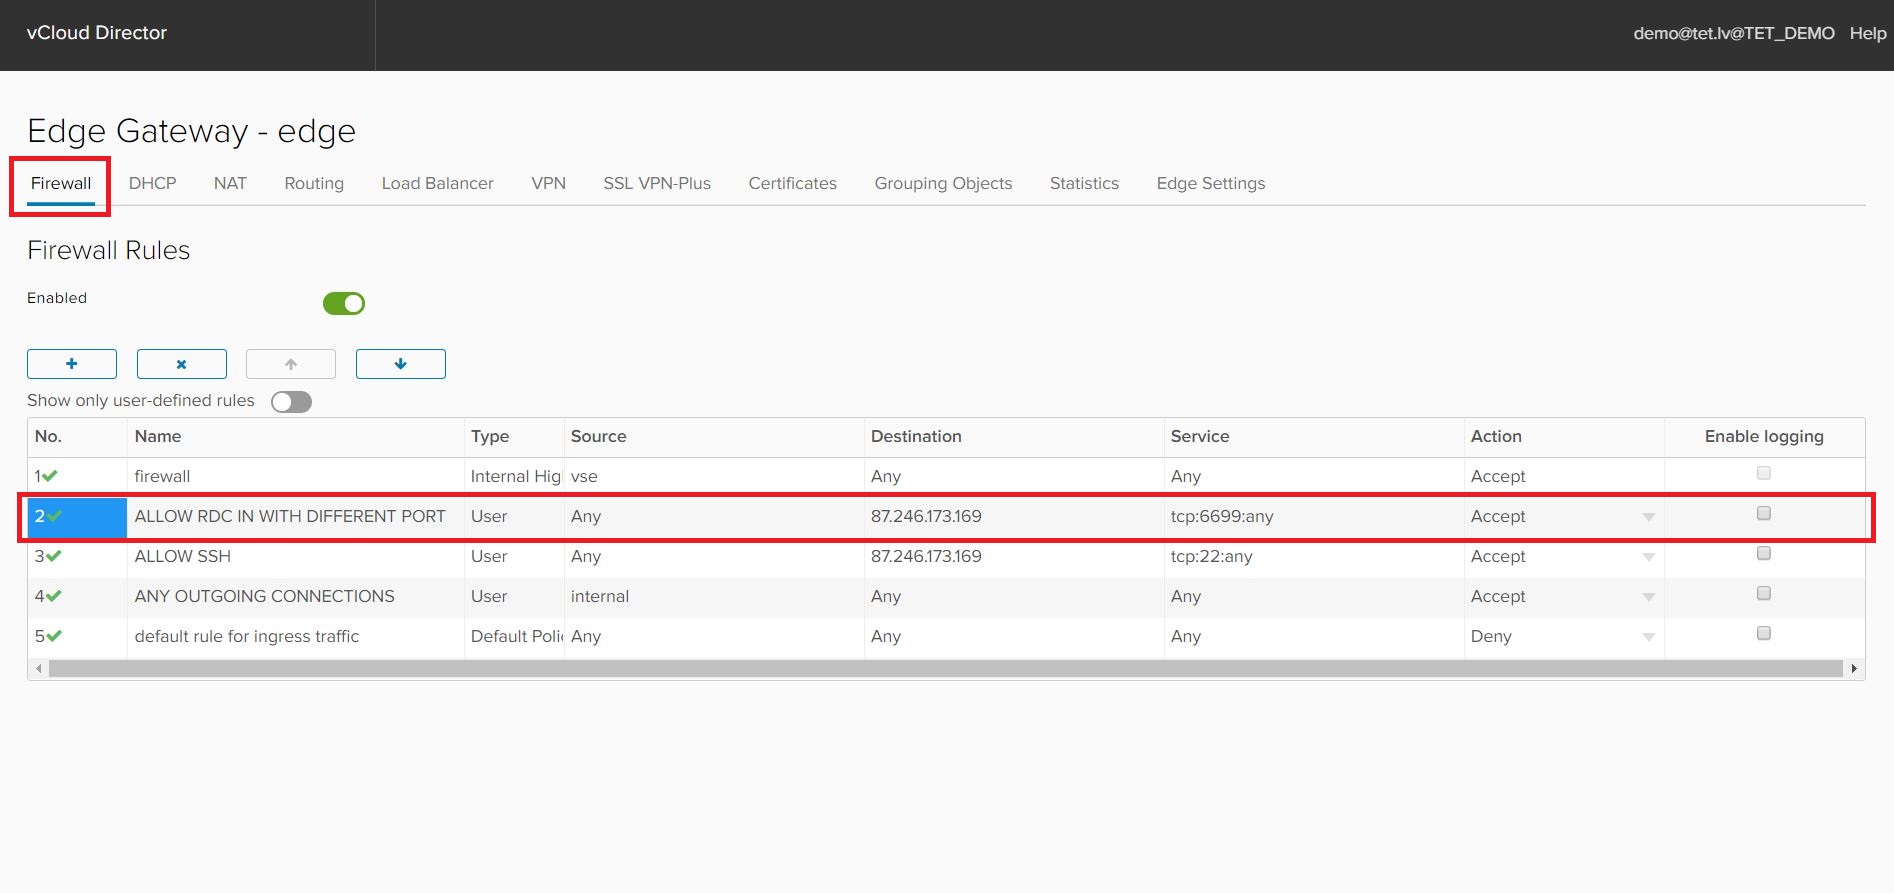
Allow RDC connection via port 6699 (original port 3389) to the VS, by using port forwarding.
Firewall rule should look like this (connection to the port 6699 is allowed):
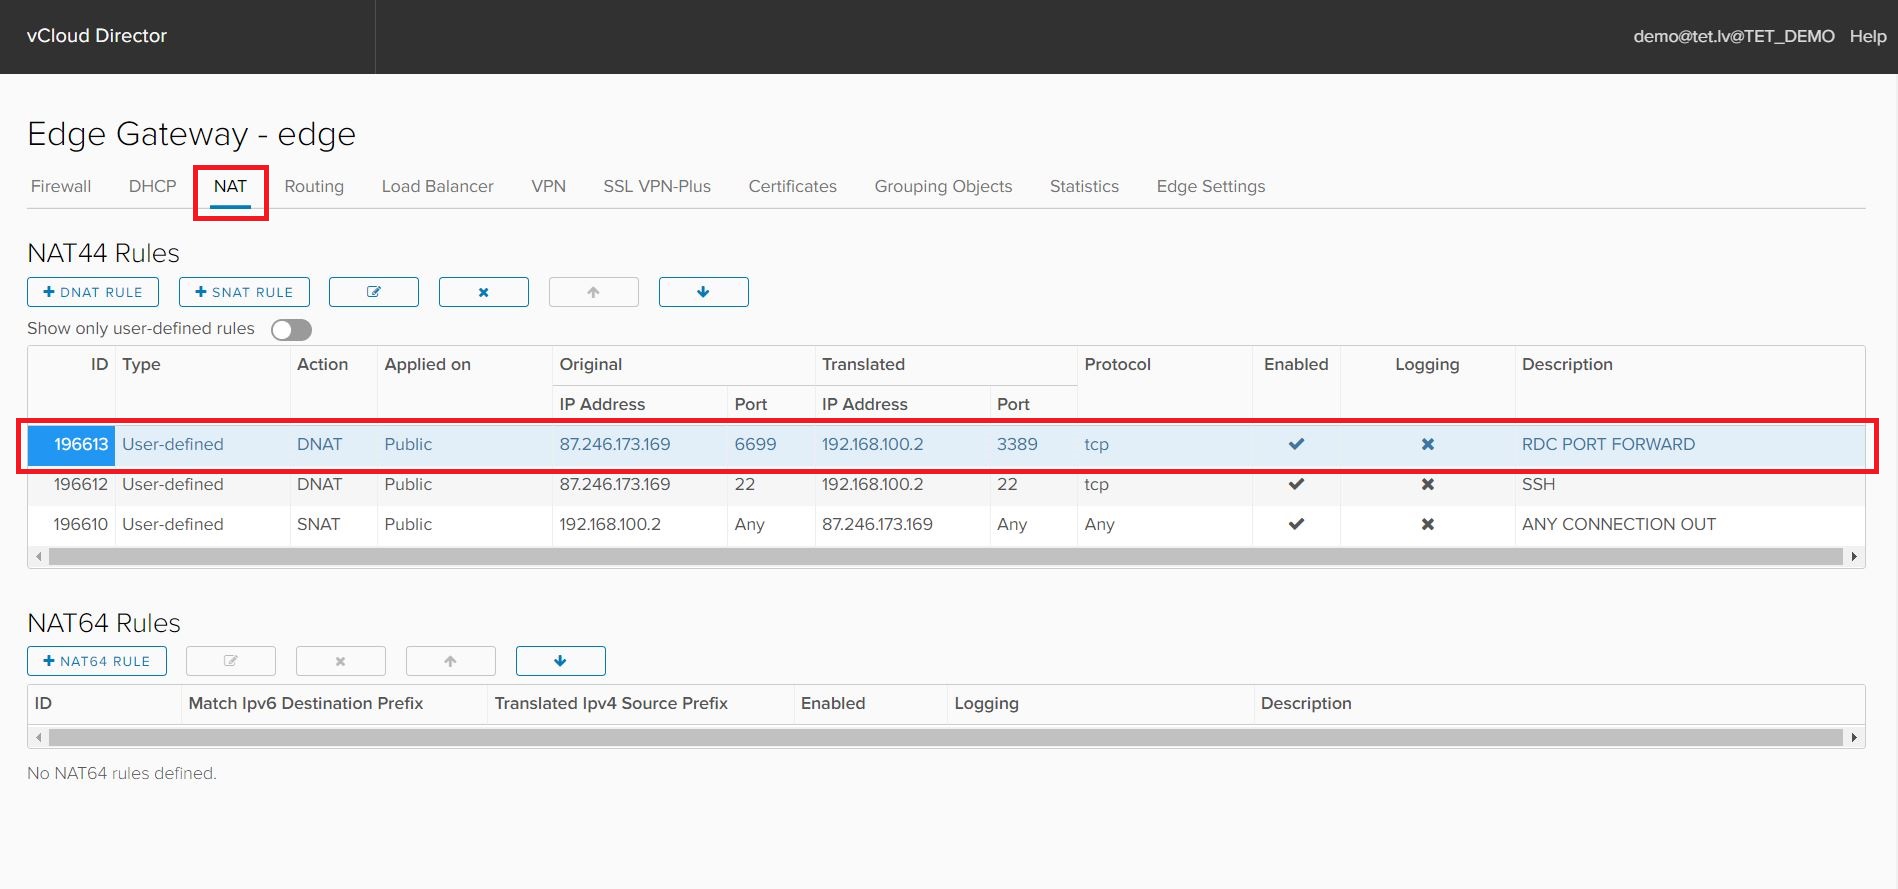
NAT rule should look like this (connection to external port 6699 will be forwarded to the port 3389 on VS):
IMPORTANT
IP addresses 87.246.173.169 and 192.168.100.2 are given as an example, please use your actual IP addresses instead.
EDGE Gateway SSL VPN configuration example
coming soon
Org Networks
How to create New Org Network
coming soon
EDGE Gateway Services
coming soon
Other actions with EDGE Gateway
coming soon
Resource Pools
How to create Edge Gateway
coming soon
EDGE Gateway Services
coming soon
Other actions with EDGE Gateway
coming soon
Users
Create additional user
coming soon
Other actions with users
coming soon
Customers user actions limitations in the portal
Responsibilities and limitations table
| Dattum | Kleistu | |
|---|---|---|
| 1U vai vairāku U noma statnē | ||
| 1/2 vai pilnas statnes noma | ||
| 1/3 vai pilnas statnes noma | ||
| Iespēja izvietot klienta nestandarta izmēra statni | ||
| Maksimāla elektrības jauda uz statni | 10kW | 7kW |
| Papildus pakalpojumu pieejamība (pēc DC pakalpojumu kataloga) | ||
| No sakaru operatora neatkarīgs Datu Centrs | ||
| Tier III Design & Facility sertificēts | ||
| PCI-DSS Level 1 sertificēts | ||
| Pilnīgi rezervēta datu infrastruktūra | ||
| Pieejamība (SLA) | 99,98% | 99,75% |
| Norobežots individuāls būris |
Other actions with users
coming soon
Backup-As-A-Service IBM Spectrum Protect
TSM agent installation on CentOS/RHEL/Ubuntu/Debian
Agent installation
coming soon
Configure the backup-archive client
coming soon
Configure the GUI (JAVA) client
coming soon
Configure automated (scheduled) backups
coming soon